Do you have a question about the Texas Instruments CDCE6214-Q1EVM and is the answer not in the manual?
Install TICS Pro software and select the CDCE6214-Q1 device for EVM operation.
Connect the CDCE6214-Q1 EVM to the PC using a micro-B USB cable for control.
Configure the jumpers on the EVM board according to desired settings and operation.
Scan the I2C bus using TICS Pro to detect the EVM and confirm communication.
Load default startup configuration and check the PLL lock status in TICS Pro.
Configure and check the output frequencies and signal formats using the TICS Pro GUI.
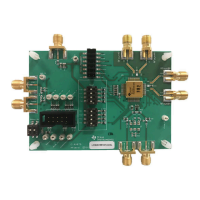
The CDCE6214-Q1EVM is an evaluation module designed for the CDCE6214-Q1, an automotive Q1-grade, ultra-low power clock generator. This evaluation platform facilitates the testing and programming of the device through a USB interface, which also supplies power. The module is accompanied by a user's guide that outlines basic configurations for quick setup and details various modes of operation.
Key features of the CDCE6214-Q1 device itself include a single high-performance phase-locked loop (PLL) for precise clock generation and ultra-low power operation, making it suitable for power-sensitive applications. It supports mixed power supply operation, ranging from 1.8 V to 3.3 V, offering flexibility in system integration. The device provides four differential outputs with multi-mode output buffers and one LVCMOS bypass output, catering to diverse output requirements. An integrated crystal oscillator with configurable load capacitance and gain simplifies external component selection. For reference inputs, it accepts either LVCMOS or AC-coupled differential signals. Advanced functionalities include output divider synchronization and a zero-delay function, crucial for maintaining timing accuracy in complex systems. The device also features general-purpose inputs and outputs (GPIOs) for individual output enable and status signals, an I²C programming interface for easy configuration, and an integrated EEPROM with two pages for storing settings. Designed for automotive applications, it meets AEC-Q100 temperature grade 2, operating reliably from -40°C to +105°C.
The evaluation module (EVM) itself is designed for ease of use and flexibility. It can be powered directly from a USB +5 V source, simplifying the power setup. Users have options for selecting on-board LDOs (Low-Dropout Regulators) for either 1.8 V or 3.3 V operation, allowing for testing under different power conditions. The programming interface incorporates level-shifters that automatically adapt to the selected supply voltage, ensuring compatibility and preventing damage. Onboard input and output termination options are provided, which are essential for signal integrity during testing. Additionally, the EVM features a flexible footprint that accommodates four-pin SMD crystals, offering versatility in reference clock selection.
To get started with the EVM, users need to install the TICS Pro software on a Windows PC. The software, available from Texas Instruments, provides a graphical user interface for configuring the CDCE6214-Q1. Once the software is installed, the EVM is connected to the PC using a micro-B USB cable. The TICS Pro software should then detect the USB2ANY connection, indicated by a green "Connection mode" field. If the connection is not established, troubleshooting steps involve identifying the USB2ANY device within the software and potentially upgrading its firmware. The firmware loader for USB2ANY is available separately and typically runs on Windows 7 or earlier versions.
Configuring the jumpers on the EVM is a crucial initial step. This involves unplugging the USB to disconnect power, then shorting specific jumpers to enable the desired LDOs (e.g., 1.8-V LDOs by shorting pins 2 and 3 of J26). Jumpers are also configured to connect the SCL and SDA pins of the device under test (DUT) to the on-board microcontroller for I²C programming. For instance, shorting pin 2 of J6 to pin 1 of J9, and pin 2 of J10 to pin 1 of J13, establishes this connection. The REFSEL pin, which controls the reference input selection, can be pulled low by shorting pins 1 and 2 of J12 to use an on-board 25-MHz crystal as the secondary reference source. Other jumpers should be removed or left floating, with specific attention to J25, which controls 3.3-V rail enablement via resistors that are not populated by default.
After jumper configuration, the TICS Pro software is used to scan the I²C bus to detect the device, which should be found at address 0x68. The next step is to load the default configuration and check the PLL lock status. This involves navigating to "Default configurations" -> "Default Startup" in TICS Pro, then selecting the "PLL" tab, clicking "Recalibrate," and finally "Check Lock Status." A green "locked" text confirms successful PLL operation.
Output verification is performed by checking the output frequencies. By default, the output frequency is set to 1 MHz. Users can modify this on the "Output" page in TICS Pro. For example, changing output 1 to "CMOSPN" format allows for connecting an oscilloscope to SMA_OUT1P (J15) or SMA_OUT1N (J17) to measure the 100 MHz output with a 50-Ω DC termination. It's important to note that only the SDA/GPIO2 and SCL/GPIO3 pins are connected to the on-board microcontroller and can be controlled by TICS Pro; other pins require jumper configuration or an external controller.
The device supports various modes of operation, including input configuration, PLL configuration, SSC (Spread Spectrum Clocking), DCO (Digitally Controlled Oscillator), and ZDM (Zero Delay Mode). Input selection can be controlled either by the "REF_SEL" register (R2[1:0]) or by pin 4 "REFSEL" via jumper J12. For crystal input, the on-board 25-MHz crystal is used by default, and users can program the input bias current and load capacitance through TICS Pro. The software also allows for detailed PLL configuration, including input doubler/divider, loop filter component values, charge pump gain, VCO frequency, fractional N divider, and prescaler A and B (PSA and PSB). SSC, DCO, and ZDM modes are configured according to the data sheet descriptions. Output configuration involves programming the output channel MUX, integer output divider values, and output format.
Power supply management is also detailed, particularly for 1.8-V and 3.3-V LDOs. The 3.3-V LDOs are disabled by default and require populating specific 0-Ω resistors (R64, R66, R68, and R70) before enabling them via jumper J25. A critical warning is issued against enabling both 1.8-V and 3.3-V LDOs simultaneously to prevent damage.
For advanced users, the EVM can be controlled by an external microcontroller. This requires reworking the board to enable 3.3-V LDOs and configuring specific jumpers to disconnect the on-board microcontroller from the SDA and SCL pins of the DUT. The external microcontroller, such as a USB2ANY, can then be connected to the SDA, SCL, and GND pins. The USB2ANY device, however, only supports a 3.3-V I²C bus, necessitating the use of the 3.3-V LDOs on the EVM.
Maintenance aspects primarily involve troubleshooting connection issues with the USB2ANY device, which may require identifying the device in TICS Pro or upgrading its firmware using the dedicated firmware loader application. The user's guide also provides schematic and layout diagrams for the EVM, including the cover sheet, USB interface, power distribution, level shifter, and input/clock generator sections, as well as the output stage. These diagrams are essential for understanding the board's design and for any potential rework or advanced debugging. The layout diagrams, spanning multiple layers (top, middle, and bottom), offer a comprehensive view of the PCB design.
| Type | Evaluation Module |
|---|---|
| Part Number | CDCE6214-Q1EVM |
| Device Type | Clock Generator |
| Input Voltage | 3.3 V |
| Number of Outputs | 4 |
| Operating Temperature Range | -40°C to +105°C |
| Description | CDCE6214-Q1 Evaluation Module |
| Purpose | Clock Generation |
| Output Format | LVPECL, LVCMOS |
| Package | VQFN |