16
If the machine unused for a period of time, please
refer to the instructions in this manual.
Maintain or replace safety and instruction labels, as
necessary.
Only use orginal spare parts or accessories. If not
orginal parts or accessories is used, the liablility is
no longer applied.
Miscellaneous
The motor is not pre-filled with oil.
Always before start check the engine oil level.
Factory-fitted control devices, such as the handle-
mounted clutch cable, must not be removed or
exposed.
Only drain the fuel tank outdoors. Gasoline is
extremely flammable and the fumes are explosive.
Ensure that the machine is properly secured when
transported on a flatbed etc.
The lawnmower is manufactured according to the latest
safety requirements. These include a blade brake that
stops the motor and blade in 3 seconds when the blade
brake. Every precaution is only effective when it is
followed exactly. Use the following description when
you mount your lawnmower.
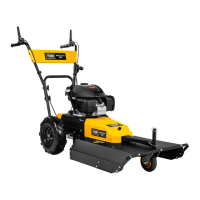
Identification of the parts: Illustration 1
1. Engine
2. Upper handlebar
3. Clutch handle – blade
4. Clutch handle – drive
5. Handle
6. Throttle
7. Lower handlebar
8. Wheel
9. Cutting deck
10. Extension deck
11. Front spur / Front wheel
12. Height adjustment
13. Front cover
14. Pulley/belt cover
Mounting
Unpacking:
Remove the mower from the box by pulling the machine
out form the side. The box contains:
• Lawn mower
• Handlebar
• Front spur / Front wheel
• Extension deck
Warning: Ensure that cables are not pinched. It is
recommended that another person helps you with
the assembly of the machine.
Mounting the handlebar and cables: Illustration 2+3
1. Start with attaching the lower handlebar (7) to the
machine
2. Mount both upper handlebars (2) firmly on the
lower handlebar, then mount the panel plate
between the two upper handlebars.
3. Mount both clutch handles (3+4) on both upper
handlebars
4. Mount throttle control (6) on upper handlebar.
5. Fasten the clutch cable to the holder on the right
side.
Mounting front spur / front wheel: Illustration 4+5
1. Remove front cover (13). Put the front wheel arm in
place by fitting it firmly into the chassis.
2. Mount front spur/front wheel on the front wheel
arm.
3. Attach the extension deck (10) to the cutting cutter.
(can also be used without extension deck)
Cable adjustment: Before the machine is being used,
the cable adjustment should always be checked.
The cables can be checked by activating the handles
fully and check if the cable is tight. If not, it must be
tightened. If the handle cannot easily be fully activated,
the cable should be loosened.
After first season, it must be expected that the cables
need to be adjusted for optimal activation, as cables
can stretch when used.
Start and stop
Starting the engine:
NOTE the lawnmower is delivered without oil and
gasoline, therefore please fill:
• Honda engine = 0.4 L SAE30 engine oil and
max 1.0 L octane 98/100 (E5) unleaded gasoline.
• Loncin engine = 0.5 L SAE30 engine oil and
max1.4 L octane 98/100 (E5) unleaded gasoline.
Never start the lawn mower directly in high in grass.
1. Put the throttle lever in the “CHOKE/START”
position.
2. Grasp the recoil handle and pull it up quickly.
Slowly return it to the recoil housing after the
engine has started.
3. Run a cold engine with choke for about 30 seconds
(with throttle in choke position) then push throttle to
full throttle (rabbit).
Knife rotation:
Press the "clutch handle blade" (3) handle down to
activate the knife. To keep the blade rotation running,
hold down the "clutch handle blade" handle.
Release the "clutch handle blade" handle to stop knife
rotation.
Stopping the engine:
Push the throttle lever to the "STOP" position to stop
the engine.
Changing forward speed
Change of forward speed (by belt): Illustration 6
The rotary mower has 2 forward speeds. To switch
between the 2 speeds, the belt needs to be moved from
the upper to the lower pulley (on both pulleys).
Start by removing the rear pulley/belt cover (A), then
loosen the belt tensioner with help from the knob (B) at
the top of the shield and move the belt to the second
groove on both pulleys. Finally, the belt is tightened by
pressing the belt tensioner towards left against belt with
right hand, while tightening the knob again with left
hand, while holding it against the belt.
Fasten the pulley/belt cover again.
As standard, the belt is mounted on upper pulleys (slow
speed, 1.8 km/h). Using the lower pulleys, will increase