SAFETY PRECAUTION
INITIAL USE
START CALIBRATION
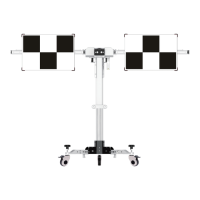
TARGET PATTERN KIT
PRODUCT PROFILE
25
2.3.1.3 Workstation lighting
• The lighting system around the calibration workstation should be a non-frequency flash source, including
but not limited to: LED light source, industrial lighting complying with international standards, dual light
source in opposite phase.
• In the field of view of the camera, there should be no direct light source into the camera, otherwise
the camera will reduce the exposure so that the captured calibration pattern becomes darker, adversely
affecting the calibration.
• The light source should ensure that there is no reflected spot on the calibration panel.
• The light source should ensure uniform illumination distribution in the calibration workstation.
• thgil gnignahc rehto on eb lliw ereht taht erusne dna ,degnahc eb ton dluohs thgil eht fo ssenthgirb ehT
source around the workstation, such as a driving vehicle with lights ON, etc.
2.3.2 Calibration Operation
The calibration operation should be performed strictly following the on-screen instructions on the diagnostic
tool. For some vehicle models, calibration pattern and calibration tool are not mandatory. But for some
camera-based ADAS, the calibration cannot be done without the help of calibration tool and calibration
pattern. In this case, for the positioning of the calibration tool and vehicle, it is necessary for the user to
manually finish it.
The following steps are needed when working with the THINKCAR ADAS:
1. Determine the center line of the vehicle.
2. Determine the placement location of the THINKCAR ADAS.
3. Place the THINKCAR ADAS.
4. Adjust THINKCAR ADAS in parallel with the vehicle.
5. Select and install the target/pattern board on the THINKCAR ADAS.
6. Adjust the height of the target/pattern board.
Required accessories:
• Five-line laser device LAM09-01
• Cross laser module LAM09-02
• Laser reflector LAM09-03
• Auxiliary mirror LAM09-04
• L-shaped positioning bracket LAM09-05
• Plumb line LAM09-06
2.3.2.1 Determine the center line of the vehicle
1. Suspend a plumb line LAM09-06 against the center of the front vehicle emblem and let it naturally drop
to the ground. Mark the front center point of the vehicle (Point A) on the ground directly under the
plumb.
Lightly flick the string with your fingers several times to confirm that the string is perpendicular
to the ground.
THINKCAR ADAS Calibration Tool