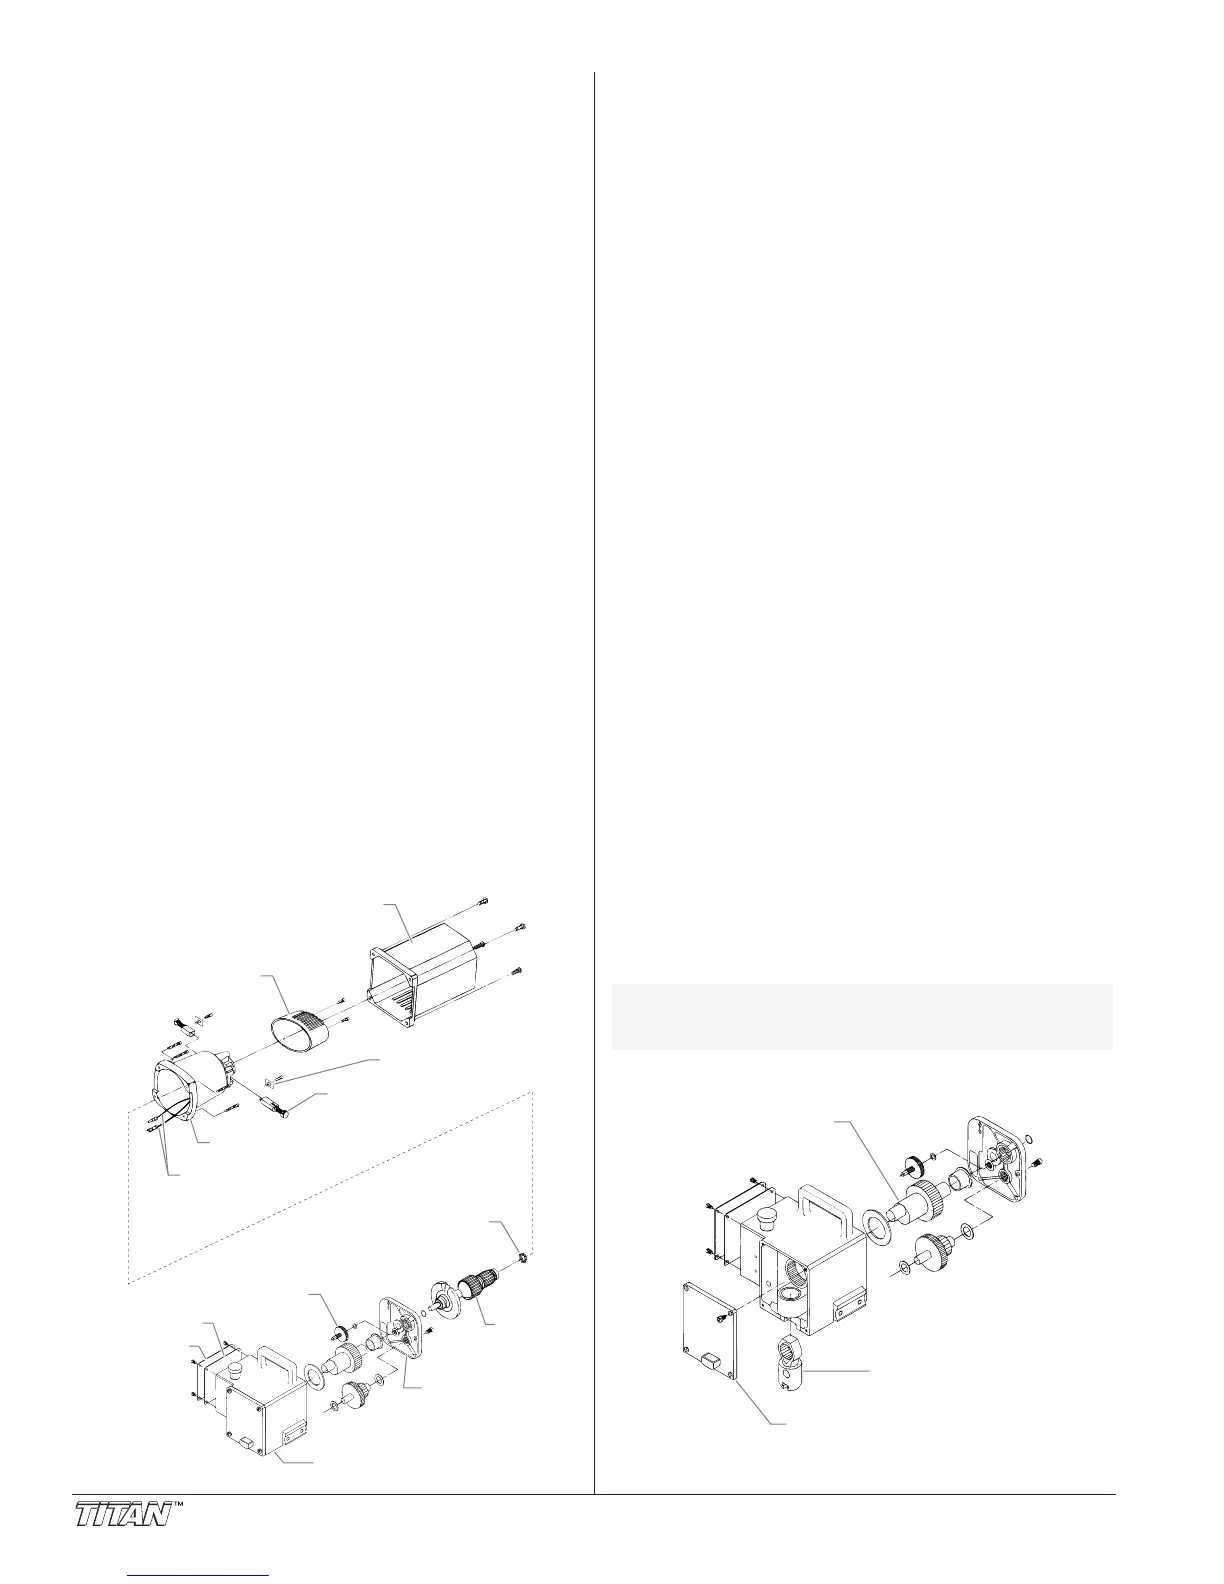
Replacing the Motor
1. Unplug the unit.
2. Loosen and remove the four rear cover screws. Remove
the rear cover.
3. Remove the cover plate and the insulator plate on the
pump housing by removing the corresponding four
screws.
4. Disconnect the white motor wire from the white power
cord wire and the black motor wire from the motor starter.
Position the disconnected wires so they can slide easily
through the rear bearing housing assembly when the
motor housing is removed.
5. Loosen and remove the four motor mounting screws.
6. Carefully remove the motor housing so that the two motor
wires slide through the rear bearing housing one at a time.
Be careful not to lose the spring washer as it sits loosely
on the end of the armature.
7. Remove the armature from the pump housing by pulling
up on the armature. Inspect the pinion on the old
armature. If damaged, the pinion gear in the pump
housing must be replaced also.
8. Install the new motor assembly into the pump housing.
Make sure that the motor wires are fed through the rear
bearing housing and into the pump housing one at a time
during installation.
9. Before securing the motor, make sure that the motor wires
are completely free of the motor and have been fed
properly into the pump housing.
10. Secure the motor housing with the four motor mounting
screws.
11. Slide the rear cover over the motor with the air vent facing
down. Secure the rear cover with the four rear cover
screws.
12. Connect the “male” white motor wire to the “female” white
power cord wire. Connect the black motor wire to position
#2 on the motor starter.
13. Place the insulator plate and the cover plate on the pump
housing and secure in position using the corresponding
four screws.
Rear Cover
Insulator Plate
Motor Housing
End Cap
Motor Brush
and Tube
Pinion Gear
Spring Washer
Cover Plate
Brush Clamp
Rear Bearing
Housing
Pump Housing
Armature
Motor Wires
8©Titan Tool Inc. All rights reserved.
Replacing the Motor Brushes
1. Loosen and remove the rear cover screws. Remove the
rear cover.
2. Loosen and remove the end cap screws. Remove the
end cap.
3. Loosen and remove the brush clamp screws. Remove the
brush clamps.
4. Disconnect the wire lead to the motor brushes. Remove
the motor brush.
5. Reassemble in reverse order using the new motor
brushes.
Replacing the Gears
1. Loosen and remove the four front cover screws. Remove
the front cover.
2. Remove the cover plate and the insulator plate on the
pump housing by removing the corresponding four
screws.
3. Disconnect the white motor wire from the white power
cord wire and the black motor wire from the motor starter.
Position the disconnected wires so they can slide easily
through the rear bearing housing assembly when the
motor housing is removed.
4. Loosen and remove the four rear cover screws. Remove
the rear cover.
5. Loosen and remove the four motor mounting screws.
6. Carefully remove the motor housing and armature so that
the two motor wires slide through the rear bearing housing
one at a time. Be careful not to lose the spring washer as
it sits loosely on the end of the armature.
7. Inspect the gears on the armature for damage or
excessive wear. Replace the motor assembly if
necessary.
8. Loosen and remove the three rear bearing housing
screws.
9. Using a rubber mallet, carefully tap the front of the
crankshaft that extends through the connecting rod. This
will dislodge the rear bearing housing from the pump
housing. Remove the rear bearing housing.
10. Inspect the gears for damage or excessive wear. Replace
if necessary.
11. Reassemble the pump by reversing the above steps.
During reassembly, make sure all washers are in place
and all gears and bearings are greased properly.
Crankshaft
Connecting Rod
Front Cover
NOTE: Grease the crankshaft and connecting rod
every 100 hours of use (grease fittings
supplied).