GC-35 Setup
Profiler (Milling) Applications
12
P/N: 1001548-01
9. Use the Grade Adjustment Knob as needed to make changes to the cutting depth.
Getting Started Milling Using Slope Control
1. Setup the profiler as you would to start milling manually.
2. Make sure the slope sensor is mounted parallel to the cutting drum as close as possible to the drum.
3. To mill using slope control you must first calibrate the slope sensor to the cutting drum.
4. Find a smooth area where the drum can rest evenly across its entire surface. Using a laser, a Smart Level, or a slope
board, that itself has been calibrated, check the slope and direction of the fall of the ground.
5. Place the drum on the ground on the same location as the slope was measured.
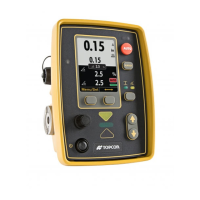
6. Power up the Control Box and select Slope Control by pressing the Slope/Elevation button until the yellow LED
above the slope symbol lights up.
7. Press Survey.
a. If the On-grade bar lights up, and the screen displays a slope value that is identical to the laser or Smart
Level, press the Auto button to put the Control Box into Automatic control, and begin milling.
Once steps 1-6 have been done when using yoyo sensors, the actual cutting depth will always
be shown. Only steps 7 to 9 will be required.
Slope Cal. Block must be set to Off in the Performance Menu to calibrate the slope sensor.
GC-35_QRG.book Page 12 Tuesday, January 31, 2017 3:43 PM