10.Loopthediggingchainovertheaugerdriveshaft
andontothedrivesprocket,ensuringthatthe
diggingteethpointforwardontheupperspan.
11.Settheupperspanofthechainintoplaceon
thetrencherboom,thenwrapthechainaround
therollerattheendoftheboom.
12.Threadtheadjustmentboltintotheboomand
turnitinuntilthereis3.8to6.3cm(1-1/2to2-1/2
inches)ofslackinthechainonthebottomspan.
13.Threadthejamnutdowntheadjustingboltand
tightenitsecurelyagainsttheboom.
14.Torquethe2boltsandnutssecuringtheboom
to183to223N·m(135to165ft-lb).
15.Installthespoilsaugerusingthebolt,2saddle
washer,andnutthatyouremovedpreviously.
16.Torquetheboltandnutto101N·m(75ft-lb).
2
CheckingtheFluidLevels
NoPartsRequired
Procedure
Beforestartingtheengineforthersttime,check
theengine-oilandhydraulic-uidlevels.Refertothe
followingsectionsformoreinformation:
•CheckingtheEngine-OilLevel(page27)
•CheckingtheHydraulic-FluidLevel(page40)
3
ChargingtheBattery
(Electric-StartModelsOnly)
NoPartsRequired
Procedure
Chargethebattery;refertoChargingtheBattery
(page32)formoreinformation.
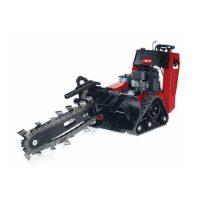
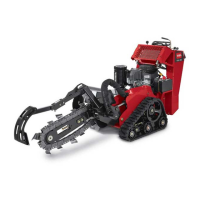
ProductOverview
g015375
Figure4
1.Control
panel
4.Chain
guard
7.Boom10.Reverse
safety
plate
2.Engine
5.Chain
8.Trencher
head
3.Spoils
auger
6.Digging
teeth
9.Track
Controls
Becomefamiliarwithallthecontrols(Figure5)before
youstarttheengineandoperatethemachine.
ControlPanel
g007801
Figure5
1.Tractioncontrol5.Throttlelever
2.Hydraulic-lift(boom
elevation)lever
6.Chokelever
3.Trenchercontrollever7.Keyswitch
4.Referencebar
8.Hourmeter
12