Setup
LooseParts
Usethechartbelowtoverifythatallpartshavebeenshipped.
ProcedureDescription
Qty.
Use
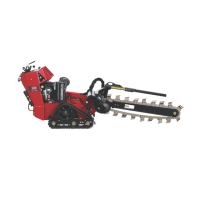
Boom(soldseparately)
1
1
Chain(soldseparately)
1
Installtheboomandchain.
2
Nopartsrequired
–
Checktheuidlevels.
3
Nopartsrequired
–
Chargethebattery.
1
InstallingtheBoomand
Chain
Partsneededforthisprocedure:
1
Boom(soldseparately)
1
Chain(soldseparately)
Procedure
Important:Thereareseveralboomandchainsize
congurationsavailable.RefertoyourAuthorized
ServiceDealertoobtaintheappropriateboomand
chaintomeetyourrequirements.
1.Parkthemachineonalevelsurfaceandengage
theparkingbrake.
2.Shutofftheengineandremovethekey.
3.Removethebolt,2saddlewashers,andnut
securingthespoilsaugerandremovetheauger
(Figure4).
Note:Savethefastenersforfutureuse.
g011470
Figure4
1.Spoilsauger
6.Adjustingbolt
2.Boom7.Jamnut
3.Bolt(2)
8.Armonthedrivehead
4.Doublewasher9.Drivesprocket
5.Nut(2)
4.Removethe2bolts,nuts,anddoublewashers
fromthesidesoftheboom(Figure4).
5.Loosentheadjustingboltandjamnut(Figure4).
6.Slidetheboomoverthearmonthedrivehead.
7.Installthe2bolts,nuts,anddoublewashers
removedinstep4throughtheboomandarm,
butdonottightenthem.
8.Ifthechainisnotconnected,connectthelinks
bypressingorhammeringtheclevispinsupplied
withthechainthroughthelinks.
Important:Toavoidbendingthechainlinks,
placeblocksunderandbetweenthelinks
whenhammeringtheclevispinthrough.
9.Securetheclevispinwiththecotterpinsupplied
withthechain.
10