Do you have a question about the turbofan EC40D7 and is the answer not in the manual?
Open the door carefully after steam cooking to avoid being hit by escaping residual steam.
Do not obstruct oven vents or openings to ensure safe operation and prevent hazards.
Cooking with added alcohol is strictly prohibited due to safety risks.
Failure to follow safety guidelines can lead to operational issues and serious danger to the operator.
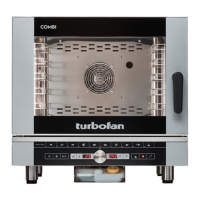
Activates panel and self-diagnosis; used for turning on/off and changing display values.
Set temperature by pressing button 6, using knob 1 to adjust; confirm with button 6 or wait 10s.
Set cooking time using button 9 and knob 1; infinite time [InF] or specific duration. Option to switch to probe cooking.
Manual stop for infinite time; acoustic signal for timed completion. Check/change values using button 11.
Press button 11 to read 'SP'; insert food and core probe. See Chapter 14 for details.
Select mode (2-3-4); display shows pre-set core temp '50°C'.
Set oven temperature using button 6 and knob 1; confirm with button 6 or wait 10s.
Set core probe temperature using button 10 and knob 1; confirm with button 10 or wait 10s.
Acoustic signal indicates completion. Check/change values via button 11; follow removal instructions.
Recall programme via button 11; select number with knob 1, shown on display 7.
Start programme with/without pre-heating. Warning on pre-heating necessity.
Manually stop cooking by pressing the active button for 3s; LEDs flash, exit menu with button 11.
Delete programme by pressing button 11 (3s), then knob 1 to [DEL], confirm with button 9.
Copy programme by pressing button 11 (3s) then 6; select destination with knob 1 and confirm.
Recall recipe via button 11; select number with knob 1, shown on display 7. See Section 23.
Start recipe with/without pre-heating. Warning on pre-heating necessity.
Copy recipe via button 11 (3s) then 6; select destination with knob 1 and confirm.
Turn oven on for 3s; consult self-diagnosis and error guide for display codes.
Start programme by pressing Touch & Cook icon 14; display 7 shows recipe/programme, e.g. [L01].
Keep probe outside for pre-heating; insert into product after temp set, then proceed with cooking.
Position probe in barycentre, insert completely. For thin products, insert horizontally.
Set moisture level (h00-h99) using button 5 and knob 1; confirm with button 5 or wait 10s.
Automatic electronic check of main functions upon turning on. Displays real temp if conditions are perfect.
Errors shown on display 7 with acoustic signal. Error codes provide vital info for technical support.
Lists key error codes (E1, E2, E7, E8, doP) and their interpretations for troubleshooting.