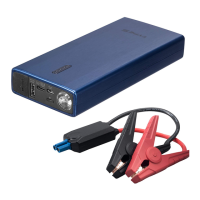
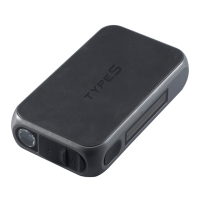
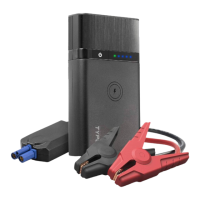
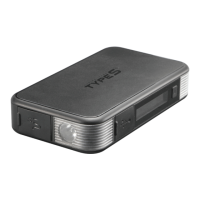
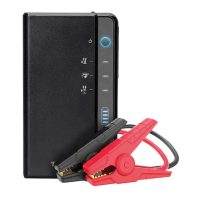
The device is a portable jump starter and power bank designed for automotive and personal electronic charging needs. It is branded as "TYPES" and is manufactured by Winplus North America Inc.
Function Description
This device serves two primary functions:
- Jump Starter: It can jump start 12V cars, trucks, boats, or motorcycles with internal combustion engines and single lead-acid battery systems. It provides a jump start current of 200A to 400A.
- Portable Power Bank: It can charge USB devices, including smartphones and tablets, through its USB-A and USB-C output ports.
Important Technical Specifications
- Product Dimensions: 168 x 77 x 27 mm (6.61 x 3.03 x 1.06 in)
- Product Weight: 0.97 lbs (440 g)
- Internal Battery: Lithium-Ion
- Capacity: 10000 mAh (3.7V)
- Watt Hours: 37.2 Wh
- Input Voltage: 5V 2A
- USB-A Output Voltage: 5V 2.4A
- USB-C Output Voltage: 9V 2A / 5V 2.6A
- Jump Start Current: 200A - 400A
- Operating Temperature: -20°C ~ 34°C (-4°F ~ 93°F)
- Storage Temperature: -20°C ~ 40°C (-4°F ~ 104°F) Avg. Temp.
- Charging Temperature: 0°C ~ 40°C (32°F ~ 104°F)
- Charging Time: 5-6 hours
Usage Features
Package Contents:
The device comes with a power bank unit, a storage case, a USB cable and car adaptor, a user manual, and a jumper cable with smart & safe protection.
Power Level Indicator Lights:
The device features power level indicator lights to show its battery capacity. Pressing the power button once checks the capacity. The lights flash during charging, and solid lights indicate the battery capacity (1 Flashing: Below 5%, 1 Solid: 5-25%, 2 Solid: 26-50%, 3 Solid: 51-76%, 4 Solid: 76%-Full). All solid lights mean the device is fully charged.
Charging the Jump Starter:
The jump starter can be charged in two ways:
- At home: Plug the USB cable into a computer or any USB 2A wall adapter (not included) and connect the micro USB cable to the jump starter.
- In car: Plug the included USB car adapter into an available 12V socket and connect the micro USB cable to the jump starter.
It is recommended to fully charge the unit upon first receipt and recharge every 2-3 months, and after every use, to maintain efficiency and prolong battery life.
Charging USB Devices:
Users can charge two USB devices simultaneously. One port is a Type-C socket (max output 2A at 9V, 2.6A at 5V), and the other is a USB-A port (max output 2.4A). To start charging, press the power button once. The power level indicator will show the battery level for 30 seconds before turning off. Pressing the button again will check the power capacity.
Jump Starting a Vehicle:
- Preparation: Put the vehicle in park (neutral for manual transmission) and engage the emergency brake. Locate the vehicle battery.
- Check Jump Starter Power: Press the power button once to ensure the jump starter has at least 3 solid indicator lights (51% or more charge).
- Connect Jumper Cable to Jump Starter: Plug the blue end of the jumper cable into the jump start socket on the power bank, located underneath the black cover.
- Connect Clamps to Battery:
- Connect the RED clamp to the POSITIVE (+) post on the car battery. The positive post is usually larger and marked with a PLUS (+) sign, possibly with a red protective cover.
- Connect the BLACK clamp to the NEGATIVE (-) post on the car battery. The negative post is marked with a MINUS (-) sign, possibly with a black protective cover.
- Caution: Do not connect the RED and BLACK clamps at the same time. Connect RED first, then BLACK. Do not lean directly over the battery while making connections. Avoid mixing up cables or allowing metal ends to touch.
- Check LED Status: Observe the LED status on the indicator light box on the jumper cable. Proceed to the next step unless the light is RED and BEEPING.
- Start Vehicle: You have 90 seconds to start the vehicle. If it doesn't crank or cranks slowly, wiggle connections. Wait 60 seconds before trying again. Each new attempt requires disconnecting and reconnecting both clamps. Do not attempt more than 3 times.
- Disconnect Jumper Cables: Once the engine starts, the BLACK clamp's indicator box will show red and beep. Disconnect cables within 30 seconds: first the RED/POSITIVE (+) clamp, then the BLACK/NEGATIVE (-) clamp. Unplug the BLUE end of the jumper cable from the jump starter. The jump starter will power off automatically after 30 seconds.
- Engine Run Time: Keep the engine running for 20-30 minutes or drive the car to recharge the battery.
LED Light Features:
The device includes an LED flashlight with multiple modes:
- Flashlight: Press and hold the power button for three seconds.
- Strobe Light: Press the power button once while in flashlight mode.
- Hazard Light: Press the power button once while in strobe light mode.
- Turn Off: Press and hold the power button for three seconds.
The flashlight will not work while the unit is charging as a safety precaution.
Maintenance Features
Battery Maintenance:
To maintain efficiency and prolong the service life of the internal battery, fully charge the jump starter upon first receipt and recharge it every 2-3 months, and after every use.
Troubleshooting:
The manual provides a troubleshooting guide for common issues:
- Cannot jump start: Check clamp connections, ensure the jump start timer hasn't expired, verify sufficient battery charge (at least 51%), and ensure the vehicle battery voltage isn't too low.
- LED light on clamp box keeps flashing: Refer to the status table on page 9 of the manual for indicator box status.
- Flashlight does not turn on: Recharge the unit via USB cable. The flashlight is disabled during charging.
- No wall adaptor: Charge via USB cable using a computer or any USB 2A wall adapter.
- No LED indicator light: Refer to the power level indicator section on page 4 of the manual.
- Power bank in off mode: Press the power on/off button.
Safety and Disposal:
- Always wear safety glasses and gloves when jump starting.
- Ensure the blue plug is securely fitted into the jump start socket.
- Keep battery clamps clean and connected correctly.
- Avoid exposing the product to water, explosive atmospheres, or temperatures exceeding 104°F (40°C).
- Do not modify or disassemble the product.
- Charge only with the provided charger.
- In case of battery leakage, avoid contact with skin/eyes and seek medical attention. Dispose of the unit at a local battery recycling center.
- Do not place the jump starter on the floor or below 18 inches (457mm) during use in a repair facility.
- This device is for 12V vehicles only. Using it on non-12V vehicles can cause damage or injury.
- The battery is self-contained and not consumer replaceable. Dispose of it properly when it no longer holds a charge.
- For air travel safety with batteries, check with the U.S. Department of Transportation or your airline. The device contains 2.9g of lithium and 37.2 watt hours of power.
- Personal precautions when working with lead-acid batteries include having assistance nearby, having fresh water and soap, wearing eye and clothing protection, washing off battery acid immediately, avoiding smoking or sparks, being cautious with metal tools, and removing personal metal items.
- Charge the internal battery in a well-ventilated area.
- Avoid exposing the jump starter to fire or excessive temperatures above 130°C (266°F).
- Servicing should be performed by a qualified repair person using identical replacement parts.
- Do not allow output clamps to touch each other.
- Avoid dropping, hitting, or applying excessive force to the jump starter.
Warranty:
Winplus North America provides a limited warranty for 1 year from the date of original purchase, covering defects in material and workmanship. The warranty applies to North American customers and requires repairs to be performed by Winplus North America, a copy of the sales receipt, and adherence to product instructions. It does not cover damage from negligence, accidents, improper operation, normal wear and tear, or costs incurred for installation/removal. It is a "repair or replace" warranty only.