47
Installation instructions
ENGLISH
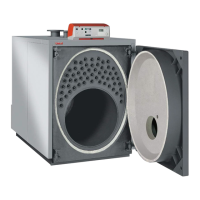
Second phase – Cleaning
• Remove the gaskets and the burners.
• Dry clean the burners by blowing compressed air from the
“ame side”
• Visually inspect the welding on the corner pieces and on the
burner mesh.
The burner gaskets must be replaced at each
cleaning operation.
• Wash the combustion chamber with water, taking care not to
wet the electrical wiring.
During this operation, make sure that the condensate drain
pipe always remains clear so that the washing water does
not leak from the inspection opening.
• Blow the combustion chamber with compressed air, trying to
remove any dirt still attached to the pins.
• When the parts have been washed, make sure that the con-
densate drain trap is clear: clean it if necessary
• Inspect the ue gas exhaust pipe and the ue
Third phase – Re-assembly
When reassembling, proceed in reverse
order, taking care to tighten the fastening
screws of the mixer/fan unit to the body, with
13 Nm tightening torque
ATTENTION
AT EACH MAINTENANCE OPERATION, IT IS
MANDATORY TO REPLACE THE SEALING
GASKETS OF EACH BURNER.
• Before ignition, check that the condensation drain trap is
properly lled with water.
• Before opening the gas supply valve again make sure that
the previously loosened gas tting, is tight. To do this, open
the valve and check its seal with soapy solution.
• As a burner ignites, immediately check the seals between
each individual gas valve and its premixing chamber
• Analyse the combustion and check its parameters.
• Make sure that all opened gas pressure sockets are closed.
• After cleaning the body and/or burners, put the burners back
in their seats
• Position the new gaskets.
COMPRESSED AIR
 Loading...