Do you have a question about the Van Raam Fun2Go 2 and is the answer not in the manual?
Provides essential contact details for Van Raam, including address and email.
Details the compliance of the Fun2Go 2 and FunTrain 2 with European and UK regulations.
Urges users to read the manual thoroughly and keep it safe for proper bicycle operation.
Lists the specific item numbers for the Fun2Go and FunTrain models.
Outlines the expected items included with the bicycle delivery and checks to perform.
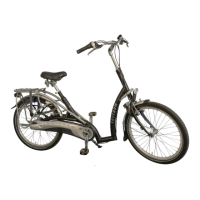
Describes who the Fun2Go 2 and FunTrain 2 are designed for, including people with mobility challenges.
Specifies the intended use on flat surfaces and maximum load limits, emphasizing safety.
Covers supervision, brake checks, tyre pressure, surface conditions, and slope limits for safe operation.
Warns about clothing getting caught and proper use of parking brakes for safety.
Details safe practices for downhill riding, tunnels, pregnancy, and hot brake discs.
Advises against direct sunlight exposure and details pedal assistance/reverse function usage.
Highlights crucial safety points for children and individuals with limited mental perception.
Offers advice for safe cycling on a side-by-side tandem, emphasizing handling differences.
Provides key safety instructions for the primary rider, focusing on steering and braking.
Details essential checks before each ride, including brakes, tyre pressure, lights, and seat/handlebar security.
Explains the importance of checking for wear and tear on components and when replacement is necessary.
Specifies maximum load limits for the bicycle and basket, and prohibits carrying people in the basket.
Mandates that safety-related parts must be replaced by a dealer using new parts; warranty implications.
Guides on how to correctly adjust the seat position for the main rider for optimal leg extension.
Details the steps to adjust the seat depth, affecting leg length, by loosening screws and repositioning.
Explains how to adjust handlebar height for riding comfort and posture, with a warning about insertion depth.
Describes how to angle handlebars for optimal arm posture and comfort.
Instructs on using the parking brake for the Fun2Go and FunTrain to secure the tricycle.
Explains manual headlight modes (On, 50%, Off), angle adjustment, and battery replacement.
Details how to switch the rear light on/off and replace its CR2032 battery.
Describes how centrally operated lighting is linked to the electric system and can be manually controlled.
Explains the operation of the 8-speed gears using the grip and warns against using pedals while shifting.
Provides step-by-step instructions for coupling the FunTrain to a Fun2Go using a ball coupling.
Outlines the procedure for uncoupling the FunTrain from the Fun2Go safely.
Explains the function of the display buttons (On/Off, Lights) for controlling the electrical system.
Details the functions of the button unit: Mode, Plus, Minus, and Starting Aid.
Labels and describes each element shown on the information screen, such as speed, battery, and range.
Explains the three screen modes: Range, Trip Distance, and Total Distance.
Guides on how to enter the settings screen to adjust display brightness and units.
Lists and explains various symbols that can appear on the information screen indicating system status or faults.
Explains how the silent electrical system provides pedal assistance and how the starting aid/boost function works.
Describes the three levels of pedal assistance (low, average, maximum support) and their range effects.
Details the reverse function activated by pedalling backwards and related safety warnings.
Introduces presets for assistance settings and the Van Raam E-Bike app for tracking and configuration.
Step-by-step guide on how to charge the battery, including indicator light meanings.
Explains the meaning of the charger's indicator lights (green, red, flashing red).
Describes how to read the battery's charge status using its LED indicators.
Explains the deep sleep mode for batteries and how to wake them up for use.
Provides important safety warnings and recommendations for charging and maintaining the battery pack.
Discusses self-discharge, battery wear, and the consequences of deep discharge on warranty and capacity.
Lists common system faults, their symbols, descriptions, and consequences or actions.
Provides a detailed table of fault symbols, descriptions, and required actions for troubleshooting.
Outlines critical safety measures for using the charger, including environmental conditions and handling.
Describes the option for an external charging point for easier battery charging without removal.
Explains the availability and use of a second battery to extend riding range.
Details the option for a switchable battery pack allowing selection between two batteries.
Describes the hand throttle and thumb throttle options, including their operation and forward/reverse functions.
Explains the operation and power source of the optional direction indicator system.
Outlines the functionalities of the Van Raam app, distinguishing between batteries with and without GPS stickers.
Elaborates on the app's capabilities as a bicycle computer and where to download it.
Details the standard shared gears and optional separate gears for riders.
Explains the function of the switchable freewheel and its three settings (A, OFF, B) for co-rider engagement.
Describes the adapter for mounting various rear options like baskets, racks, or carriers.
Explains how to use and mount the stick holder for carrying walking canes.
Details the installation and use of the crank shortener for adjusting pedal position.
Guides on adjusting the foot support straps and plate position for optimal pedaling.
Specifies shoe size suitability and width adjustments for small and large foot supports.
Describes how to set up the optional lower leg fixation for securing the rider's lower leg.
Explains how to rotate the seat to facilitate easier side-boarding of the bicycle.
Details how to wrap and secure the hipbelt around the co-rider for safety.
Describes the function of armrests for comfort and safety, with usage limitations.
Explains how to operate and use the optional footplate for resting feet during cycling.
Provides detailed technical specifications including dimensions, weight, and load capacities for both models.
Details methods for cleaning the tricycle frame, wheels, grips, and seats, warning against pressure washers.
Explains the correct procedure and frequency for cleaning and lubricating the bicycle chain.
Advises on yearly dealer inspections for warranty and initial break-in period checks.
States that safety-related components and repairs must be handled by the dealer using original parts.
Provides steps to remove the front cover of the chain guard using a screwdriver.
Details how to remove the left side of the middle cover to access the chain.
Outlines the steps to remove the hub cover after detaching the middle cover.
Explains how to remove the top part of the crank chain guard to access crank chain covers.
Guides on adjusting the crank chain tension using an Allen bolt and eccentric bracket.
Explains the automatic chain tensioning systems for minimizing maintenance, noting limitations.
Details chain tension adjustment for the through-axle variant using a fork at the rear.
Describes how to readjust the seat post guide to eliminate play and noise.
Advises contacting dealers or waste disposal companies for proper tricycle disposal.
Emphasizes the need for battery recycling and contacting dealers for information.
Stresses the importance of providing documentation and keys when transferring ownership.
Outlines the warranty period for the frame, fork, and accessories, and conditions for voiding the guarantee.
Explains where to find the frame number sticker on the bicycle and provides an example.
Presents a table outlining service moments, durations, and responsibilities for one-person and multi-person bikes.
Lists the checks and tasks to be performed during a monthly user inspection of the bicycle.
Details the checks and tasks for the annual user inspection, including component checks and E-bike electrics.
Specifies tasks and duration for the first service moment, including general checks and lubrication.
Lists tasks for the second service moment, building upon the first, including bracket inspections and E-bike tests.
Details tasks for the third service moment, adding paintwork, fork, seat cushion, and motor checks.
Provides templates for recording details of the 1st, 2nd, and 3rd service moments performed.
Offers a table format to record details of annual inspections, including date, dealer, mechanic, and remarks.
Outlines the purpose of the delivery and service form for warranty claims and user instruction verification.
| Frame material | Steel |
|---|---|
| Brakes | Hydraulic disc brakes |
| Parking brake | Yes |
| Adjustable seat height | Yes |
| Adjustable handlebar height | Yes |
| Gear system | 8 gears |
| Max. user weight | 120 kg per user |
| Type | Tandem bicycle |
| Color options | Blue, Red, Green, Black |