GEIST
TM
PDU IMD MODULES
Replacement Guide
VM1150/SL-70545_REV3_11-19 1
To contact Vertiv Technical Support: visit www.VertivCo.com
© 2019 Vertiv Group Corp. All rights reserved. Vertiv and the Vertiv logo are trademarks or registered trademarks of Vertiv Group Corp. All other names and logos referred to are trade
names, trademarks or registered trademarks of their respective owners. While every precaution has been taken to ensure accuracy and completeness herein, Vertiv Group Corp.
assumes no responsibility, and disclaims all liability, for damages resulting from use of this information or for any errors or omissions. Specifications are subject to change without notice.
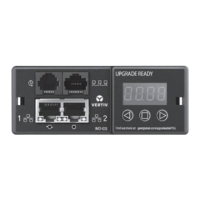
IMD Replacement
The plastic carrier (IMD) portion of
the PDU is designed to be field
replaceable by qualified service
personnel only. The IMD is
designed to be replaced while the
PDU is still connected to AC Mains
power.
CAUTION: Observe proper
precautions for handling
electrostatic components.
TO REPLACE THE IMD
MODULE:
IMPORTANT: Photos for these
steps are shown on page 2.
NOTE: Be sure to have the new
IMD module ready for installation
immediately after removal of the
old IMD.
1. Remove the disposable ESD
wrist strap from the package,
remove adhesive backing and
attach to PDU. Put the wrist
strap on your arm so that it
has contact with bare skin.
2. Insert the Vertiv IMD
Removal Tool as shown. Be
sure to press tool in level,
pressing in until tool is flush
with face of the IMD. Some
older versions may require
overlays to be removed prior
to inserting tool.
3. Carefully pull the tool and
IMD straight out about 2
inches. Remove tool from
IMD.
CAUTION: The IMD is still
connected internally. Do not
pull it more than 2 inches
from chassis.
4. Gently unplug the connector
from the IMD.
TO INSTALL THE IMD
MODULE:
IMPORTANT: Photos for these
steps are shown on page 2. Ensure
you have the wrist strap on before
proceeding. See step 1 for more
information.
5. Connect the cable to the
replacement IMD module.
6. Place cable into the strain-
relief slot in the IMD’s
housing.
7. Tuck the excess cable back
into the PDU and slide the
IMD straight in. Press with
both thumbs until the IMD
snaps into place.
IMD Replacement Modules