23VERTIV™ - Liebert
®
EFC - UM - 10040805MAN_ENG - 30.03.2023
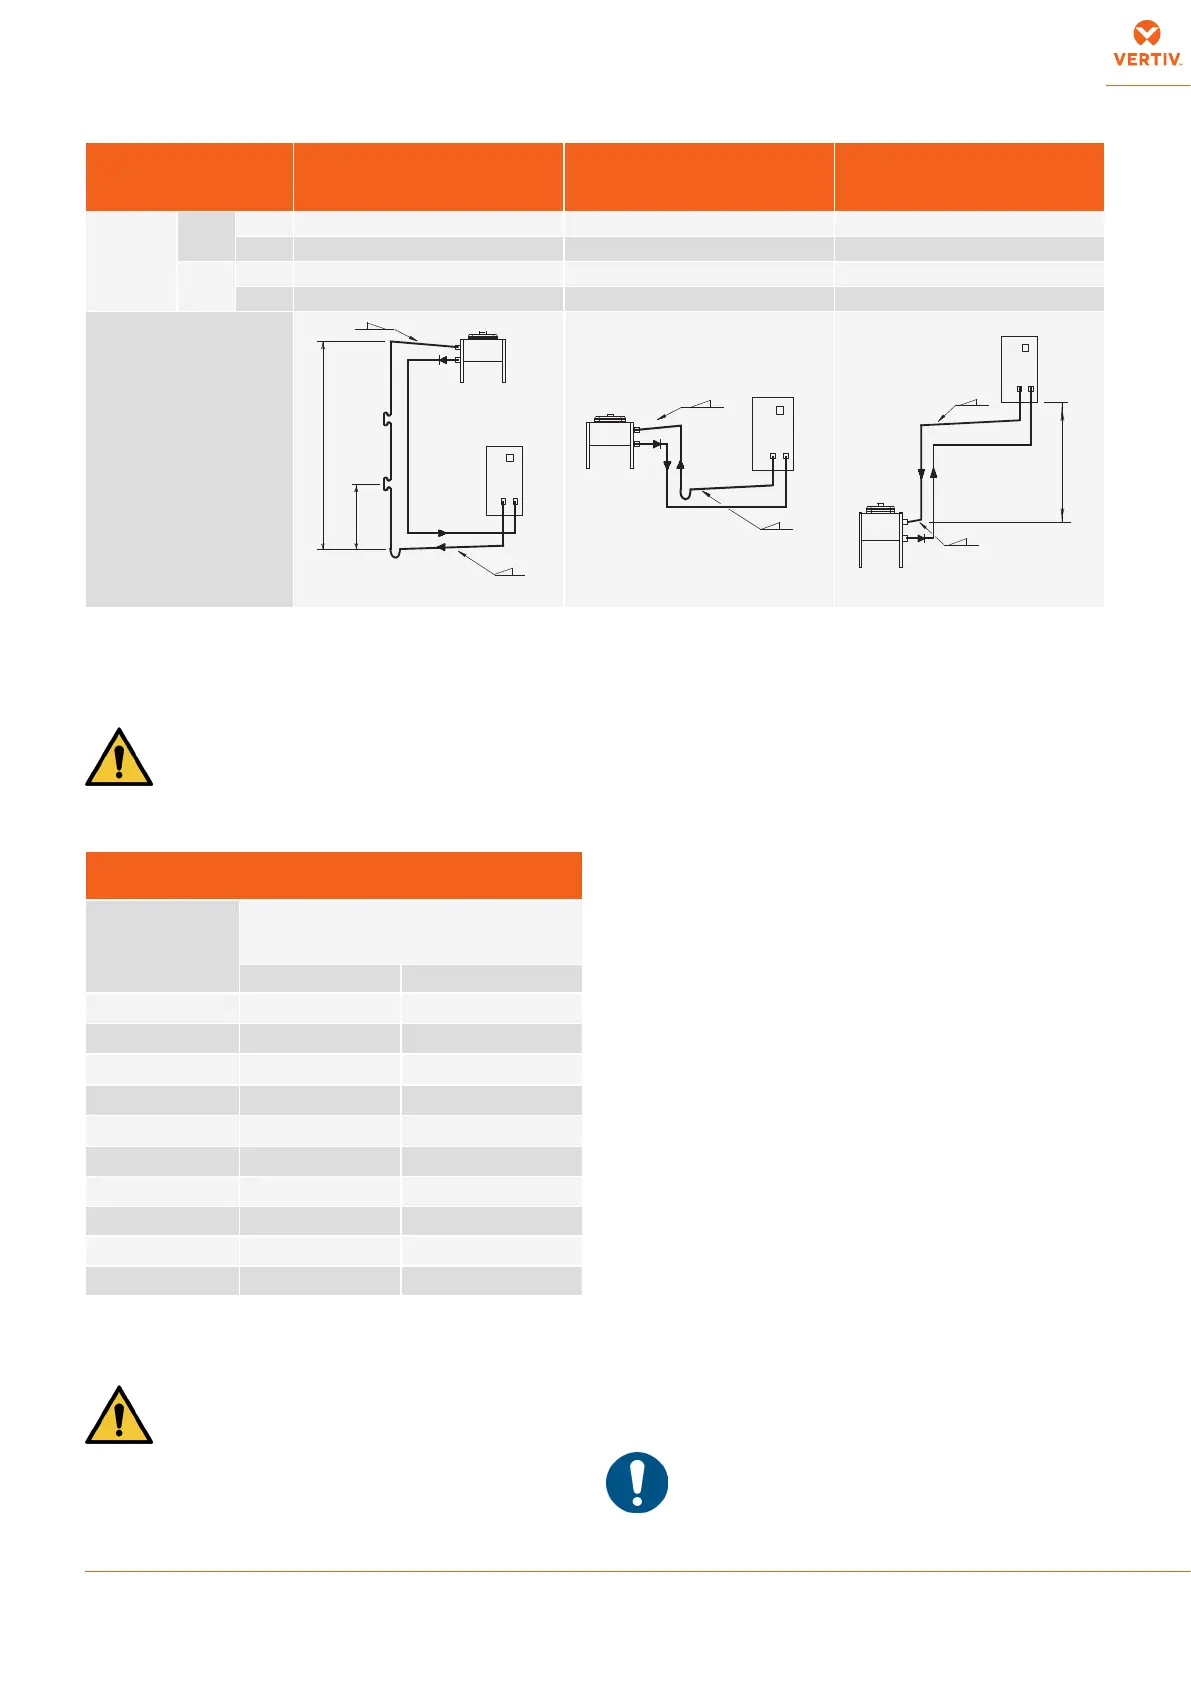
In case of remote condenser installation, the diameters of the
connecting pipes between the unit and the condensing unit listed
in Tab. 5.1 must be respected, otherwise the guarantee becomes
invalid.
Due to higher pressure with R410A, use
1,5 mm when external pipes diameter are higher than 18
mm and lower than 42 mm, in any case suitable for the
refrigerant circuit working pressure.
(Valid for equivalent lengths up to 60 m)
copper tube
external diametre x thickness [mm]
R410A
28 x 1.5 22 x 1.5
35 x 1.5 28 x 1.5
28 x 1.5 22 x 1.5
35 x 1.5 28 x 1.5
28 x 1.5 22 x 1.5
35 x 1.5 28 x 1.5
35 x 1.5 28 x 1.5
35 x 1.5 28 x 1.5
35 x 1.5 28 x 1.5
35 x 1.5 28 x 1.5
The discharge operation of the refrigerant
circuit pressurized with nitrogen (at 2 bar) and the
unbrazing of the bottoms from the connections must be
carried out as last operations, immediately followed by
the connection and emptying of the whole system.
1. Lay the piping, taking note of the following:
• Welding:
• All joints must be braze-welded.
• Avoid butt welds by using sleeves or enlarging one
of the pipes using a pipe opener.
• Use silver-based solders and the correct apparatus.
• Guarantee a correct weld as a refrigerant leak, or
a faulty weld which leads to a leak later on, can
seriously damage the air conditioner.
• Always use large-radius curves (bending radius at least
equal to pipe diameter). Bend the pipes as follows:
• by hand or bending device.
• use preformed curves. Do not overheat
the pipes when welding so as to minimize oxidation.
2. Connect the pipes to the condenser:
• Condensers with butt-welded pipe connections: cut the
pipe, enlarge it and weld it to the pipeline.
•
pipes and connect.
3. Wash out the pipelines as follows:
a. Plug up the free ends of the pipes.
condenser.
c. Pressurize the pipes with helium or nitrogen.
d. Unplug the pipes instantaneously.
e. Repeat a. - d. several times.
4.
5. Discharge the heat exchanger module unit pressurized with
nitrogen (at 2 bar) opening the charge valves so that all the
branches of the circuit are discharged (e.g. on the receiver, on
the low pressure side and on the compressor delivery).
6. Unbraze the bottoms from the connections of the heat
exchanger module unit.
7. Fix (weld) the pipes.
Check the refrigerant type to be used on the
data plate of the unit and on the refrigerating compressor.
gas
int. necessary necessary necessary
ext. only for aesthetic reasons only for aesthetic reasons only for aesthetic reasons
liq.
int. absolutely not not necessary
ext. only for aesthetic reasons only if exposed to sun only if exposed to sun
(*) Oil traps every 6m
of vertical piping
6m
(see *)
1%
1%
liquid
gas
unit
see **
1%
1%
see **
gas
liquid
unit
1%
1%
unit
gas
liquid