EasyManua.ls Logo

Viper AS5160 Series User Manual

Viper AS5160 Series
2 pages
To Next Page IconTo Next Page
Page #1 background imageLoading...
Page #1 background image
Use and maintenance
Operating guidelines AS5160 series
July 2018
Turn on the key and verify
there is enough battery power
to complete the work. Charge
batteries if required.
Install the squeegee using
the thumb nuts. Attach
squeegee hose.
Remove the red cover and fill
the tank. Add appropriate low
foaming detergent. Maximum
tank capacity 16 Gallons / 61
liter.
Check the level of water with
the red ball on the left side of
the machine.
Disc version: place the brush/pad holder under the scrub deck then use the pedal to lower the deck over the
brush. Press the OneTouch
TM
scrub button to enable scrubbing.
The vacuum will start. Push on one of the two switches ½ second to install the brush.
Boost version: attach a pad to the fixed pad holder, press the OneTouch
TM
scrub button and the deck will
lower auto matically.
Use the handle to lower or
raise the squeegee to the
floor. Adjust the squeegee
angle with the knob to adjust
suction performance if
needed.
Place the machine in working mode and
press any of the two red safety switches to
activate the machine.
Press the + or – solution buttons to
increase / decrease the water flow rate
or to turn solution off.
For wheel traction version: use the rabbit /
turtle knob to control the speed of the
machine.
BOOST version: Adjust scrub pressure when
needed.
For wheel traction version: pressing either
of the red safety switches and the black
reverse button together will put the
machine into reverse.
On disc version, the brush/pad holder can
be removed automatically by raising the
deck with the pedal and then press the click
off button.
Push
on the
button
Question and Answer IconNeed help?

Do you have a question about the Viper AS5160 Series and is the answer not in the manual?

Viper AS5160 Series Specifications

General IconGeneral
BrandViper
ModelAS5160 Series
CategoryScrubber
LanguageEnglish

Summary

Operating the AS5160 Series

Powering On and Battery Check

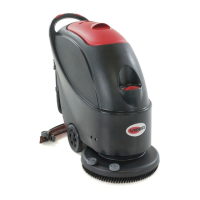
Turn on the key and verify sufficient battery power. Charge if required.

Squeegee Installation and Hose Attachment

Install the squeegee using thumb nuts and attach the squeegee hose.

Tank Filling and Detergent Addition

Fill the tank with water and add low foaming detergent. Max capacity 61 liters.

Water Level Check

Check water level using the red ball indicator on the machine's left side.

Brush/Pad Holder Installation

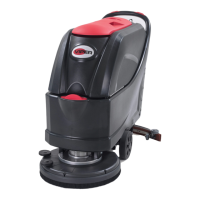
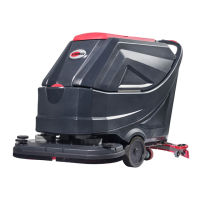
Place brush/pad holder under deck; lower deck. Press OneTouch scrub button for scrubbing.

Squeegee Adjustment

Use handle to adjust squeegee height and angle for optimal suction performance.

Machine Activation

Place machine in working mode and press safety switches to activate.

Speed Control (Wheel Traction)

Use rabbit/turtle knob to control machine speed on wheel traction versions.

Reverse Operation (Wheel Traction)

Press safety switches and reverse button together for reverse movement.

Solution Flow Control

Adjust water flow rate or turn off using '+' and '-' solution buttons.

Scrub Pressure Adjustment (Boost Version)

Adjust scrub pressure as needed for the Boost version.

Brush/Pad Removal (Disc Version)

Remove brush/pad holder by raising deck and pressing click-off button on disc version.

Maintenance Procedures

Daily Clean Water Tank Emptying

Empty the clean water tank using the drain knob under the machine.

Daily Recovery Tank Emptying

Empty the recovery tank using the recovery hose, controlling flow.

Daily Float Ball Cage and Lid Gasket Inspection

Inspect and rinse the float ball cage and clean the lid gasket if required.

Daily Squeegee Cleaning and Inspection

Remove, clean, inspect squeegee blades, and flip or replace them.

Weekly Solution Filter Inspection

Inspect the solution filter and clean it if required.

Recovery Tank Lid Open for Odor Avoidance

Leave the recovery tank lid open after cleaning to avoid bad odor.

Battery Charging Procedure

Use the supplied AC cord to connect the machine's onboard charger to a wall socket.

Battery Charging Indicator and Policy

Charge battery if indicator is red, or if empty/unused for 8-10 hours.

Related product manuals