8 DE5467U
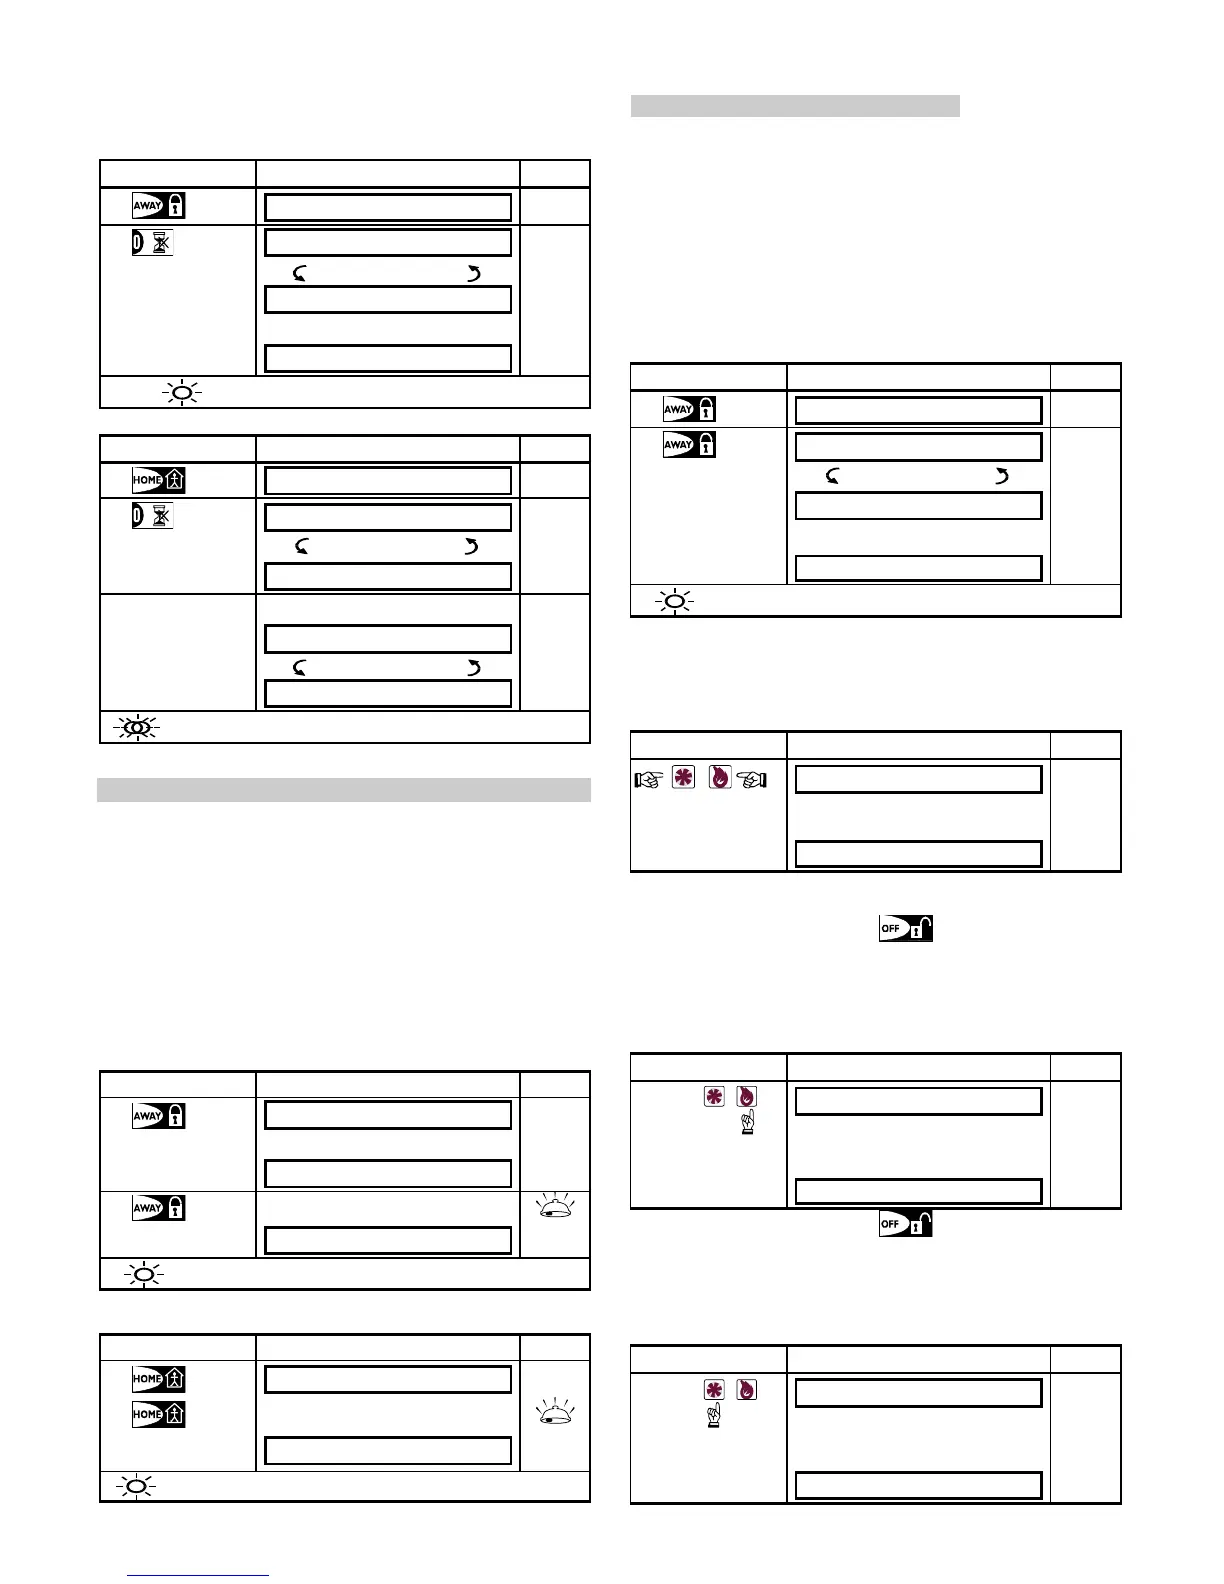
2.7 Arming ‘Instant’
You may arm AWAY or HOME without an entry delay - any
detection in any zone will trigger an immediate alarm.
If you wish to arm AWAY-INSTANT, proceed as follows.
Action Resultant Display Sound
ARMING AWAY
y
ARMING INSTANT
y
(alternating)
PLEASE EXIT NOW
y
Vacate the premises
(Exit Delay)
!!
AWAY
ARM lights throughout the armed state
If you wish to arm HOME-INSTANT, proceed as follows:
Action Resultant Display Sound
ARMING HOME
y
ARMING INSTANT
y
(alternating)
ARMING HOME
Go to an interior zone
(Exit Delay)
!!
ARM HOME HH:MM
(alternating)
ARM HOME INSTANT
ARM indicator flashes throughout the armed state
2.8 Forced Arming
(Not to be used in UL- listed systems)
Forced arming allows you to arm the system even though
one zone or several zones are disturbed, and the NOT
READY message is displayed.
Automatic forced arming only works if the installer allowed
this option while programming your system. Disturbed
zones will be bypassed - they will not be armed. The
protected site will not have maximum protection.
Note: When forced arming is carried out, the buzzer
“protests” by emitting a continuous tone during the exit
delay until the last 10 seconds of the delay. You can
silence this signal by pressing the arming button again.
When NOT READY is displayed, Forced arming “AWAY”
is performed as follows:
Action Resultant Display Sound
ARMING AWAY
y
PLEASE EXIT NOW
(Exit Delay)
(to mute the buzzer)
AWAY
ARM indicator lights throughout the armed state
When NOT READY is displayed, Forced arming “HOME”
is performed as follows:
Action Resultant Display Sound
ARMING HOME
y
(Exit Delay)
(to mute the buzzer)
Go to an interior zone
HOME HH:MM
ARM indicator flashes throughout the armed state
2.9 Arming in the Latchkey Mode
(Not to be used in UL-listed systems)
This mode is useful for a parent at work who wants to be
sure that his children have returned from school and have
disarmed the system. Arming in the “latchkey” mode
means that a special “latchkey” message will be sent out
when the system is disarmed by a “latchkey user”.
Latchkey users are holders of user codes 5 through 8 or
users of Keyfob transmitters 5 through 8. The latchkey
message is considered an alert and not an alarm, and is
therefore sent to the private telephones programmed by
the user as targets for alert messages.
Latchkey arming is possible only when you arm “AWAY”.
To arm in the Latchkey mode, proceed as follows:
Action Resultant Display Sound
ARMING AWAY
y
ARMING LATCHKEY
(within 2 seconds)
(alternating)
y
PLEASE EXIT NOW
Vacate the premises
(Exit Delay)
!!
AWAY
ARM indicator lights throughout the armed state
2.10 Initiating a Panic Alarm
You can generate a panic alarm manually in the disarmed
and armed states alike. If this feature has been enabled by
the installer (consult your installation company to determine
if it has been enabled).The sequence will be as shown:
Action Resultant Display Sound
PANIC ALARM
Siren
(pressed
simultaneously)
Then, if or when the system is
in the disarmed state:
READY HH:MM
Note: If you are using a key-ring transmitter, press both
AWAY and HOME buttons simultaneously for 2 seconds.
To stop the alarm, press
and then key in your
valid user code.
2.11 Initiating Fire Alarm
You can generate a fire alarm manually (depends on the
purchased PowerMax+ version - see PowerMax+ door
label) in disarmed & armed states, as follows:
Action Resultant Display Sound
FIRE
EMERGENCY
FIRE
Siren
Then, if or when the system is
in the disarmed state:
READY HH:MM
To stop the alarm, press and then key in your
valid user code.
2.12 Initiating Emergency Alarm
You can generate an emergency alarm manually (depends
on the purchased system version - see PowerMax+ door
label) in the disarmed and armed states as follows:
Action Resultant Display Sound
EMERGENCY
FIRE
EMERGENCY
Then, if or when the system is
in the disarmed state:
READY HH:MM