Starting and Ignition WM 80 repair
44 wc_tx000521gb.fm
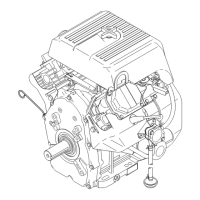
See Graphic: wc_gr002887
Installation:
4.11.12 Apply a light coating of oil to the ground (a) and ignition wires (b) and
slide them through the protective sleeve (c).
4.11.13 Slide the ignition wire through the boot (d) in the side of the crankcase.
4.11.14 Secure the ground wire to the stop switch (e). (Older models use a
terminal flag (f).) Tuck the ground wire within the groove of the
crankcase.
4.11.15 Position the wire sleeve underneath the holding tab (g) and bend the
tab down to hold the wires and sleeve in place.
4.11.16 Clean the area of the crankcase around the ground wire and apply a
new white label (h) to the crankcase.
4.11.17 Attach the spark plug cap (i) to the ignition wire.
4.11.18 Apply Loctite 243 or equivalent to three M8 slot head screws (j) and
using the screws, secure the ignition module (k) to the crankcase.
Torque screws to 3.4 Nm (2.5 ft.lbs.). For those engines requiring
manual air gap adjustment, adjust the ignition module air gap. See
section Setting Air Gap.
4.11.19 Insert the key into the crankshaft. Secure the flywheel (l) to the
crankshaft with washer and M12 nut (m). Torque the nut to 50 Nm (41
ft.lbs.).
4.11.20 Check for spark. See section Checking Spark.
4.11.21 Apply Loctite 243 or equivalent to seven M5 screws (n) and using the
screws, secure the flywheel housing to the crankcase.