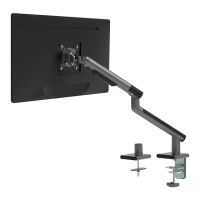
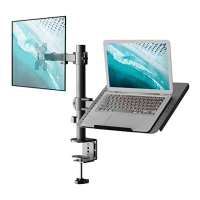
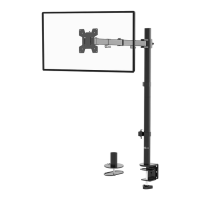
This document describes the WALI Single Monitor Desk Mount, models MATI001-G and MATI001-W, an installation manual for a monitor desk mount designed to provide an adjustable and ergonomic viewing experience for a single monitor.
Function Description:
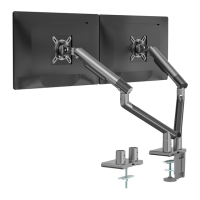
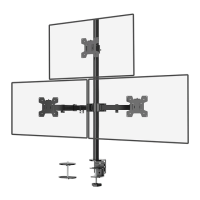
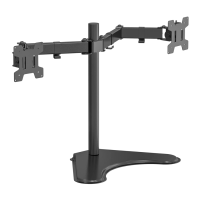
The WALI Single Monitor Desk Mount is designed to securely hold a single monitor on a desk, allowing for various adjustments to achieve an optimal viewing angle and position. It functions by providing a sturdy arm that attaches to a desk via either a C-clamp or grommet base, and then connects to the monitor using a VESA plate. The mount allows for rotation, tilt, and swivel adjustments, enhancing user comfort and productivity. It aims to free up desk space by elevating the monitor and offering flexibility in monitor placement.
Important Technical Specifications:
- VESA Compatibility: 75x75mm and 100x100mm. This indicates the standard hole patterns on the back of monitors that the mount can accommodate.
- Maximum Monitor Size: Up to 32 inches.
- Weight Capacity: 2-10 kg (4.4-22 lbs). It is crucial not to exceed this weight limit to ensure stability and prevent damage or injury.
- Desk Thickness Compatibility (C-Clamp): 0.4" - 3.3".
- Desk Thickness Compatibility (Grommet): 0.4" - 3.1".
- Grommet Hole Diameter (Existing): 0.4" - 2.4".
- Grommet Hole Diameter (Self-drilled): 3/8" (10mm).
- Rotation: 360 degrees (manual adjustment).
- Tilt: +40 degrees / -40 degrees (adjustable with Allen Key).
- Swivel: -90 degrees / +90 degrees (manual adjustment).
- Materials: The components include an arm, VESA plate, C-clamp, C-clamp brace, base, plate, bottom grommet plate, various bolts (M6x12, M4x12, M5x12), spring washers, nuts, anti-skid pads, Allen keys (4mm, 5mm), a wrench, and D5 washers.
Usage Features:
The WALI Single Monitor Desk Mount offers several features to enhance its usability and adaptability:
- Two Mounting Options:
- C-Clamp Installation: This method allows the mount to be clamped to the edge of a desk. It involves assembling the C-clamp brace and base, attaching anti-skid pads, and then securing the clamp to the desk. The height of the clamp can be adjusted to match the desk thickness, and a knob is rotated clockwise to fasten it securely.
- Grommet Base Installation: This option is for desks with an existing grommet hole or for users willing to drill one. It involves attaching the plate to the base, applying anti-skid pads, and then securing the assembly through the grommet hole using a bolt, bottom grommet plate, spring washer, and nut. For self-drilled holes, a 3/8" (10mm) diameter hole is required.
- Modular Arm Assembly: The mount consists of two arm segments (Arm A and Arm B) that connect to the base and to each other, allowing for extended reach and flexibility. These connections are secured and tightened using an Allen key.
- VESA Plate Attachment: The VESA plate (C) attaches to the back of the monitor using either M4x12 (M-A) or M5x12 (M-B) bolts, along with D5 washers (M-C). Users are instructed to hand-thread screws first to determine the correct diameter. A screwdriver (not included) is required to tighten these bolts.
- Quick Release VESA Plate: The VESA plate features an unlock/lock knob, allowing for easy attachment and detachment of the assembled TV/monitor to Arm A. Users turn the knob to the unlock position, slide the monitor onto the arm, and then turn the knob to the lock position to secure it.
- Tension Adjustment: The spring tension of the arm can be adjusted using a 5mm Allen key (O) to properly balance the arm with the monitor's weight. This is crucial for smooth and stable positioning. For heavier monitors, the screw is turned counter-clockwise; for lighter monitors, it's turned clockwise. A red line on the tension indicator helps guide the adjustment.
- Cable Management: The mount includes a bottom cable slot cover on the arm. Users can detach this cover, guide cables through the slot, and then slide the cover back to conceal and manage cables, contributing to a tidy workspace.
- Adjustable Rotation: The monitor can be manually rotated 360 degrees.
- Adjustable Tilt: The VESA plate tilt can be adjusted using an Allen key (N) within a range of +40 degrees to -40 degrees. If the display does not hold its desired position, the screws should be tightened.
- Adjustable Swivel: The monitor can be manually swiveled within a range of -90 degrees to +90 degrees.
- Swing Prevention: A limiting screw (N) on the base can be tightened to prevent the monitor arm from swinging into screens or walls, allowing for a 90-degree rotation. Loosening this screw allows for a 180-degree rotation without stopping.
Maintenance Features:
- Regular Checks: The manual emphasizes checking carefully for missing or defective parts during installation and ensuring that all connections are secure.
- Weight Capacity Adherence: Users are warned not to exceed the specified weight capacity to prevent damage or injury.
- Tension Adjustment: The ability to adjust the spring tension ensures that the arm remains balanced and holds the monitor securely over time, even if the monitor's weight distribution changes slightly or if the spring tension naturally loosens.
- Allen Key Storage: The manual shows a dedicated holder for storing the Allen keys (N and O) on the base, ensuring they are readily available for future adjustments or maintenance.
- Tipover Restraint (Warning): While not a direct maintenance feature of the mount itself, the "TIPOVER WARNING" section advises using tipover restraints or anchoring the stand to the wall to prevent serious or fatal crushing injuries, especially concerning children. This highlights a crucial safety aspect that users should consider for overall system stability.
- Professional Assistance: The manual advises calling a qualified technician if there are any doubts about the safety of the installation or if directions are not understood, promoting safe and correct usage.