Innovation - Edge [i] Installation, Operation, Maintenance Manual
CHAPTER 5 – SAFETY DEVICE TESTING
5.3 HIGH GAS PRESSURE FAULT TEST
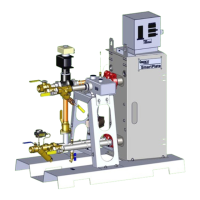
To simulate a high gas pressure fault, refer to Figure 5.2 and proceed as follows:
1. Put the unit in Manual Mode by going to the Main Menu → Diagnostics → Manual Run
and setting the Manual Mode toggle to Enabled.
2. Remove the 1/4“ plug from the leak detection ball valve located at the High Gas Pressure
switch (see Figure 5.2).
3. Install a 0 – 16” W.C. (0 – 4.0 kPa) manometer (or W.C. gauge) where the 1/4” plug was
removed.
4. Slowly open the leak detection ball valve
5. Start the unit at a valve position (firing rate) of 25%.
6. Slowly increase the gas pressure using the adjustment screw on the SSOV.
7. The unit should shut down and display a High Gas Pressure fault message when the gas
pressure exceeds the setting on the high gas pressure switch. The FAULT indicator should
also start flashing. The switch should be set for 1” W.C. more than the “Manifold Pressure
Setpoint” written on the Manifold Gas Pressure Setting tag. For example: if the tag states
that the unit was set up at 1.9” W.C. full input rate as the factory calibration, then the high
gas pressure switch will be set for 2.9” W.C. (1.0 kPa).
8. Reduce the gas pressure back to the original setting listed on the tag.
9. Press the CLEAR button on the Controller to clear the fault.
10. The fault message should clear, the FAULT indicator should go off and the unit should
restart.
11. Upon test completion, close the ball valve and remove the manometer. Replace the 1/4“
plug removed in step 2.
 Loading...