Do you have a question about the Weider WEBE96120.0 and is the answer not in the manual?
Register product online and gather necessary tools for assembly.
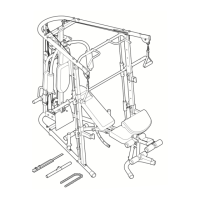
Instructions for attaching uprights, storage tubes, and spotters at the same height.
Instructions for connecting front/rear stabilizers and the front leg.
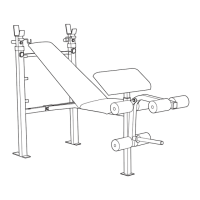
Attaching backrest frames, post, and backrest with grease.
Installing the seat, weight tube, and leg lever with adapters.
Attaching leg pads and securing the curl bar with a pin.
Securing the curl pad and ensuring all parts are tightened.
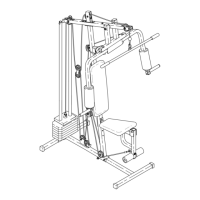
Adjusting the height of weight rests and spotters for safe and effective use.
Guidance on storing weights on the bench's storage tubes.
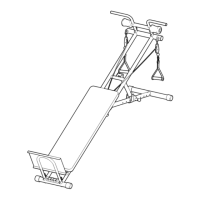
How to change the backrest angle for different exercises.
Instructions for loading weights onto the leg lever and safety limits.
Procedures for mounting and dismounting the curl bar.
Steps to attach and detach the curl pad.
Explains Muscle Building, Toning, Weight Loss, and Cross Training.
General advice on warming up, workouts, cooling down, and proper exercise technique.
Tips for motivation through logging workouts and tracking progress.
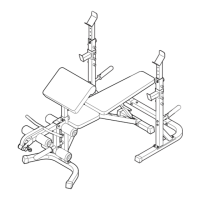
The Weider Attack Olympic Bench & Rack (Model No. WEBE96120.0) is a versatile weight bench designed for home use, offering a selection of exercises to develop major muscle groups. It is suitable for toning, building muscle size and strength, and improving cardiovascular fitness. The product does not include weight plates or a barbell.
The Weider Attack Olympic Bench & Rack provides a comprehensive platform for strength training. It features adjustable weight rests and spotters, a backrest, a leg lever, and a curl bar, allowing for a variety of exercises. The bench is designed to support a maximum user weight of 300 lbs. (136 kg) and a maximum total weight of 610 lbs. (277 kg). The weight rack can hold up to 310 lbs. (141 kg) including a barbell, and the leg lever can support up to 150 lbs. (68 kg). The chest fly per arm has a maximum capacity of 50 lbs. The Olympic Adapters (8) allow for the use of Olympic weights on the storage tubes and leg lever, though these are not included with the product.
| Brand | Weider |
|---|---|
| Model | WEBE96120.0 |
| Category | Fitness Equipment |
| Language | English |