4850 / 4860 Master Clock
Operating and Installation Instructions
Issue 2.0
The w482
®
signal was developed for controlling electronic
clocks, using a single cable pair data interconnection, in
electrically noisy environments. A principal advantage of
w482
®
is the ability to provide time information in any one of
fifteen different synchronised time zones. All fifteen time
zones can be individually configured from the front panel of
the 4850 / 4860, using ‘Set Once’ technology to allow automatic
seasonal time change correction.
The w482
®
signal is transmitted at 4-24v amplitude and at a
50 bits per second data rate. The signal is virtually immune to
electro-magnetic interference.
One 4850 / 4860 unit can control up to fifty 400A series slave
displays located up to 1km from the master clock unit using a
simple, non-critical cable pair.
Setup Procedure
1 Decide what time you want to display on your slave
clocks. If you just want to display Local Time, as
previously programmed during ‘location’ setting (section
4), proceed to stage 2.
If you have more than one time zone to display or want
to display a different time zone from that set in the
location setting, determine the zone location codes
(Page 4-2) and program w482 zones ‘2’ - ‘A’ accordingly.
Ensure that the 4850 / 4860 system is disconnected
from the mains power supply when making
connections to the w482 output.
2 Connect the 400A slave clocks to the 4850 / 4860 w482
output terminals. (See above and page 6-2).
Check that the 400A (or 470A) slave clock is programmed
for w482 time code synchronisation. If the 400A (or
470A) slave clock is to be synchronised by a w482 time
zone which is not zone 1, program the 400A (or 470A)
clock accordingly.
Refer to the 400A (or 470A) series operating and
installation manual for more details.
3 Apply power to the 4850 / 4860.
Note: If you using the IRIG output (4861 and 4850.x.I versions
only) or EBU output (4862 and 4850.x.E versions only) and are
using it in an application that requires the location setting to
be set to a time zone other than the local time zone, w482 zone
2 should be programmed for the local time zone and the slave
displays should be configured accordingly.
6 - w482 Time Zone Setup
4850 / 4860 w482 Code Output
10 way terminal block
A w482 Code +
B w482 Code -
EMC grounding point
Note:
Polarity of connection is not critical.
If a screened cable is used for system
interconnection, the screen should
only be connected to the EMC
grounding point on the 4850 / 4860.
6-1
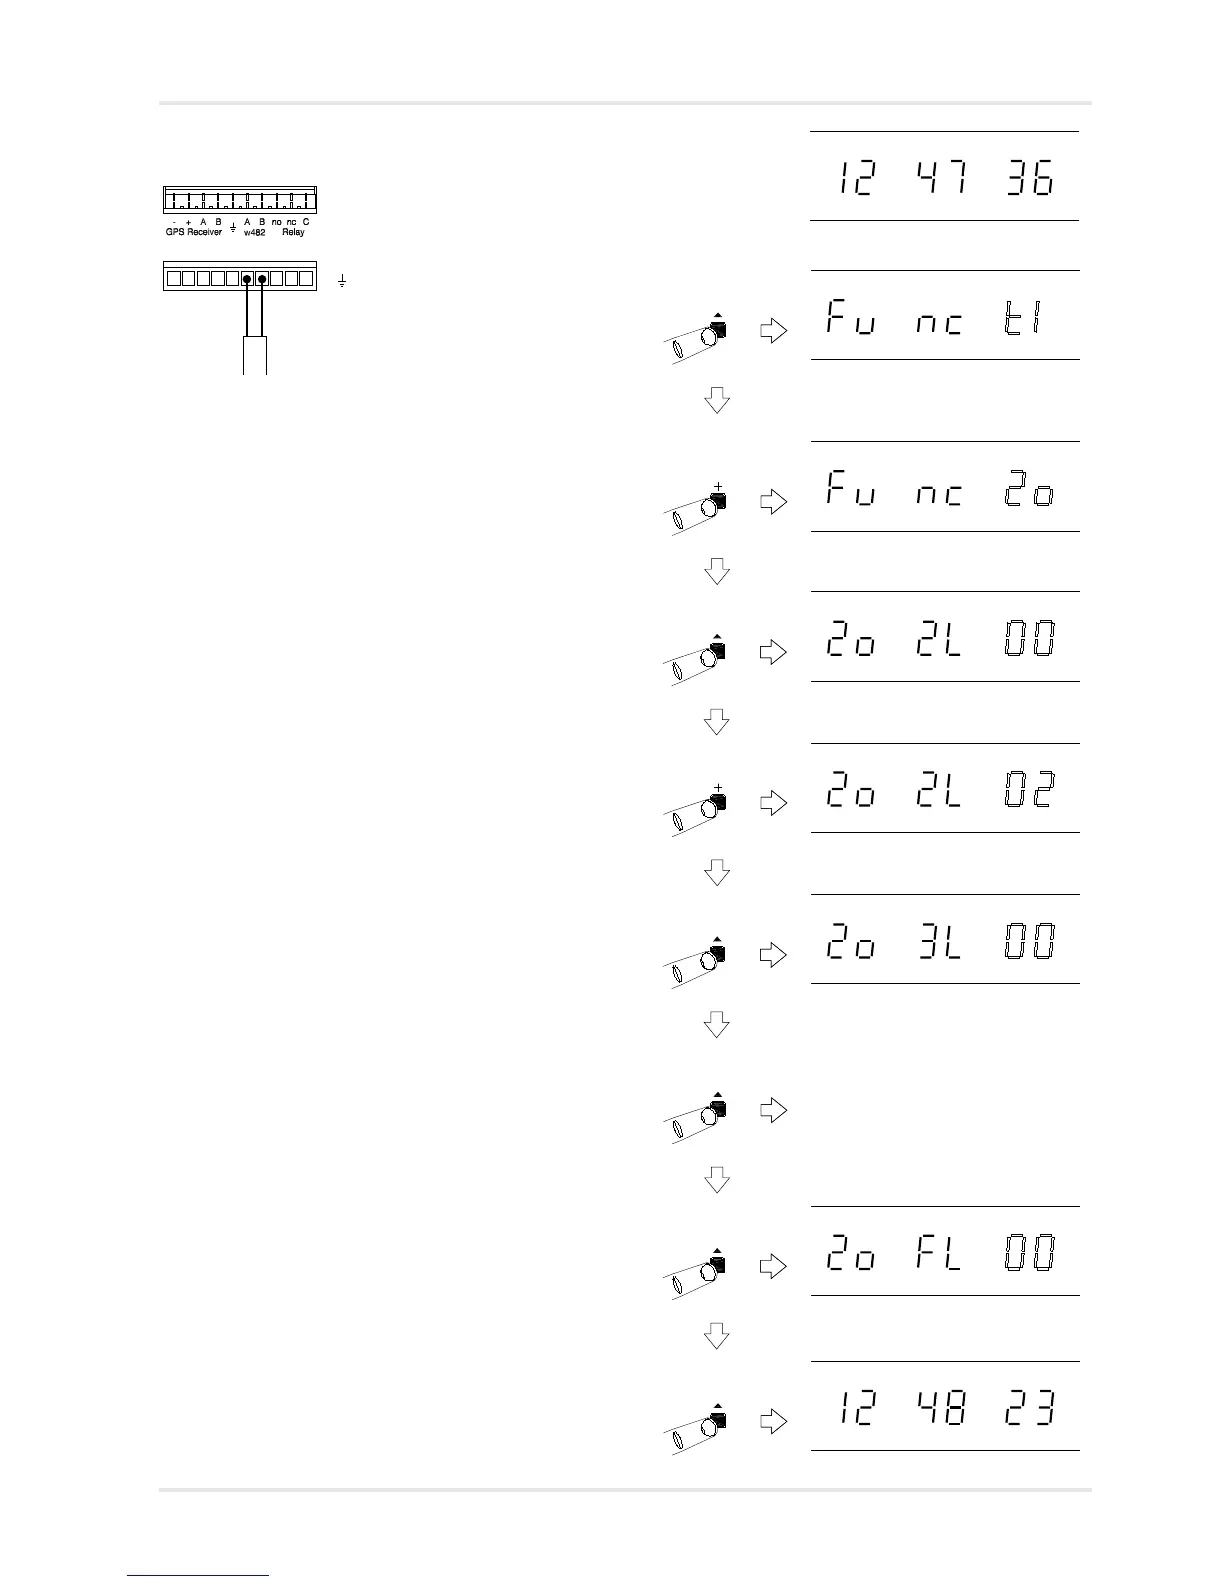
Normal time display
Function ‘Time Setting Mode’. Press ‘+’
four times to move to w482 zone
setting mode.
Function ‘w482 Zone Setting Mode’.
Press ‘^’ to select.
w482 Zone Setting Mode, zone 2
selected with current location flashing.
Use ‘+’ and ‘-’ to change.
Press ‘^’ to store the new zone 2
setting and move on to the w482 time
zone 3 setting.
Zone 3 selected, press ‘+’ and ‘-’ to
change current setting, ‘^’ to move to
next zone.
w482 zone settings 4 - F
Zone F selected, press ‘+’ and ‘-’ to
change current setting, ‘^’ to return to
normal time display.
Normal time display.