Step B - Install RO Drain Under Sink
10
INTRODUCTION
A suitable drain point is needed for the drain water
from the Reverse Osmosis Filter. You have two options
to choose from:
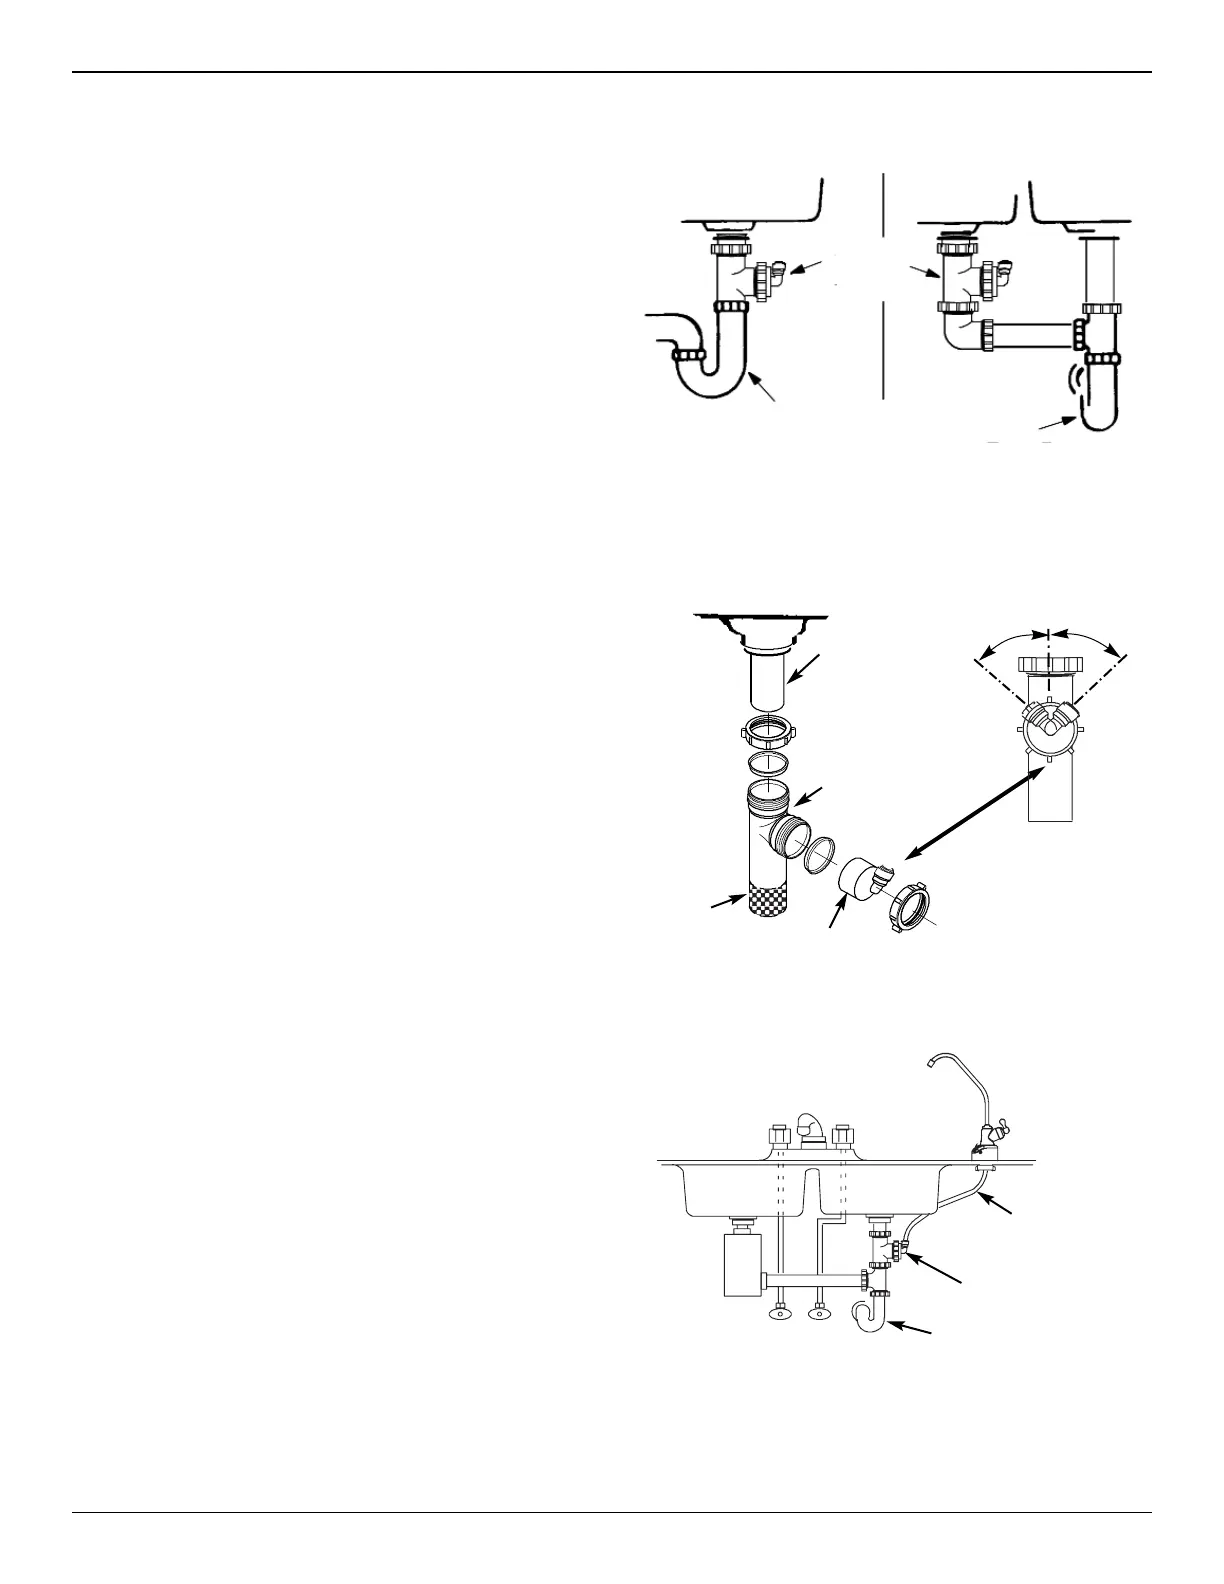
•InstalltheDrainAdapterincludedwithyourunit
See Fig 7, Fig. 8, and Fig. 9. This is used in under
the sink installations. The drain adapter kit is
installed onto your sink drain pipe above the P-trap.
See Fig. 7.
•Useanotherexistingdraininyourhome
(See Fig 10 & 11) This is usually used in remote
location type installations. The drain tube from the
Reverse Osmosis Filter runs directly to an open
drain. See Fig. 10 & 11.
NOTE:Anincorrectlyconnecteddrainpointcan
causewatertoleakfromthefaucet’sairgap.
NOTE:Localcodemaydictatewhichtypeofdrain
installationisused.Otherthanlocalcode,either
draininstalltypemaybeusedinbothunderthe
sinkorremotelocationinstallations.Consulta
plumberifyouarenotfamiliarwithplumbingpro-
cedures.
INSTALLDRAINADAPTERKIT
(UndersinkInstallation)
A drain adapter kit is included in your package. Review
the drain adapter kit parts in Fig. 8. Install the drain
adapter above or ahead of the P-trap. See Fig. 7 & 9.
Be sure to comply with your local plumbing codes. The
drain adapter fits 1-1/2" sink drain pipes. Other drain
pipe fittings, purchased locally, may be needed in addi-
tion to the adapter.
1. Slowly disassemble the sink drain pipe between the
sink P-trap and the sink tailpiece. See Fig. 7 & 9.
2. Clean the sink tailpiece to assure a leak-tight fit.
3. Install drain adapter directly onto the sink tailpiece
using the ferrule and nut. Snug the nut, but do not
tighten. See Fig. 8.
4. Assemble the drain tubing connector to the drain
adapter using the ferrule and nut. Snug the nut, but
do not tighten. See Fig. 8.
NOTE:Locatesothatthedraintubingfromthe
ReverseOsmosisfaucetwillrunstraighttothe
adapter,withnodips,loops,orkinks.SeeFig.9.
5. Turn the connector to about 45° (10:00 or 2:00
position). See Fig. 8. Tighten the nut securely.
6. Assemble the P-trap to the drain adapter, and other
drain pipe fittings as required to complete the drain
run. See Fig. 7.
NOTE:Ifneeded,youcancuttheunthreaded
endoftheadaptertomakeitfit.Donotcuttoo
shortortheadapterwillnotmakealeak-tight
sealwiththeconnectingfitting.
7. Tighten all connections, but do not over tighten plas-
tic connections.
FIG.7
Drain
Adapter
P–Trap
P–Trap
Singletrap DoubleTrap
FIG.8
FIG.9
UndertheSinkInstallation
IMPORTANT:Locatedrainadaptersothatwhenthe
blackdraintubefromtheReverseOsmosis
Faucetisinstalleditwillrunstraighttothe
adapter,withnodips,loops,orkinks.
Black Drain
Tube
P–Trap
Drain Adapter
HOT
COLD
Nut
Ferrule
Cut, if
needed
Nut
Ferrule
Drain Adapter
Drain Tubing
Connector
45°
2:00
10:00
45°
Sink Tailpiece




 To Next Page