B. Air 360
+
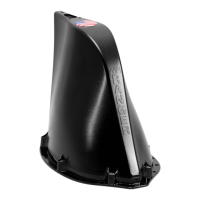
In Dome Install
see page 8 for diagram
If the compatible Air 360
+
system was installed at the RV manufacturer and
there isn’t a white circular Winegard cable access cap on the RV’s ceiling,
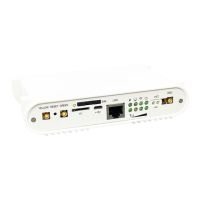
the Gateway was meant to be installed inside the dome of the Air 360
+
. If
the Air 360
+
was not previously installed, refer to the Air 360
+
Installation
instructions on mounting the antenna before attempting to mount the
Gateway system.
WARNING: There is a coax cable connected to the over-the-air antenna under
the dome. Gently remove the dome and lay on its side next to the base to avoid
damaging the antenna, coax, or other antennas within the dome.
Step 1 – Remove the four screws on the outside of the Air 360
+
dome and
gently remove the dome.
Step 2 – With the provided two wire nuts, splice the included 9.5" power cable
and the power cable that the RV Manufacturer installed. Connect the black
wire and ground wire from the RV and red wire to the power wire from the RV.
Ensure that the cables are secure to the wire nuts before continuing. Continue
to Step 12 if the power cable was already installed. Discard the included wall
plate and power switch, if not needed.
NOTE: If the power wire was not installed, you will need to install your own
power wire. It is recommended to use 18 gauge wire no longer than 50 feet
with a dedicated 12VDC circuit and a 3A inline fuse. See the Air 360
+
installation manual for more information.
Step 3 – Choose a location to install the supplied Wall Plate with Power On/Off
switch. When selecting a location, remember that a +12VDC power cable will
need to be run from the Gateway to the switch.
Installation (cont.)
6

 Loading...