EasyManua.ls Logo

Wittime WT2076B - User Manual

Wittime WT2076B
21 pages
Print Icon
To Next Page IconTo Next Page
Loading...
Digital Wireless Weather Station
OPERATING INSTRUCTION
Base unit: WT2076B
Wireless sensor: WT2022A
If you want to know about our features or support solutions, please let us know! We really hope that owning
an Wittime Technology product is not only a practical experience, but also a pleasure.
Please email us at: Casa-wittime@hotmail.com

Questions and Answers

Summary

Safety and Usage Guidelines

General Safety Precautions

Advice for safe device operation, including warnings for children and electrical hazards.

Intended Use of Weather Station

Describes the weather station's function and limitations, not for commercial forecasting.

Electrical Safety with Adapter

Details electrical safety precautions when using the power adapter and socket.

Product Setup and Contents

Unpacking and Initial Check

Instructions for unpacking, removing protective films, and checking contents and damage.

Included Items in Delivery

Lists all components provided in the product package, including base unit, sensor, batteries, and adapter.

Key Weather Station Functions

Lists features like color display, time/date, alarm, temp/humidity, forecast symbols, and more.

Device Overview and Components

Wireless Sensor Details

Specifies the maximum wireless range and mentions the availability of a wall mounting bracket.

Base Unit Top View

Identifies the top view of the base unit and its control buttons like MODE, CH, ALARM, SNOOZE LIGHT, UP, DOWN.

Base Unit Details

Base Unit Rear View

Shows the back of the base unit, indicating ports and compartments for power and batteries.

Connecting Power Adapter

Provides instructions on how to plug in the power adapter and attach the detachable base unit.

Base Unit Controls and Parts

Base Unit Button Functions

Details the function of each button on the base unit: MODE, CH, ALARM, SNOOZE LIGHT, UP, DOWN.

Base Unit Part Identification

Identifies numbered parts of the base unit: loop for hanging, power adaptor port, battery compartment, and cable hole.

Wireless Sensor Setup

Wireless Sensor Component Identification

Identifies numbered parts of the wireless sensor: pilot light, loop for hanging, sliding switch, and battery compartment.

Wireless Sensor Battery Installation

Step-by-step guide for inserting batteries into the wireless sensor, ensuring correct polarity.

Powering and Expanding the System

Using Multiple Wireless Sensors

Explains how to use up to three sensors, assign channels, and how the station analyzes data.

Base Unit Power Options

Instructions for powering the base unit via adapter or batteries, including data collection time.

Configuration and Settings

Setting Local Air Pressure

Guides users through setting the air pressure value and selecting corresponding weather symbols.

Establishing Radio Frequency Connection

Explains the process of receiving RF signals from the wireless sensor and reconnecting if necessary.

Configuring Basic Device Data

Details how to set year, month, date, time, 12/24H format, DST, and air pressure units.

Optimal Placement and Indicators

Choosing Ideal Location

Advises on protecting units from environmental factors and potential signal interference for optimal performance.

Base Unit Placement Guidance

Recommends placement on a desk or wall, with safety warnings for wall installation.

Wireless Sensor Placement Guidance

Suggests placing the wireless sensor in a sheltered location, protected from direct weather.

Timekeeping and Alarms

Understanding Time and Date Display

Illustrates the time and date display format, including 12-hour format and day of the week.

Setting the Alarm Function

Step-by-step guide to setting the alarm time (hour and minute) using the ALARM, UP, and DOWN buttons.

Alarm Management and Weather Data

Activating and Deactivating the Alarm

Explains how to turn the alarm on or off by pressing the ALARM button.

Methods for Stopping the Alarm

Describes how to stop the alarm using Snooze, any button, or the automatic stop function.

Snooze Function Operation

Details how to use the snooze function by pressing SNOOZE LIGHT to pause the alarm for 5 minutes.

Temperature and Humidity Display

Explains how temperature and humidity data are displayed, divided into wireless sensor and base unit information.

Outdoor Sensor Data Display

Outdoor Temperature and Humidity Indicators

Details the indicators for outdoor temperature, humidity, trends, battery status, and radio reception.

Indoor Sensor Data and Trends

Indoor Temperature and Humidity Indicators

Details the indicators for indoor temperature, humidity, trends, comfort, and battery status.

Viewing and Resetting Max;Min Data

Explains how to view and reset the daily maximum and minimum temperature and humidity values.

Interpreting Weather Trends

Describes how temperature and humidity trends are displayed using directional arrows.

Air Pressure and Forecasts

Understanding Air Pressure Trends

Explains how air pressure trends are shown with symbols indicating rising, constant, or falling pressure.

Reading the Pressure History Graph

Describes the pressure history graph and the meaning of the numbers indicating past readings.

Weather Forecast Explanation

Details how the forecast is generated, its coverage area, and accuracy after initial setup.

Specialized Weather Indicators

Temperature Alarm and Frost Warning

Explains conditions for the temperature alarm and frost warning, including snowflake symbol display.

Mold Indicator Interpretation

Describes the mold indicator, its basis on temperature/humidity, and possible readings (LOW, MED, HI).

Dew Point Display Information

Explains the dew-point display and the conditions for 'LL.L' and 'HH.H' indicators.

Outdoor Conditions and Comfort

Heat Index Calculation and Display

Defines the heat index and when it is displayed, based on outdoor temperature and humidity.

Moon Phase Tracking

Shows illustrations of different moon phases that are automatically updated with the date.

Indoor Comfort Level Indicator

Explains how the comfort indicator uses temperature and humidity to show the degree of indoor comfort.

System Management and Maintenance

Automatic Daylight Saving Time (DST)

Describes how the weather station automatically adapts to daylight saving time (DST) changes.

Adjusting Display Illumination

Explains how to activate display illumination for 10 seconds on battery or constant on power mains.

Low Battery Indicator and Replacement

Details the low battery symbol, when to replace batteries, and important notes on battery replacement.

Resetting to Factory Defaults

Instructions on how to reset the weather station to factory settings by removing and reinserting batteries.

Troubleshooting and Cleaning

Troubleshooting Outdoor Temperature Issues

Addresses problems with outdoor temperature showing dashes, indicating wireless interference, and provides solutions.

Troubleshooting Display and Accuracy

Covers troubleshooting for display not working and inaccurate temperature/humidity readings.

Cleaning the Weather Station Unit

Provides steps for cleaning the base unit, especially when operating via the power mains.

Base Unit Technical Specifications

Lists technical details for the base unit, including model, power consumption, and measuring ranges.

Technical Data and Compliance

Wireless Sensor Technical Specifications

Lists technical details for the wireless sensor, including model, batteries, range, and accuracy.

Switching Adapter Specifications

Details the power supply and output specifications for the switching adapter.

FCC Compliance and Interference

States compliance with FCC rules, warnings, and notes on interference and residential installation.

Product Information and Support

Product Specification Disclaimers

Notes that the manufacturer reserves the right to change product specifications without notice.

Warranty and Customer Support

Outlines the 1-year limited warranty and provides customer support contact details for assistance.

Overview

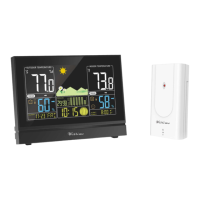
This document describes the Wittime Digital Wireless Weather Station, a device designed to provide comprehensive weather information and time-related functions for home use. The weather station consists of a base unit and a wireless sensor, offering a range of features to enhance daily life.

Function Description

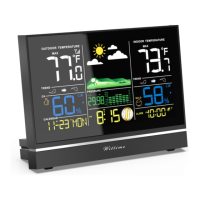
The primary function of the Wittime Digital Wireless Weather Station is to display various weather information from its immediate surroundings, including air pressure, humidity, and temperature. It provides a weather forecast based on the collected data, helping users anticipate upcoming weather conditions. The device also displays the date, time, and phases of the moon, and includes an alarm function with snooze capabilities. Additional information such as dew point and heat index is also provided.

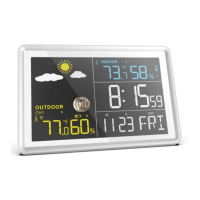
The weather station features a high-definition color display for clear readability. It supports both 12-hour and 24-hour time formats. Indoor and outdoor temperature displays are available in either Celsius or Fahrenheit. The device can display indoor and outdoor humidity, along with humidity and temperature trends, indicating whether these values are rising, constant, or falling. It also shows current and previous air-pressure tendencies, represented by a history graph that tracks changes over the past 12 hours. Weather forecast symbols, such as sunny, partly cloudy, overcast, rain, thunderstorm, snowfall, and heavy snowfall, are displayed to visually represent the forecast. A mold indicator helps users assess the likelihood of mold growth based on temperature and humidity. A comfort indicator, represented by a smiley face symbol, indicates the indoor comfort level. The device also features a low battery indicator for both the base unit and the wireless sensor.

The wireless sensor extends the weather station's capabilities by measuring outdoor temperature and humidity. It can connect with up to three wireless sensors at different measurement sites, although the delivery includes one wireless sensor by default. The sensor transmits data wirelessly to the base unit, allowing for remote monitoring of outdoor conditions.

Usage Features

The weather station offers flexible power options, operating either with batteries or via a switching adapter connected to mains power. When connected to a power socket, it prioritizes mains operation even if batteries are present.

Setting up the device involves a straightforward process. First, batteries are inserted into the wireless sensor, ensuring correct polarity. The sensor's red pilot light will illuminate, indicating data transmission to the base unit. For additional wireless sensors, each must be assigned a unique sensor number using sliding switches. Once the base unit is powered on (either by batteries or the adapter), it enters air pressure mode, where the air pressure unit flashes. Users can then adjust the air pressure value using the UP and DOWN buttons and confirm with the SNOOZE+LIGHT button. The weather symbol can also be manually adjusted to shorten the reception time for the weather station. After the weather symbol is selected, the radio frequency symbol will flash, and the device will attempt to receive RF signals from the wireless sensor for three minutes to display outdoor temperature and humidity. If connection fails, the CH button can be pressed and held to reconnect.

Basic data settings, including year, month, date, hour, minutes, 12/24H format, DST ON/OFF, and air pressure unit (inHg or hPa), can be configured by pressing and holding the MODE button until the year flashes. Values are adjusted using the UP and DOWN buttons and confirmed with the MODE button.

The alarm function can be set by long-pressing the ALARM button until the time flashes. Users can set the desired hour and minute using the UP and DOWN buttons, confirming each step with the ALARM button. The alarm is off by default and needs to be activated manually by pressing the ALARM button once. Pressing it twice deactivates the alarm. When the alarm sounds, it can be temporarily paused for approximately 5 minutes using the SNOOZE+LIGHT button, or completely stopped by pressing any other button on the base unit. If no buttons are pressed, the alarm automatically switches off after 2 minutes.

The device also displays maximum and minimum temperature and humidity values. These can be viewed by repeatedly pressing the UP button. Holding the UP button will delete the stored highest and lowest values since midnight.

The weather station automatically updates moon phases with the date. It also adapts to winter/summer time changes automatically. The display illumination can be adjusted (Bright, Muted, Off) when operating on mains power by repeatedly pressing the SNOOZE+LIGHT button. When on battery power, any button press will light up the display for 10 seconds.

Maintenance Features

To ensure accurate temperature measurement, the wireless sensor should be placed in a location protected from direct weather elements like rain, sun, and wind, such as under a porch or in a carport. The base unit should be placed in a dry, enclosed space, away from dust, shocks, extreme temperatures, and direct sunlight. It can be placed on a desk or hung on a wall.

When replacing batteries, it's important to use alkaline batteries for longer life, especially in low temperatures. When the low battery symbol appears, batteries in the respective unit (base unit or wireless sensor) should be replaced. All batteries should be exchanged simultaneously, and only those listed in the technical data should be used. Even if the base unit is mains-powered, empty batteries should be removed. Correct polarity (+/-) must be observed during insertion. Battery and device contacts should be cleaned if necessary before inserting new batteries. Old batteries should be disposed of in an environmentally responsible manner.

If the weather station displays incorrect values, it can be reset to factory settings by removing and reinserting batteries (or unplugging and replugging the power adapter if mains-powered). This will cause all symbols to briefly appear on the display, followed by a beep and the unit starting to retrieve data from the wireless sensors after about 20 seconds.

For cleaning, the base unit should be disconnected from the power mains by removing the switching adapter plug. It can then be wiped with a slightly damp cloth and dried completely before reconnecting.

The manufacturer reserves the right to change product specifications and is not responsible for malfunctions caused by interference. Wittime Technology, Ltd. provides a 1-year limited warranty for manufacturing defects. For support or questions, users are encouraged to contact customer support via email.

Wittime WT2076B Specifications

General IconGeneral
Model NumberWT2076B
TypeWireless Weather Station
Display TypeLCD
Humidity Measurement Range20% to 95%
Temperature DisplayYes
Humidity DisplayYes
Power SourceBattery
Weather ForecastYes
Power Supply2 x AA batteries

Related product manuals