Do you have a question about the Xantrex Link 1000 and is the answer not in the manual?
Allows remote control of inverter/charger functions like invert, equalization, and power share.
Provides insights into battery state-of-charge, voltage, current, and Ah consumed.
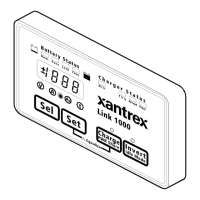
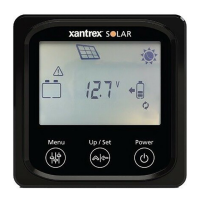
Explains the components and indicators of the Link 1000 control panel interface.
Visual indicator of battery state-of-charge, using LEDs to show charge level.
Shows voltage, amps, Ah, or time remaining; units can be changed.
Describes the function of SEL, SET, CHARGE, INVERT buttons and associated LEDs.
Indicates charging status: Bulk, Acceptance, or Float mode.
Details parts needed, materials to supply, and tools for installation.
Covers safety guidelines and performance factors during installation.
Guidance on color-coded wiring, twisted pairs, and connecting the starting battery.
Provides a sequential guide for the complete installation process.
Step-by-step instructions for mounting the control panel to a surface.
Procedure for securely mounting and properly cabling the current shunt.
Detailed guide on connecting wires to the terminal block based on color and function.
Instructions for connecting terminal block wires to the shunt and battery terminals.
Procedure for installing fuses and connecting the phone cable.
How to verify the correct connection and initial operation of the installed unit.
Guidance on routine maintenance and safe disconnection of the unit.
Overview of configurable settings and default values for optimal system performance.
Step-by-step guide to navigating setup mode and modifying device parameters.
Procedures for locking settings and resetting values to factory defaults.
Setting battery capacity, type, and ambient temperature for accurate monitoring.
Adjusting charged voltage and current percentage for optimal battery charging.
Configuring time remaining calculation, Power Share, and Idle Mode settings.
Details and configuration of advanced functions for system optimization and monitoring.
Configures display scanning, sleep mode, and unit toggling (Ah/kWhr).
Sets ambient temperature, temperature coefficient, and alternative energy mode.
Adjusts Peukert's exponent, discharge floor, and battery type for accurate capacity calculation.
Enables second battery voltage sense, tests display, and sets temperature compensation.
Reading battery state-of-charge and selecting display units (Volts, Amps, Ah, Time).
Explains how to select and interpret display units like Volts, Amps, Ah, and Time Remaining.
Explains how to interpret the BATTERY STATUS light bar for battery charge level.
Allows customization of the light bar to indicate discharge floor.
Details how to turn on the inverter and adjust its idle mode setting.
Covers charging procedures, status LEDs, and battery equalization.
Explains the meaning of different LED indicators on the charger status panel.
Guidance for equalizing standard and gel cell batteries, plus precautions.
Activating Power Share feature and conducting battery capacity tests.
Process to synchronize Link 1000 with battery and understand over-charge Ah.
Accessing and interpreting battery history data and reading error codes.
Steps to retrieve stored battery performance data like CEF and discharge levels.
Explains how to understand battery history data such as CEF and discharge depth.
Detailed electrical parameters, voltage, current, and accuracy specifications.
Physical dimensions, weight, and finish of the control panel.
Lists default configurations for inverter/charger controls and monitoring functions.
Details the terms, coverage, and duration of the product warranty.
Procedure for obtaining authorization and returning products for service.
Specifies intended use and warns against using the product in life support systems.
| Brand | Xantrex |
|---|---|
| Model | Link 1000 |
| Category | Control Panel |
| Language | English |