22 www.xilinx.com AC701 Getting Started Guide
UG967 (v3.0) July 10, 2013
Advanced Bring-up with Base Targeted Reference Design
Setting the AC701 Jumpers And Switches
1. Turn off the power to the AC701 board and verify the switch and jumper settings are as
shown in Table 3, Table 4, and Figure 15.
Tabl e 3 : AC701 Board Required Jumper Settings
Jumper Function Setting
J12 PCIe endpoint configuration width; 4-lane design 3-4
Tabl e 4 : AC701 Board Required Switch Settings
Switch Function/Type Setting
SW15 Board power slide-switch off
SW2 User GPIO DIP switch
4off
3off
2off
1off
SW1 Positions 1, 2, and 3 set configuration mode
3 001 – Master SPI
101 – JTAG
on
2off
1off
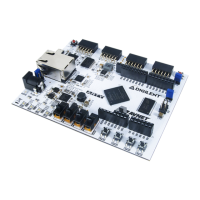
X-Ref Target - Figure 15
Figure 15: AC701 Board Switch and Jumper Locations
UG967_15_040513
SW1
123
On
Pin 1
SW2
123
On
Pin 1
4
SW1
SW2
J12
SW15
J49

 Loading...