16
(English)
EN
Changing the Connection Type
1. Tap Settings .
2. Tap [Preferred Connection - (connection type)]
3. Tap the connection type you prefer:
• USB
• WiFi
• Bluetooth
• Skip Sync – This selection disables the sync process
4. Tap [Select].
Setting Synchronization Time
1. Tap Settings
.
2. Tap [Synchronization Time].
3. Rotate the hour and minute wheels until the time you want is highlighted.
4. Tap [Done].
PERFORMING ADMINISTRATIVE TASKS
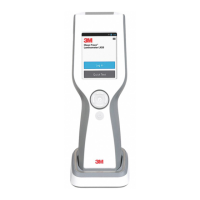
Setting the Date and Time on the 3M Clean‑Trace Luminometer
1. Touch the top of the screen for 1 second, then swipe down.
2. Tap the date and time that’s displayed.
3. To enable [Set date] and [Set time], tap [Automatic date & time]
4. To set the date, tap [Set date] then rotate the month, day, and year wheels until the correct date is displayed.
Tap [Done].
5. To set the time, tap [Set time] then rotate the hour, minute, and AM/PM wheels until the correct time is displayed.
Tap [Done].
6. Tap Return
.
Performing a Diagnostic Check
1. Tap Settings
.
2. Tap [Diagnostic Check] to do the same diagnostic check the 3M Clean-Trace Luminometer does automatically when
the power is switched on. For more information, refer to the Switching the Power on section in this User Manual
Changing the Screen Brightness
1. Tap Settings .
2. Tap [Screen Brightness].
3. To increase the screen brightness, drag the slider to the right. To decrease the screen brightness drag the slider to the left.
Restarting the 3M Clean‑Trace Luminometer
1. Tap Settings
.
2. Tap [Restart Device].
Exporting a Log File
1. Tap Settings
2. To generate a log le, tap [Export Log File]
• To view the log le:
a. Connect the 3M Clean-Trace Luminometer to your computer by USB cable.
b. Browse to 3M Clean-Trace\Luminometer Main Storage\Logs
c. To open the log le, use Microsoft® Notepad®.