A basic requirement for developing a
quality CLI program is to be sure that
field technicians understand how to
use their leakage detection equipment
correctly. Throughout this section of
the booklet, we will discuss proce-
dures that should be followed when
using leakage detection equipment to
measure leakage sources in the field.
The primary equipment needed for
leakage detection in the field includes:
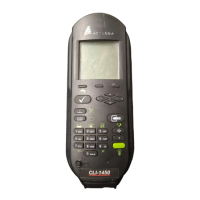
• Leakage Detection Meters –
CLI-1450 and CLI-1750
• Vehicle Mount Antenna,
Monopole – VMA-3
• Dipole Antenna – HD-1
• Adjustable 10-Foot Pole – PL-1
(optional for calibrated leaks and
government leakage tests)
• Tagger – LT1000 (optional for sig-
nal detection sensitivity and over-
build situations)
• Signal Transmitter – LST-1700
(optional for home wire testing,
used with CLI-1750 only)
• Docking Station – DS-1 (optional
for patrol vehicles)
4-1
Leakage Detection Guide
4
~ Set-Up Your Leakage Meter
In this guide we will only discuss the
procedures which should be followed
when setting-up your meter to deter-
mine cable leakage. Both the CLI-
1450 and CLI-1750 models have signal
level meter capabilities which will not
be discussed in this manual.
It is important to become familiar
with the leakage detection functions
on your meter. We suggest that you
practice the following procedures in
order to become familiar with the
process of setting-up these leakage
functions.
• Select your leakage meter (CLI-
1450 or CLI-1750). Refer to the
operation manual for each of the
models regarding specific ques-
tions for operation and additional
capabilities.
• Be sure that your meter battery is
properly charged. The battery will
provide 2.25 hours of continuous
operation. The re-charge time
required will be a maximum of 16
hours when the unit is off.
• Check the set-up of your meter for
these functions. Do not assume
that these functions are already
set-up to meet your specific leak-
age detection needs. Use the fol-
lowing procedure to check the
current settings on your meter for
each of these functions.
(see
pages 3-8 & 3-9 for step-by-step
configure instructions)
• Following the completion of the
above steps, you are ready to
start doing leakage detection.