Do you have a question about the Actron CP9580 and is the answer not in the manual?
Details critical warnings for user and equipment safety, including DANGER, WARNING, CAUTION, and IMPORTANT.
Explains hazard signal words and their meanings to prevent personal injury and equipment damage.
Explains formatting conventions like bold text for functions, bold-italic for menus, and capitalized text for responses.
Details how to refer to safety messages, check notes, equipment tips, and identify equipment damage warnings.
Overview of the scan tool's purpose in diagnosing vehicles and assisting in troubleshooting procedures.
Guide to downloading and installing the PC-based scanning suite application for tool updates and features.
Provides web sites and phone numbers for electronic engine control diagnostic information for various vehicle manufacturers.
Explanation of the On-Board Diagnostics II system, its standardization, and capabilities.
Description of the DLC, its location, function, and pin assignments for vehicle communication.
Explanation of DTC standards, format, and types used for identifying vehicle problems.
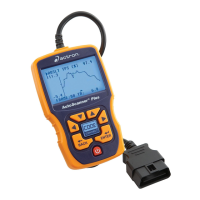
Identifies and describes the physical components and features of the scan tool, including display and keypad.
Lists the technical specifications of the scan tool, including display, operating temperature, and power requirements.
Details the parts included with the scan tool and how to order replacement parts or manuals.
Covers how the scan tool is powered, using internal batteries or vehicle power via the DLC.
Overview of system setup options for configuring measurement units, display contrast, and auto-power off.
Step-by-step guide to changing measurement units from English to Metric within the System Setup.
Instructions for adjusting the scan tool's display contrast level for optimal readability.
Explains how to set the auto-power off feature to conserve battery life when the tool is not in use.
Describes the Quick Test feature for initial vehicle communication and display of I/M Monitors and Read Codes.
Allows users to turn the printing of vehicle information in the header on or off before printing data.
Instructions for changing the language used by the scan tool interface to English, Espanol, or Francais.
How to access and view specific information about the scan tool, such as serial number and software version.
Procedure to test the scan tool's display for missing pixels or defects by filling the screen with solid characters.
Verifies that all keys on the scan tool's keypad are functioning correctly by checking for inverse color changes.
Tests the scan tool's internal RAM and Flash ROM for proper operation and detects potential errors.
Used for updating the scan tool's software with new versions, typically via a PC connection.
Introduces features like Review Data that may vary or depend on the vehicle being tested.
Allows viewing information and data from previously tested vehicles stored in the tool's memory.
Captures and plays back vehicle data (PIDs) during drive or parked conditions for later analysis.
Function to print diagnostic information stored in the scan tool, either individually or all collected data.
Allows users to look up definitions of Diagnostic Trouble Codes (DTCs) stored in the scan tool.
Steps for connecting the scan tool to the vehicle's DLC and selecting the correct vehicle for diagnostics.
Accesses a database of repair information based on vehicle and trouble codes for DIY assistance.
Views the status of emission system monitors (Inspection/Maintenance) to ensure proper operation.
Reads Diagnostic Trouble Codes (DTCs) from the vehicle's control modules to identify problems.
Deletes DTCs and I/M Monitor data from the vehicle's computer, typically after repairs.
Displays the status of the Malfunction Indicator Lamp (MIL) or Check Engine light to indicate system health.
Shows a basic status of the vehicle's OBD system, including MIL status and monitor readiness.
Real-time viewing of vehicle Parameter Identification (PID) data, such as sensor readings and switch operations.
Records PIDs during vehicle operation for later playback and analysis of intermittent problems.
Retrieves snapshot data of vehicle conditions recorded at the moment an emission-related fault occurred.
Views real-time operations of the emission system and monitors, updating continuously as the vehicle reports.
Retrieves completed O2 sensor monitor test results to help determine problems related to fuel and emissions.
Receives test results for emission-related powertrain components and systems that are not continuously monitored.
Allows control of vehicle components, tests, or systems for diagnostics, if supported by the vehicle.
Requests vehicle VIN, calibration IDs, and in-use performance tracking data for model year 2000+ vehicles.
Identifies module IDs and communication types for all Global OBD II modules present in the vehicle.
Guides on checking common error messages displayed by the scan tool and potential causes.
Steps to troubleshoot issues when the scan tool fails to power on, communicate, or function correctly.
Procedures to reset the tool when the vehicle's control module enters an unrecoverable state.
Addresses issues where the vehicle's computer stops communicating with the scan tool, causing errors.
Instructions for replacing the scan tool's internal AAA alkaline batteries, including battery type recommendations.
Checks the display, keys, and internal memory of the scan tool for proper function and detects errors.
Provides the toll-free contact number for technical assistance from SPX Corporation.
States that the express warranty is in lieu of all other warranties, express or implied.
Details the proprietary and confidential nature of the unit's software and limited user rights.
Provides a step-by-step procedure for returning a unit for warranty service, including contacting support.
Information on obtaining product repair after the warranty period has expired by contacting Technical Support.
| Power Source | Vehicle Battery |
|---|---|
| OBD II Coverage | Yes |
| ABS Code Reading | Yes |
| Airbag Code Reading | Yes |
| Data Logging | Yes |
| Live Data Stream | Yes |
| Updateable | Yes |
| Printable Data | Yes |
| Device Type | OBD2 Scanner |
| Display | LCD Screen |
| Type | Handheld |
| Usage | Automotive Diagnostics |
| Connectivity | USB |
| Compatibility | OBD II Compliant Vehicles |