Maintenance and Repair
46
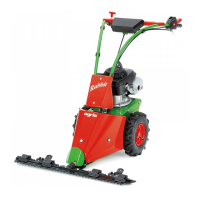
Meadow mower agria 5300
Municipal cutter bar
Switch off the engine
Pull off the sparking-plug connector
Wear protective gloves
Removing the mower knife
• Using the lever provided, lift the
rocker arm off the driver pins (4) and
swing it sideways outside the knife
• Pull out the cutter bar from the
front
• Clean the cutter bar and lightly
lubricate it with organic lubricating
oil
Put down the mower knives only
when they are in the knife protection bar
Installing the mower knives
• The assembly is carried out in re-
verse order
Maintenance
• Lubricate the lubricating nipple (11)
with organic grease after each mow-
ing and/or after the cutter bar has
been cleaned with a water spray,
but at least after every 8 operating
hours.
• With new rocker arm guides, addi-
tionally lubricate once after approx.
1 hour of operation
• After each knife change and after
every 8 hours of operation, apply
some organic grease to the driver
pins (4) of the mower knife
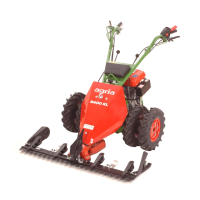
Adjusting the knife guide
• After every 25 operating hours, check the contact pressure of the rocker arms
(approx. 150 N) with a commercially available spring balance
• To increase or readjust the contact pressure of the rocker arms:
- Slightly loosen the 2 fixing screws (7) of the bearing bodies
- Actuate the adjusting screws (8) to adjust to the correct contact pressure of
about 150 N. Subsequently, tighten the 2 fixing screws (7).
- Whenever you loosen the screws (7), make sure that the bearing body (9) is
at right angles to the back of the beam (5)
- Also make sure that the projection of the knife blade tips in relation to the
beam knives is about 4 ... 5 mm in the centre position
• The driver sleeve (3) and/or the driver pin (4) must be replaced if the play be-
tween these two parts is larger than 2 mm or if the driver sleeve (3) comes into
contact with the pin carrier (2)
• When fitting new clamping sleeves (10), make sure that the slots always point
to the outside!
ixing screw