Do you have a question about the AJAX Button and is the answer not in the manual?
Essential preparatory steps before pairing the button with the Ajax hub.
Step-by-step guide for adding the Button device to the Ajax system.
How the Button functions as a panic button for alarms and emergency notifications.
Using the Button to control automation devices via short or long presses.
Instructions for physically mounting the Button using a holder.
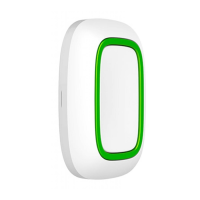
The Ajax Button is a wireless panic button designed to offer protection against accidental presses and to control automation devices. It integrates seamlessly with the Ajax security system and is configured via Ajax apps available on iOS, Android, macOS, and Windows. Users receive alerts for alarms and events through push notifications, SMS, and phone calls, if enabled.
The Button serves two primary functions:
To connect the Button, users must first install the Ajax application, create an account, add a hub, and create at least one room. Before initiating the connection, ensure the hub is active, has an internet connection, is not in armed mode, and is not being updated. Only users with administrative rights can add a device to the hub. The connection process involves clicking "Add Device" in the Ajax app, naming the device, scanning its QR code (or entering it manually), and selecting a room and group. Finally, hold the button for 7 seconds until the LEDs flash green once, indicating successful pairing. The Button must be within the hub's radio communication zone for detection and pairing. The Button operates with only one hub at a time; connecting it to a new hub will stop it from transmitting commands to the old one. Manual removal from the old hub's device list is required.
The Button transmits alarms to users and the security company's CMS when pressed. In Control mode, it allows for the control of Ajax automation devices with a short or long press. Scenarios can be created in the Button settings to bind the action of an automation device (Relay, WallSwitch, or Socket) to a button press.
If the "Mute Fire Alarm" operating mode is selected, pressing the Button can mute fire signals. The system's reaction depends on its settings and current state:
The Button offers protection against accidental presses, configurable in the settings. Options include:
The Button's status is indicated by red or green LED lights.
The Button is designed for versatility. It can be installed on a flat surface (e.g., under a table) using double-sided adhesive tape or carried around. For carrying, a strap can be attached using the mounting hole. To fix the Button on a surface, a Holder (sold separately) can be used, secured with bundled screws or double-sided adhesive tape. The Button has an IP55 protection rating, meaning it's protected from dust and splashes. Its recessed buttons and software protection further help prevent accidental presses.
When connecting the Button via a ReX radio signal range extender, it's important to note that the Button does not automatically switch between the radio networks of the range extender and the hub. Users can manually assign the Button to another hub or ReX in the Ajax app. The Button can transmit alarms up to 1,300 m from the hub, but obstructions like walls or floors will reduce this distance.
The Button can be temporarily deactivated without deleting it from the system. In this state, the device will not execute system commands, participate in automation scenarios, and its panic button function will be disabled.
When cleaning the Button's body, use cleaners suitable for technical maintenance. Avoid substances containing alcohol, acetone, gasoline, or other active solvents, as these can damage the device.
The pre-installed CR2032 battery provides up to 5 years of operation with normal use (one press per day). More frequent use will reduce battery life. The battery level can be checked at any time in the Ajax app. The battery level value updates only after the button is pressed, not on a regular basis. The pre-installed battery is sensitive to low temperatures; if the key fob cools significantly, the battery level indicator in the app may show incorrect values until it warms up. When the battery runs down, users will receive a notification in the Ajax app, and the LED will steadily light up red and go out with each button press.
| Type | Wireless panic button |
|---|---|
| Communication Protocol | Jeweller |
| Power Supply | CR2032 battery |
| Battery Life | Up to 5 years |
| Weight | 16 g |
| Water Resistance | IP54 |
| Number of Buttons | 1 |
| Accidental Click Protection | Yes |
| Transmitter Power | Up to 20 mW |
| Modulation | GFSK |
| Operating Humidity | Up to 75% |
| Ingress Protection | IP54 |
| Communication Range | Up to 1300 meters in open space |
| Operating Temperature Range | From -10°C to +40°C |
| Compatibility | Ajax hubs |
| Alarm Type | Panic |
| Communication Range with Central Unit | Up to 1300 m in an open space |
| Operating Frequency | 868.0–868.6 MHz or 868.7 – 869.2 MHz, depending on the region |