Shaw Almex Industries | 1.800.461.4351 | www.almex.com
11
49900-038
Revised - April 2014
7.1. HEATING THE VULCANIZER
CAUTION: The vulcanizer must be pressurized to at
least 5 psi (0.3 bar) before heating, or damage will oc
-
cur to the connected platen element on the vulcanizer.
7.1.1. AUTOMATIC HEATING
The SG1 can automatically follow a given splice recipe. The
parameters for a splice recipe can be set using two methods:
1. Using the Splice Monitor application on the ALMEXPAD.
2. Using the LCD user interface on the SG1.
To use the AUTOMATIC function, platen switches must be
turned to the AUTO position
OPTION 1
Using SpliceMonitor on the ALMEXPAD
Connect the SG1 to the ALMEXPAD using the USB cable or via
WiFi. On the ALMEXPAD open SpliceMonitor and connect to
the SG1. Set the desired splice parameters for the Dwell, Cure
and Cool phases and start the splice. Please see the ALMEX
-
PAD and SpliceMonitor Operator’s Manuals for more details.
OPTION 2
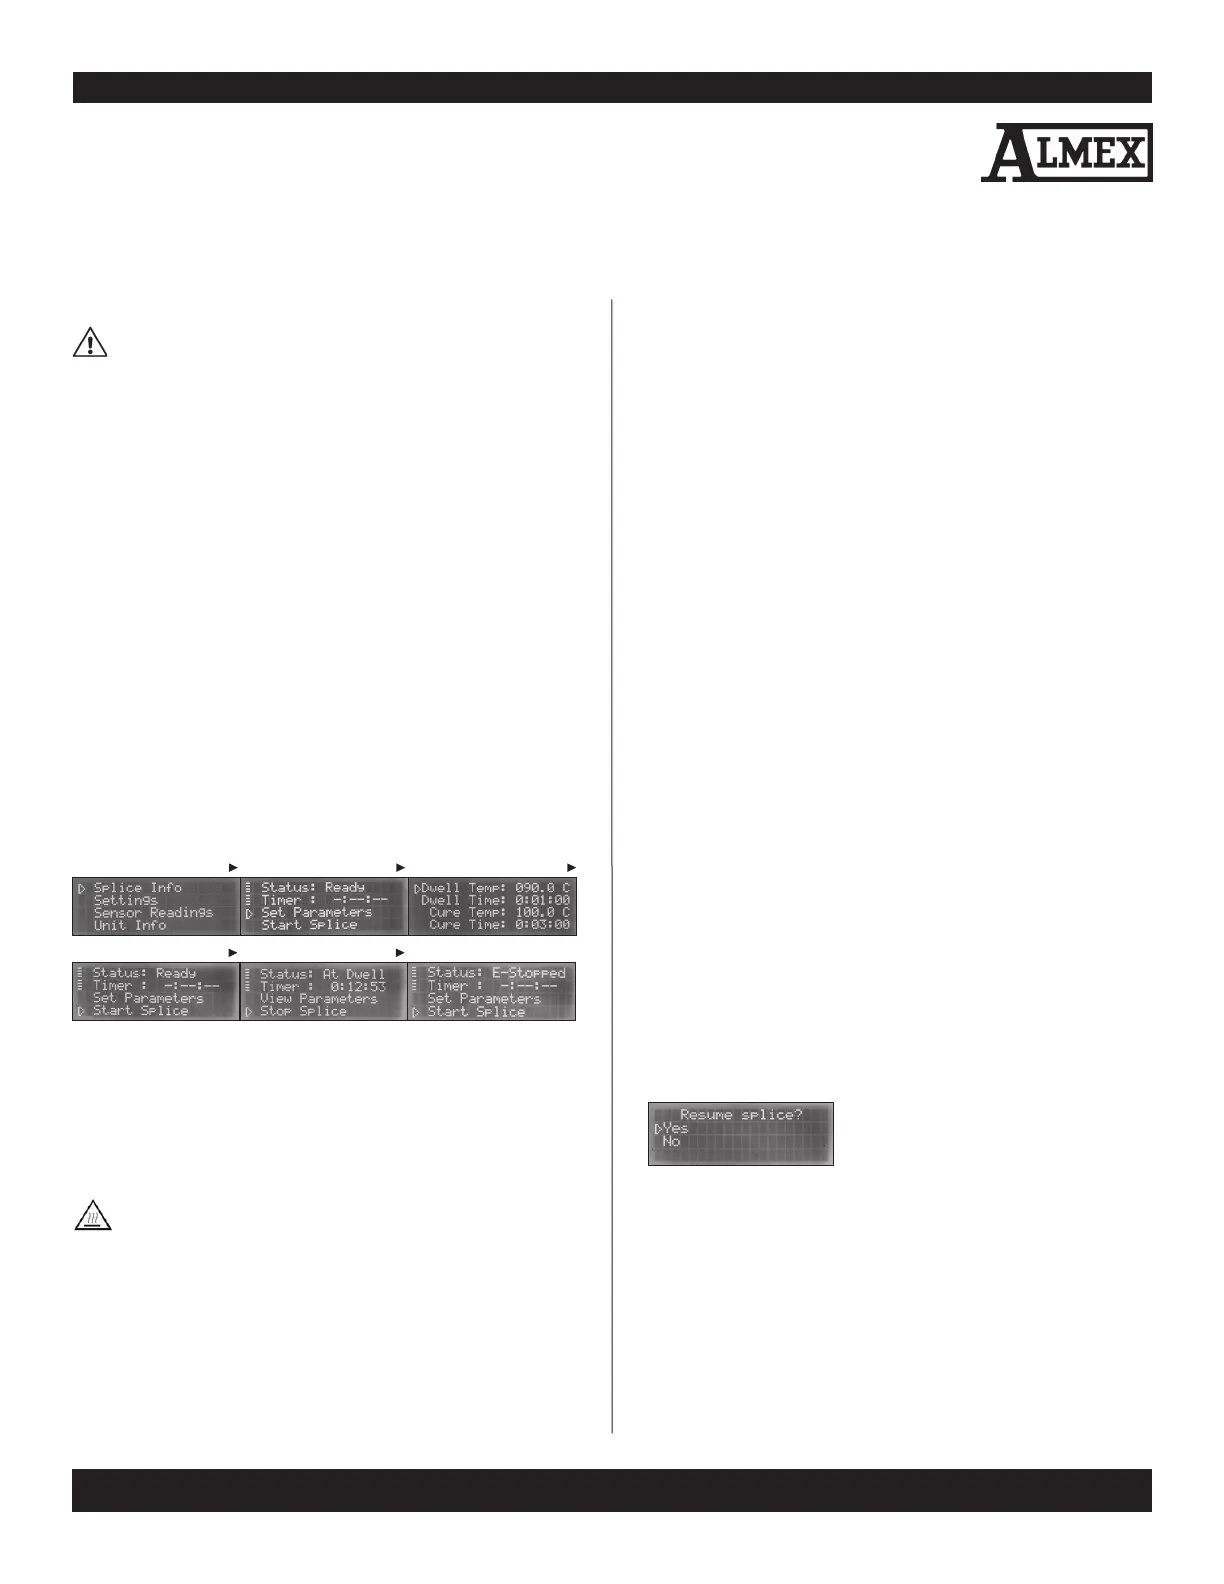
Using the SG1 Front Panel Display
Navigate to the Splice Info submenu using the LCD user inter
-
face, from there, select the Splice Parameters option and set
the desired splice parameters for the Dwell, Cure and Cool
phases. Afterward, from the Splice Info sub-menu, press Start
Splice. (SEE FIGURE 29)
Safety: Once the splice has begun the platens will be
hot to the touch.
When the splice recipe parameters have been chosen and the
“Start Splice” has been selected, the SG1 will begin heating up
in the Dwell Phase.
When the Set Point is reached for each phase, the “Set Point
Reached” LED will illuminate. The SG1 and control tablet will
start timing the dwell and cure period from the time all appli
-
cable platens have reached the Set Point.
When all connected platens reach the Set Point dwell tempera-
ture, the platen begins the “At Dwell” phase. In this phase of op-
eration the SG1 maintains the set temperature for the set time.
Remaining Dwell time can be viewed on the LCD display in the
“Splice Info” menu or on the ALMEXPAD Splice Monitor screen.
When the “At Dwell” phase is completed, the SG1 enters the
“To Cure Temperature” phase and heats up until all platens rise
to meet the Set Point cure temperature. In this phase the SG1
maintains the set temperature for the set time. (See FIGURE 1)
Once the Cure time elapses, the SG1 enters a “Cooling” state.
At this point, operators may pump coolant into the platens to
speed up the cooling phase. After all platens cool below the
Cooling temperature, the splice is complete.
7.1.2. MANUAL HEATING
If there is a temperature controller malfunction or platen tem-
perature sensor failure, the platen can be heated manually by
turning the platen switch to the MANUAL position and holding
it there. (SEE FIGURE 5) When using this function, the platen
temperature should be manually monitored with thermocou
-
ples and/or stem thermometers.
7.1.3. COOLING
Manual cooling must be used with this version of the SG1.
See the User manual for the specific press being used.
NOTE: Automatic cooling is not available at this time.
7.1.4. SPLICE RESUME
In the case of a power failure or interruption, the SG1 can
resume a splice. When the SG1 unit is repowered, the first
screen shown will give users an option to resume the most re
-
cent splice. Selecting “Yes” restores all splice parameters and
continues the splice from the time that the splice was halted.
Select “No” if you wish to start a new splice. (SEE FIGURE 30)
8. Operation with
Multiple SG1s
8.1. DESCRIPTION
Up to four SG1s supporting 16 platens, can be networked to-
gether for the purpose of combining sectional presses to com-
plete one large splice. When networked, SG1s can share sensor
readings and coordinate heating and cooling.
7. Operation
ENTER ENTER
FIGURE 29 - AUTOMATIC HEATING
ENTER ENTER
MENU
FIGURE 30 - RESUME SPLICE

 Loading...