9
15120-101 Rev. D
Unpacking and Installation
Open the outside shipping box and remove the 1.
three (3) inner boxes.
Remove the User's Guide and read it.2.
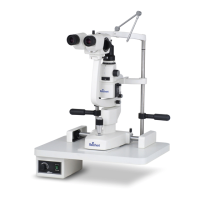
Open the box with the Table Top and Electronics 3.
in it. Refer to Figure SU-1.
Remove the Table Top from the box and install the 4.
Table Top onto the instrument stand and secure
it into place as indicated in the user guide for the
stand.
Open the box with the Chin Rest Assembly and 5.
remove it. Refer to Figure SU-2.
Using the 3mm Hex Wrench, connect the Ground 6.
Wire from the Power Supply to the Chin Rest
Assembly using the Ground Screw provided
(torqueto7.8N•m).RefertoFigureSU-3.
Using the 5mm Hex Wrench, remove the two 7.
Screws from the bottom of the Table Top and
attach the Chin Rest Assembly to the Table Top
using these Screws. Refer to Figure SU-4.
Using the 4mm Hex Wrench, adjust the Patient 8.
Handles by loosening the Allen Cap screws that
are securing them to the Chinrest Posts. Slide the
Patient Handles up or down to the desired height,
and secure them in place by tightening the Allen
Cap Screws. Refer to Figure SU-5.
-continued-
Figure SU-4 Chin Rest Attaching Screws
Screws
Figure SU-1 Table Top and Electronics
Figure SU-2 Chin Rest Assembly
Figure SU-3 Chin Rest Ground
Ground
Screw
Ground
Wire
Figure SU-5 Adjusting Patient Handle Height
Allen Cap
Screws
Move
Handles Up
or Down
Setup (continued)
 Loading...