Viale del Lavoro, 19 37030 Colognola ai Colli (Verona) Italy
Tel. ++39 045 6159411- Fax ++39 045 6159422 - e-mail: info@at-os.com – www.at-os.com
32
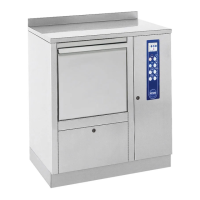
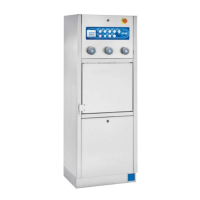
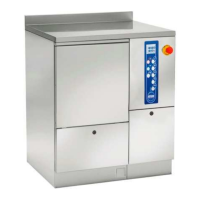
7.3.2 Supply cocks
These must be able to quickly interrupt the water supply pipeline and must therefore consist of a ball valve or a gate valve. They
must also withstand water operating pressures as indicated in the technical specifications form (see page 32).
IF WATER SUPPLY PRESSURE IS GREATER THAN THE PRESSURE INDICATED IN THE TECHNICAL DATA TABLE THEN A
PRESSURE REDUCER MUST BE INSTALLED.
The correct position for the cocks is indicated on the appliance's installation diagram.
The machine also has its own water cocks installed upstream from all the plumbing circuit. These can be used to interrupt the flow
of water when this interruption cannot be performed from the main plumbing plant (meaning upstream from the connection hoses
installed in the rear of the machine and which supply it with water).
7.3.3 Drain
The machine is equipped with a drain trap (Fig. J page IV appendix I), installed inside it and which must necessarily be connected to
the water drain of the building where the appliance is installed. The drain pipeline can be on the floor or in the wall according to the
required solution. Correct sizing and positioning of the drain bell are indicated on the installation diagram. It is the user's task to
perform periodic maintenance on drain pipelines and to check that these are not clogged.
7.3.4 Before positioning the machine check that ….
All the components necessary for installation and correct use of the machine have been installed: main switch, supply cocks, drain
and all else that is necessary. These components must have all suitable and/or necessary characteristics and must also be installed
in the positions indicated on the installation diagram. Use of unsuitable components and/or installations that are different from what
is specified on the installation diagram immediately invalidates guarantee coverage for the appliance.
The characteristics of the electric grid are compatible with the values required for proper operation and which are indicated on the
machine identification plate data and technical specifications form.
There is an efficient ground system to which to connect the machine (according to electrical safety standards).
In case a model AF2.60 is to be installed, it is necessary to check that holes have been made for anchoring the appliance (see
paragraph 7.3.9) and insert the expansion plugs supplied with our anchor kit.
The manufacturer is not responsible for damage caused by incorrect grounding of the
system or by improper electrical supply.
Do not install the machine in the same rooms where patients are lodged. The machine
may heat the room, increase humidity and make bothersome noise.
7.3.5 Connecting up the water supply
If the system has not been used for a long time period or if it is the first time that it is used then it must be purged by running water
into a container or a drain for a few minutes to remove any impurities, air bubbles and/or anything else that could damage the
machine and clog its filters.
Connect the hot and cold water hoses as indicated on the installation diagram and the steam pipe (if the machine takes steam from a
local steam pipeline network). Connect blue flexible pipe with cold water. Connect red flexible pipe with hot water. Ensure that cold
water net temperature is not higher than 45°C otherwise we cannot guarantee correct washing of the articles.
The hot and cold water connections must only supply the bedpan washer they must not supply other appliances. This is necessary to
prevent water from being shunted to other users during the wash cycle, causing a big increase in the time necessary to fill the
storage tank (in this case an alarm will indicate that the maximum time limit permitted for filling the storage tank with water has been
exceeded).
7.3.6 Electrical connection
When making electrical connection DO NOT USE multiple outlet adapters, extension cords or insufficient size cables.
THE POWER CABLE CAN ONLY BE REPLACED WITH ANOTHER WITH CHARACTERISTICS THAT MEET ELECTRICAL
STANDARDS OR THAT ARE FURNISHED (ON REQUEST) BY AT-OS S.r.l.
Connect the equipotential terminal to the machine body according to current electric standards. Be sure to use a cable
with a cross section area between 2.5 mm2 and 10 mm2. The connection must be made to the rear part of the machine at
the symbol indicated here. Correct connection to the electric grid consists in suitably connecting the power cable coming from the
main switch placed in the immediate vicinity of the appliance to the machine itself according to the instructions given for electrical
connections.
7.3.7 Drain connection (wall or floor)
The machine is furnished with a connection bell for connecting the trap to a drain. This connection bell must be cut to the right size
depending on installation requirements (the connection bell may not even be necessary: in this case just insert the end part of the
machine's trap into the drain hole; Fig. J page IV appendix I).