EasyManua.ls Logo

ATOMSTACK MAKER AC1 User Manual

ATOMSTACK MAKER AC1
65 pages
To Next Page IconTo Next Page
To Previous Page IconTo Previous Page
Page #5 background image
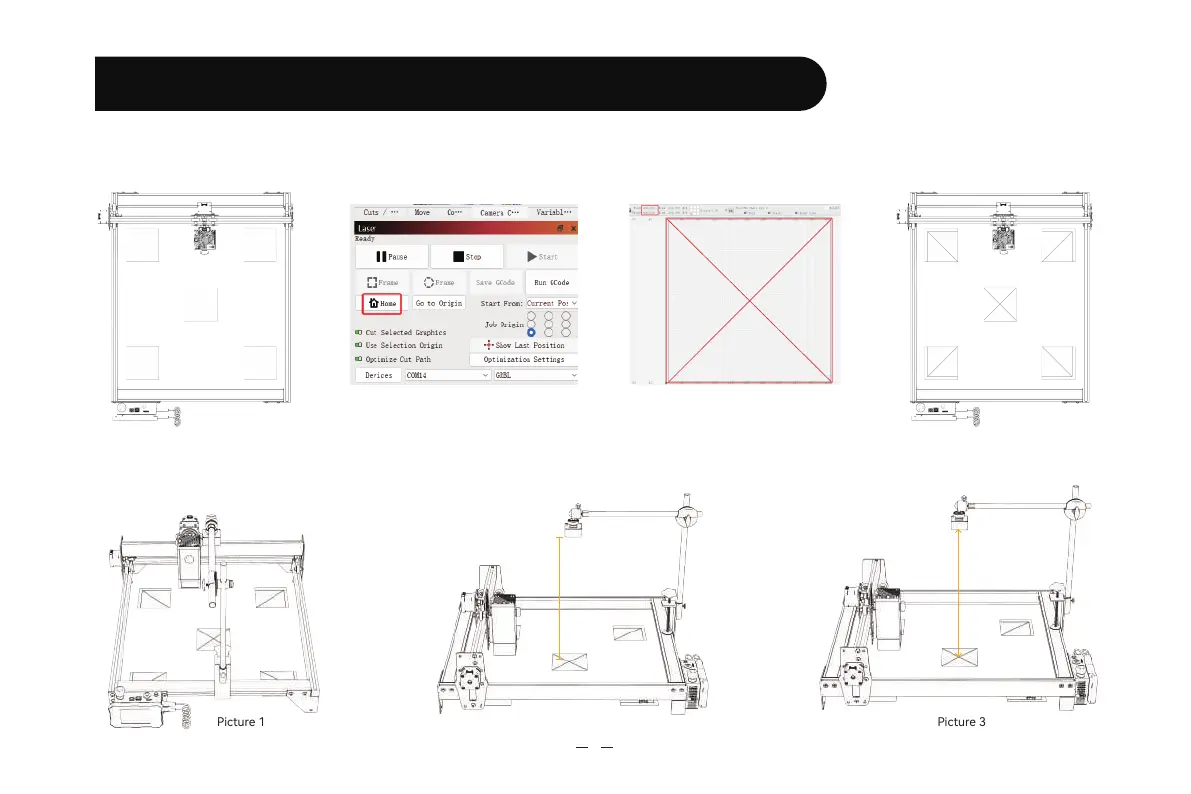
4. Preparation (installation and debugging)
4.1 Place the 100mm*100mm cardboard atly in the working area of the engraving machine, x the focus, and then return the laser to
the origin of the machine to engrave a pattern of 400*400mm.
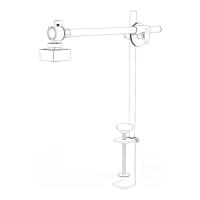
4.2 Fix the assembled camera on the machine (Picture 1), Pay attention to keep the position of the machine and the paper unchanged;
adjust the position of the camera so that the distance between the working plane and the camera lens is 420mm (Picture 2), and make the
center of the camera lens align with the cross position as much as possible (Picture 3).
Picture 1 Picture 2 Picture 3
420mm
4
400*400
Question and Answer IconNeed help?

Do you have a question about the ATOMSTACK MAKER AC1 and is the answer not in the manual?

ATOMSTACK MAKER AC1 Specifications

General IconGeneral
BrandATOMSTACK
ModelMAKER AC1
CategoryEngraver
LanguageEnglish

Summary

Declaration

Precautions

Assembly Steps

Preparation (Installation and Debugging)

Workspace Setup and Test Engraving

Placing material, fixing focus, and engraving a test pattern.

Camera Mounting and Positioning

Mounting the camera and adjusting its distance and alignment.

Calibrate Camera Lens

Camera Calibration Setup and Initiation

Accessing controls, selecting camera, and starting the calibration wizard.

Lens Fine-tuning and Data Capture

Adjusting lens for symmetry and capturing dot card positions.

Calibration Camera Alignment

Navigate to Camera Alignment Tool

Accessing the camera alignment tool within the software.

Configure Alignment Engraving Settings

Configuring speed, power, and scale for alignment engraving.

Perform Collision Check and Mark Positioning

Performing a frame test and creating a positioning mark.

Mark Alignment Points and Finalize

Marking reference points and updating the camera overlay.

How to Use Positioning

Material Placement and Laser Homing

Placing material, returning laser to origin, and positioning pattern.

Set Engraving Parameters and Start Job

Configuring job parameters and initiating the engraving process.

Review Engraving Outcome

Displaying the outcome of the completed engraving.

How to Record Video

Manage Camera within Software

Turning off the camera within the software interface.

Optimize Windows Video Recording Settings

Adjusting camera resolution for video recording on Windows.

Video Recording Best Practices

Guidance on recording duration and recommended software.

Related product manuals