Section 2: Installing the AXIS 200
AXIS 200 User’s Manual
16
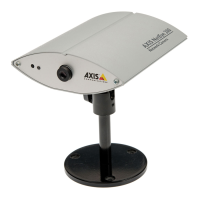
Stage 6. Adjusting the Focus
The AXIS 200 has a lens with rotational focus control. To obtain a
sharp picture, adjust the focus of your AXIS 200 by carefully turning
the lens. A white spot on the lens assembly indicates the approximate
focus position for the unit, when adjusted to a 12
o’clock position.
You can test the results of the adjustments you have made by taking
some new pictures. To do this, simply reload your Web browser. If
you are using Netscape Navigator, you can simultaneously monitor
the changes to focus by clicking on the
Server push
link within the
Home Page.
Notes:
❏ To correctly set the focus, you might need to turn the lens one or
two full turns either clockwise or anticlockwise from the 12
o’clock position.
❏ The lens assembly rotates on a conventional screw fitting and may
be completely removed if taken to the end of its thread. You
should not normally require to remove the lens, but should you
have cause to do so, take care not to let any debris enter the lens as
this will adversely effect the quality of your picture snapshots.
Front view
The installation is now complete and pictures may now be included
into your own applications.
Note:
❏ To avoid the occasional loss of snapshot images, we suggest that
you use the CRON script facility described in “CRON Script” on
page 39.
White dot
(focus position)
Camera lens
(with rotational focus control)