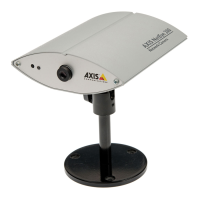
AXIS 200
User’s Manual Section 2: Installing the AXIS 200
13
Stage 3. Connecting the AXIS 200 to your Network
To connect your AXIS 200 to the network, follow the step-by-step
instructions below:
1. Note the serial number of your AXIS 200 for future reference
during the installation procedure. This is located on the underside
label of the AXIS 200. Please note that the serial number of your
AXIS 200 is identical to the Ethernet address of the unit.
2. Fasten the AXIS 200 to its tripod and position it appropriately for
your application.
Caution!
❏ Please note that the CCD (charged coupled device) within the
AXIS 200 can become permanently damaged if the camera lens is
exposed to too much direct sunlight! If your application demands
prolonged exposure to sunlight, you should consider the purchase
of a visor. Refer to the following link for further information:
http://www.axis.com/products/camera_servers/applic/housing.
htm
3. Connect your AXIS 200 to the network using an Ethernet 10baseT
connector.
4. Connect the power supply to the AXIS 200.
5. Check that the Power indicator is constantly lit.
Stage 4. Assigning an Internet Address and Host Name
Assign and download an Internet address and Host name for your
AXIS 200. Refer to Section 3 - Assigning an Internet Address.