Chapter 4: Wall Mounting an Axon Dock 15
TASER Axon Dock Installation Manual
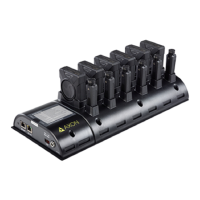
Dimensions for an Axon Dock with a 6-Bay for Axon Flex 2 Systems
Note: All dimensions are in inches (and centimeters).
You can use the overall size of the wall mount bracket to determine the spacing and t between mul-
tiple assemblies. The power input and Ethernet input are also shown above.
Step 1: Preparation
1 Ensure that you have all necessary hardware and cables required to complete the installation.
2 Read all of the manufacturer’s installation instructions for both the dock and the Wall Mount
Bracket.
3 Decide if you will leave the cables showing or hide them in the wall behind your dock.
Step 2: Attach the Dock to the Wall Mount Bracket
1 Place your dock on the Wall Mount Bracket.
2 Align the holes of the core unit with the holes on the bracket.
3 Use the screws provided in the dock wall mount kit to attach and mount the core portion of the
dock to the bracket.
4 Use the screws, washers, and wing nuts to mount the opposite end bay portion to the bracket.
5 Put the screws through the furthest set of mounting holes in the bay (making sure the core and
bays are securely mated together).
6 As the screws come out the back of the bracket, attach the washers and add the wing nuts.
7 Conrm that the core and bay units are securely mated.
8 Finish tightening all of the screws.
Step 3: Identify Dock Placement
Determine the best wall location for mounting the dock.
1 Look for a location away from heat sources and direct sunlight that does not obstruct move-
 Loading...