Fig. 104
Fig. 105
B.
Attach rear panel to each side panel with
10-32 X 3/4" screws.
NOTE: If clearance is a problem, don't install the rear
panel, set hood with side panels in place first.
C. Apply gray NSF listed silicone around face
of overpressure duct.
Fig. 106
D.
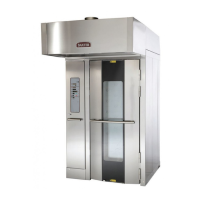
Set hood in place on top of oven.
Fig. 107
E. Ensure hood support bracket sets on front
top edge of oven.
F. Ensure bottom edge of hood is aligned with
bottom edge of oven support.
Fig. 108
G. Secure
side panels with #10 Tek screws into
top of oven.
H. If not attached in previous steps, attach rear
panel of hood.
I. Secure hood support bracket to top of oven
with #10 Tek screws.
INSTALLATION INSTRUCTIONS OV500-EE SERIES GAS RACK OVENS AND OV500 SERIES ELECTRIC RACK
OVENS - INSTALLING OVEN
F45469 Rev. D (1019) Page 40 of 49
 Loading...