10 Introduction
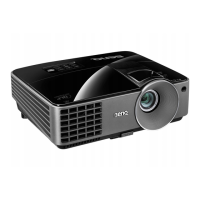
Remote control effective range
The remote control must be held at an angle within 30 degrees perpendicular to the projector's IR
remote control sensor(s) to function correctly. The distance between the remote control and the
sensor(s) should not exceed 8 meters (~ 26 feet).
Make sure that there are no obstacles between the remote control and the IR sensor(s) on the
projector that might obstruct the infra-red beam.
7. OK
Confirms the selected On-Screen Display
(OSD) menu item.
Enters the next level of OSD menu.
8. AUTO
Automatically determines the best picture
timings for the displayed image when PC signal
(analog RGB) is selected.
9. MENU
Displays or exits the On-Screen Display
(OSD) menu.
10. Source selection button: PC 1
Selects PC 1 input source for display.
11. FREEZE
Freezes the projected image.
12. PAGE+/PAGE-
Page up/down arrows when connected
through USB mini-B to a PC.
Operate your display software program (on a
connected PC) which responds to page
up/down commands (like Microsoft
PowerPoint).
13. PICTURE MODE
Selects the picture mode.
14. 3D SETTINGS
Activates the 3D On-Screen Display (OSD)
menu item.
15. ASPECT
Selects the display aspect ratio.
16.
Toggles projector audio between on and off.
17. ZOOM+/ZOOM-
Magnifies or reduces the projected picture
size.
18. Volume keys /
Decreases or increase the projector volume.
19. SMART ECO
Displays the Light Mode menu for selecting a
suitable lamp operating mode
20. INFO
Displays the projector information menu.
21. QUICK INSTALL
Displays the QUICK INSTALL menu
including Projector Installation, Test Pattern,
and Keystone.
• Operating the projector from
the front