My BERNINA
41
BERNINA SEWING MACHINE WORKBOOK
MULTI-DIRECTIONAL STITCHING
• Select the stitch, then Information (“i”), then the multi-directional icon.
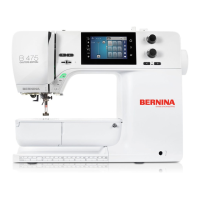
• Rotate the selected stitch in 45º increments by touching one of the direct-selection nodes on the screen (indicated by the
yellow outlines in the graphics below).
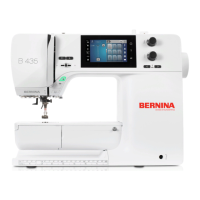
• Rotate in 0.5º increments by turning the stitch width knob.
• Rotate in 1º increments by turning the stitch length knob.
• The Stitch Altering Area indicates the sewing direction of the stitch and the Start (•) and Stop (+) points of the selected
stitch.
• The Multi-directional function only appears in the "i" menu when the selected stitch can be sewn in multiple directions.
Keys to Successful Multi-Directional Stitching
• Support fabric with stabilizer.
• Attach Slide-on Table.
• Draw parallel guidelines to aid in visually keeping the fabric straight.
• Use ngertip guiding (lightly holding the fabric without inhibiting or helping it).
• Attach Sideways Motion Foot #40C.
Stitch width
knob--0.5º
increments
Stitch length
knob--1º
increments
B 880 PLUS, 790 PLUS Only
The B 880 PLUS and B 790 PLUS can sew Multi-directional stitches and stitch combinations in
360º. This allows
angled sewing without angling the fabric. Use Sideways Motion Foot #40C for all multi-directional sewing.
HOW
Do you know:
• How to guide the fabric for Sideways
Motion?
• Three ways to set the angle?
DIRECTIONAL SEWING-Single Mode, Single Direction
1. Select Stitch #644. Select the "i" menu.
2. Select the Multi-Directional Sewing icon; set the angle to 135º.
3. When sewing this stitch, let the feed dog move the fabric
sideways to stitch the programmed pattern.
4. Select Pattern End to nish.