•
ADVANTAGES AND
PRINCIPLE
Cooking in the “AUTO COOK” mode
MUST START WITH THE OVEN
COLD; waiting until the
oven cools down completely is
recommended
before starting a second cooking cycle in the
same mode (if not, “ ” and cooking time flash in the display, “AUTO” scrolls across the
display and
a
series
of
beeps prevents
you from starting
another
cooking cycle).
With the “AUTO COOK” function, you no longer have to select the
temperature
and cooking
time.
These
two
parameters
are
automatically
calculated by your oven in order to give you optimal
cooking.
The “AUTO COOK”
cooking
mode
works in two phases:
1) The
first
phase (acquisition)
during which the
oven
will
use
its
electronic sensors
to record the
specific cooking
data
for your dish.
This phase
is
represented
by in the right side of the
display
with
animated
“ ”.
This
can last 5 to
40 minutes depending
on the dish.
DO NOT OPEN THE DOOR DURING THIS PHASE
or you
may
disturb the recording of data.
2)
During the second phase
(calculation),
the oven
determines
the
necessary
cooking time.
“AUTO”
scrolls across the
display. The oven indicates
the
remaining
cooking time as well as the
actual
time that cooking will be
finished. You
can open it if you
want
to do
something
to the food
(basting, flavouring,
etc).
3) When
the cooking
finishes,
it starts to beep.
•
USE
MODES
Immediate
cooking:
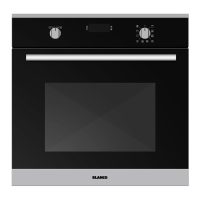
1. Press
the
“AUTO COOK”
button.
2.
Scroll through the
symbols
by
pressing
the “
+
” button to
select
your dish (fig.1).
Press
the
START
button to validate.
fig.1
Place
it in the
oven
on the
shelf
support
level recommended
in the display.
Close
the door.
The oven begins
cooking.
The data search phase begins, as symbolised
by the
animation
in the
display:
a time is
suggested. When
cooking is
complete,
the
oven emits several
beeps.