24
INSTALLATION
The appliance must be installed by qualified staff working in accord-
ance with the regulations in force. Before installing, ensure that the
appliance is correctly preset for the local distribution conditions (gas
type and pressure). The presettings of this appliance are indicated on
the nameplate shown on the cover. This appliance is not connected
to a flue gas extractor device. It must be installed and connected in
accordance with the regulations in force. This appliance may only
be installed and may only operate in rooms permanently ventilated
in accordance with national regulations in force.
SAFETY CHAIN
! In order to prevent the appliance from overturning acci-
dentaly, for example in case of a children climbing onto the
oven door, the safety chains MUST be installed !
The cooker is provided with safety chains that must be fixed with
a screw (not supplied as accessory) on the wall behind the appli-
ance, at the same height as the fixing point on the appliance.
Make sure that the chains are fixed in the back of the cooker, as
shown in the fig. 20, in such way to be tight and parallel to the
floor.
! When the installation process is complete, the chains must be
kept in tension!
VENTILATION
The rooms in which gas appliances are installed must be well venti-
lated in order to allow correct gas combustion and ventilation.
The air flow necessary for combustion is at least 2 m
3
/h for each kW
of rated power.
VENTILATION OF FOOD WARMER WITH GAS OVEN
Dripping pans, saucepans and other large items which may interfere
with the ventilation required by the oven burner should not be placed
in the food warming section
POSITIONING
Remove the packaging accessories, including the films covering the
chrome-plated and stainless steel parts, from the cooker.
Position the cooker in a dry, convenient and draft-free place. Keep at
an appropriate distance from walls which may be damaged by heat
(wood, linoleum, paper, etc.).
The cooker may be installed alone or between two kitchen units; in
this case, the sides of the units must withstand a temperature of 100
degrees C and they must not be higher than the cooker hob.
FITTING THE FEET (LEVELLING)
Cookers are equipped with adjustable feet to be screwed into their
front and rear corners respectively. The feet allow the height of the
appliance to be adjusted, in order to set it flush with the adjoining
unit, to level it with other worktops and to ensure even distribution of
the liquids in pans. See fig. 3.
BALANCING THE LID
Models equipped with plate glass lids are fitted with special balanced
springs. These are fitted into the hinge to provide smooth, gentle lid
closure.
FITTING OVEN DOOR HANDLE
- fully open the door.
- apply gentle leverage with the handle of a fork or spoon in the
three recessesi on the upper of the inside of the door, one at a
time.
- once released from the three springs, the glass can be extracted
from the lower seat of the inside of the door.
- Fix the handle using the 2 screws provided. See fig. 4.
After fitting oven door handle, repeat the same procedure in re-
verse order.
- fit the glass into the lower seat of the inside of the door.
GB
EQUIPMENT
All models are equipped with safety device for oven and grill burners.
Depending on the models, cooker may also have:
- Safety device for one or more hob burners
- Electric ignition on top burners
- Electric ignition on oven and grill burners
- Oven thermostat
- Electric oven lighting
- Rotisserie
- Grill burner
- Mechanical timer
- Electronic timer
For the LAYOUT OF HOB BURNERS see the models illustrated in
figure 1 at the back of this manual.
For the ELECTRIC WIRING DIAGRAM see figure 2 at the back of
this manual.
The electrical power is stated on the nameplate visible inside the
warming compartment (if present) or on the back of the cooker.
A copy of the nameplate is glued to the cover of this manual.
Useful information concerning the energy consumption of
electric ovens.
This information completes and expands on the figures provided
on the technical data sticker supplied with the instruction manual.
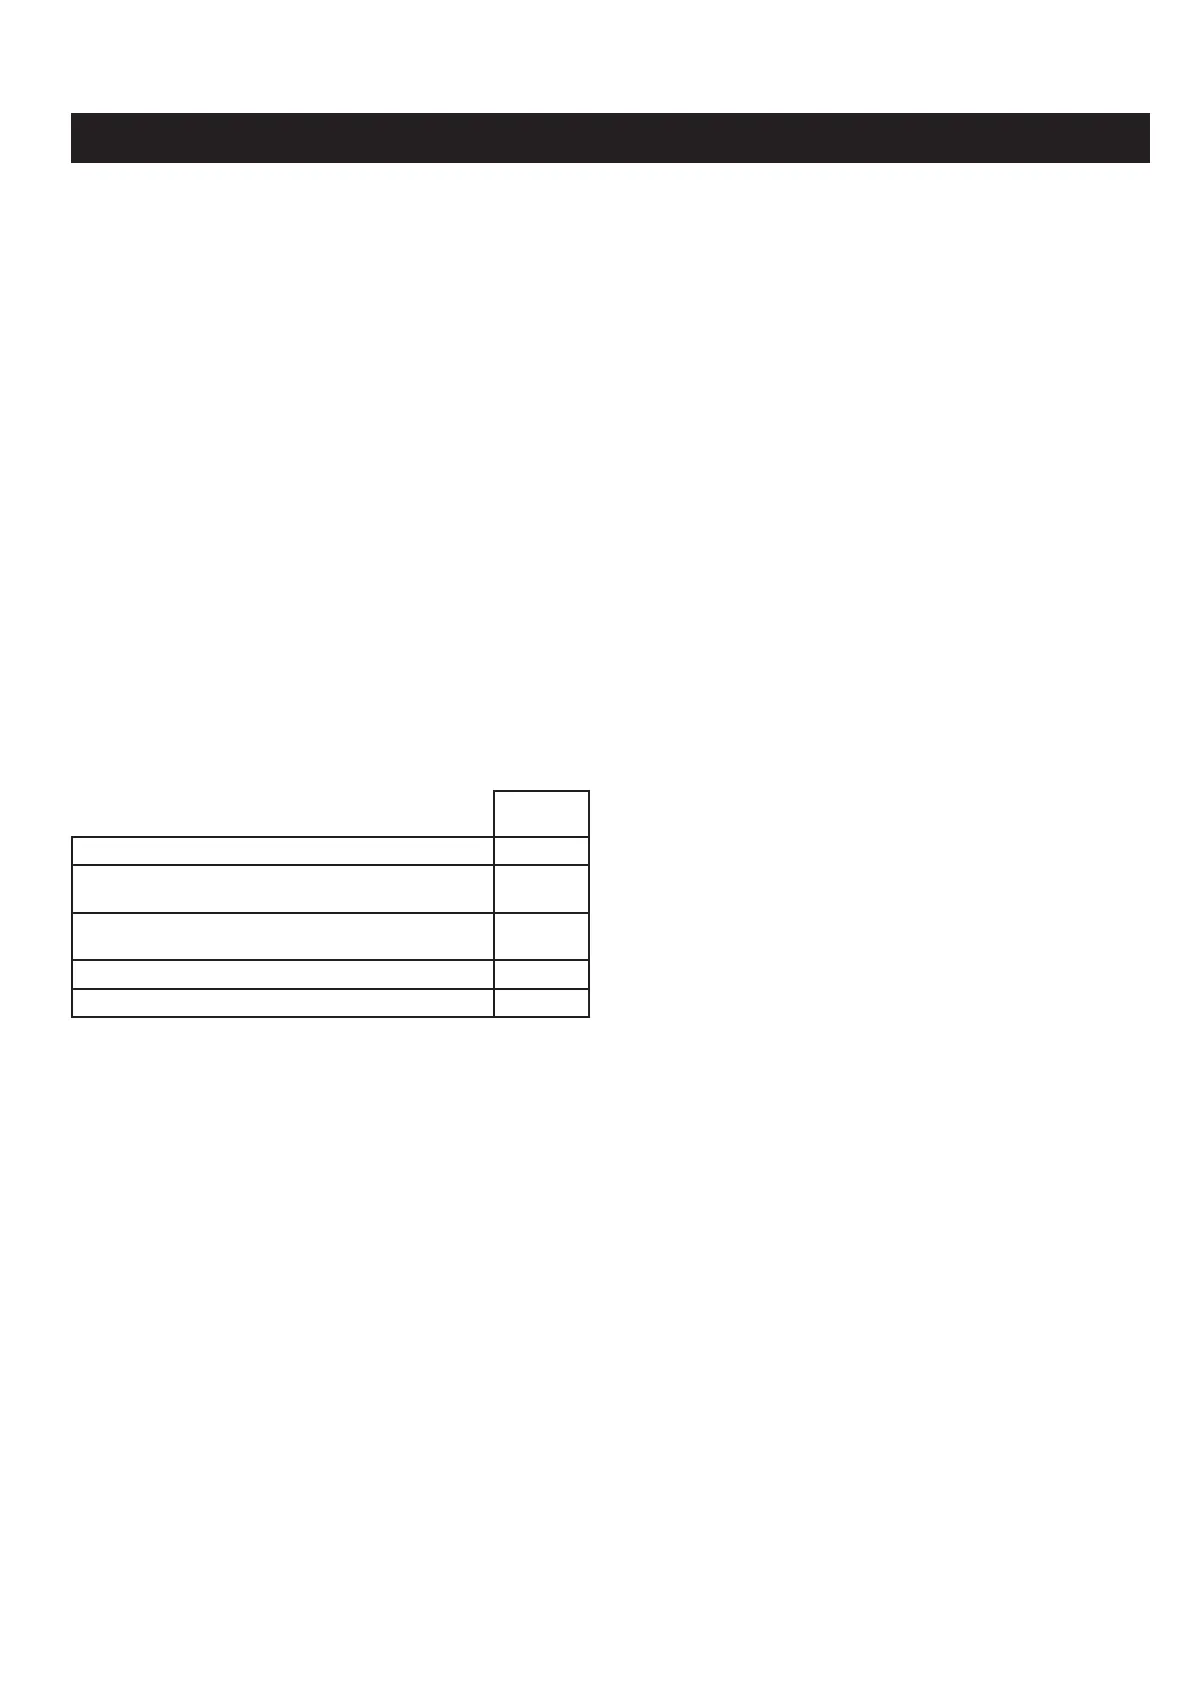
Cooker 96N
Multifunction
EU environmental quality mark No
Time required to cook a normal load in conventional
mode in minutes.
61,6
Time required to cook a normal load in fan mode in
minutes
81,6
Power consumption in stand-by setting in Watts. ...
Usable area of the dripping pan in cm
2
2729
Installation