1 689 975 254 2014-01-14| Robert Bosch GmbH
24 | CRR 120 | CRR 120 designen
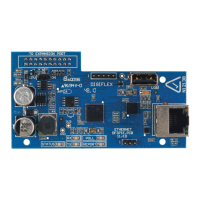
5.4 Terminal strip X1
Fig. 6: CRR 120 electrical connection, terminal strip X1
1 Row 1
2 Row 2
3 Row 3
4 Link
No. Row 1 Cable color Row 2 Link Row 3 Cable color
1
2 Pressure switch, mechanical Brown 24 V from fuse F1
3 Protective conductor, supply, back
of housing
Green/yellow
4 Pressure switch, mechanical Blue
5 Pressure switch, mechanical White
6 Pressure switch, mechanical Black 24 V
7 Pressure sensor, electr. 24 V, Pin 1 Brown Display module +24 V 24 V EDO2 24 V Brown
8 Potentiometer P1, start (3) Potentiometer P2, start
(3)
EDO2 10 V off Black
9 Switch com EDO2 setpoint White
10 Protective conductor, cover Green/yellow EDO2 protective con-
ductor
11 Pressure sensor, electr. 0 V, Pin 3 Blue Display module +0 V 0 V EDO2 0 V Blue
12 Potentiometer P1, end (1) Potentiometer P2, end
(1)
0 V 0 V from negative con-
nection
Blue
13 Display module signal - 0 V
14 Potentiometer P1, wiper (1) Switch NC
15 Switch NO Potentiometer P2, wip-
er (2)
16 Pressure sensor, electr. signal, Pin 4 Black Display module signal +
17 Pressure sensor, electr. not used,
Pin 2
White
18 Pressure sensor, electr. protective
conductor
Green/yellow Protective conductor,
front panel
Protective conductor,
base plate
Green/yel-
low
Fig. 7: CRR 120 terminal strip X1_terminal assignment
 Loading...