32/52 Assembly
BoschRexrothAG, H-4WEH...XE..., RE24751-XE-B/10.19
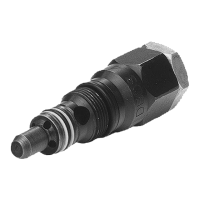
Fig. 5: Stripping lengths
L1 Stripping length of the cable sheath and simultaneously resulting length of the individual
conductor for the connection of the protective grounding conductor
L2 Length of the individual conductors of the voltage supply
L3 Stripping length of the insulation of the individual conductor for the attachment of the wire
end ferrules
L4 Stripping length of the individual conductor for protective equipotential bonding (PE)
(internal)
Table 10: Stripping lengths
Cable and line entry position Length L1
[mm]
Length L2
[mm]
Length L3
[mm]
Length L4
[mm]
Page manual override ≧ 44 24 5 +1 5.5 ±0.5
Page valve housing ≧ 84 64 5 +1 5.5 ±0.5
4. Disassemble the screw-in bushing and the clamping screws of the strain relief.
5. Ensure the correct seat of the seal insert in the double nipple.
6. Assemble the screw-in bushing (4) to the connection line and insert it through
the seal insert (3) and the double nipple (2) in the terminal box.
The outer sheath of the connection line must lie in the seal insert (3). Otherwise,
explosion protection and the IPprotection are no longer ensured.
7. Screw the screw-in bushing(4) to the double nipple(2) and tighten it securely
(hexagon nut, wrench size22). When tightening the screw-in bushing(4), the
solenoid coil must be supported in an appropriate manner or held up at the
double nipple(2) using an open-end wrench (wrench size46). The required
tightening torque depends on the line diameter.
8. Securely tighten the clamping screws of the strain relief (5).
9. Guide the individual conductor into the connection terminal and screw this into
place with the clamping screws.
Tightening torques for the clamping screws:
Table 11: Tightening torques
Operating voltage connection 0.4...0.5Nm
Connection for protective grounding conductor 1.0...1.2Nm
Connection for potential equalization conductor 2.0...2.4Nm
10. Assemble the cover with the sealing device underneath.
Tighten the mounting screws with their spring washers diagonally, one after the
other. Tightening torque of the cover screws: 1...1.1Nm.
L1
L2
L4
L3
 Loading...