EasyManua.ls Logo

BRAND HandyStep electronic - User Manual

BRAND HandyStep electronic
56 pages
Print Icon
To Next Page IconTo Next Page
Loading...
Gebrauchsanleitung
Bitte vor Gebrauch sorgfältig
lesen und alle Bedienungs- und
Sicherheitshinweise befolgen!
Mode d‘emploi
Veuillez lire attentivement avant
utilisation, et suivre toutes les ins-
tructions d’emploi et de sécurité.
Operating Manual
Please read carefully before use,
and follow all operating and safety
instructions!
Instrucciones de manejo
Por favor leer cuidadosamente antes
de la utilización y seguir todas las
normas de manejo y de seguridad.
您可在www.brand.de/cn/manuals
下载本产品的中文操作手册。
BRAND. For lab. For life.
HandyStep
®
electronic

Table of Contents

Questions and Answers

  • L
    lcolonAug 13, 2025
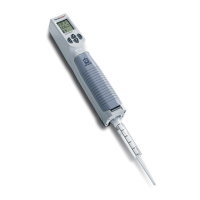
    What to do if the battery indicator is flashing on my HandyStep® electronic?
    • B
      Barbara MorrisAug 13, 2025
      If the battery indicator is flashing on your HandyStep® electronic, it likely means a new battery unit has been installed or the existing one has been reinstalled. To resolve this, charge the battery unit for a minimum of 3.5 hours while it is inside the HandyStep® electronic.
  • D
    dana45Aug 16, 2025
    What to do if the HandyStep® electronic action is interrupted and shows an incomplete volume was dispensed?
    • P
      Patrick MitchellAug 16, 2025
      If the dispensing action on your HandyStep® electronic is interrupted, it may be due to pressing the button during dispensing or an electronic malfunction. To resolve this, first, press ENTER to acknowledge the error. Then, press STEP to initiate a new dispensing step.
  • J
    James MooreAug 20, 2025
    What to do if my BRAND HandyStep electronic Laboratory Equipment has no sound or light when placed on the charger?
    • V
      Victoria PhillipsAug 20, 2025
      If your BRAND Laboratory Equipment doesn't produce a sound or light up when placed on the charger, it could be due to several reasons: no battery unit is installed, the battery unit isn't correctly installed, or the battery unit is defective. To address this: - Install a battery unit. - Ensure there's a proper connection between the battery unit's contacts and those inside the device. - Replace the battery unit if necessary.
  • M
    Mark GomezAug 25, 2025
    Why is my BRAND HandyStep electronic not responding?
    • T
      Tony MooreAug 25, 2025
      If your BRAND Laboratory Equipment is not responding, it could be due to an electronic error or the tip connector not being in the lowest position for changing the tip. First, press ENTER to confirm the error. Follow the on-screen instructions, which may include a reference run (rEF). If prompted for a reference run, press the STEP button, noting that any remaining liquid in the tip will be expelled. Collect the liquid in a suitable container. If the issue persists, try removing and reinserting the battery unit to reset the device. If the problem continues after these steps, the device may require repair.
  • V
    Vanessa OdomAug 28, 2025
    What to do if the dispensing action is interrupted on my BRAND Laboratory Equipment?
    • R
      rachel26Aug 28, 2025
      If the dispensing action is interrupted and a partial volume has been dispensed, the cause may be due to pressing the button during dispensing or an electronic disturbance. To resolve this, press ENTER to confirm the error, then press STEP to execute a new dispensing step.
  • W
    walterlindsayAug 31, 2025
    What to do if my BRAND Laboratory Equipment does not respond?
    • B
      Briana RamirezAug 31, 2025
      If your BRAND Laboratory Equipment is unresponsive, it could be due to an electronic error or the tip connector not being in the lowest position for changing the tip. First, press ENTER to confirm the error. Then, follow the on-screen instructions. If the display shows 'rEF' (Reference run), press the STEP button. Be aware that any remaining liquid in the tip will be expelled during the reference test; purge the liquid into a suitable container. If there is no change, remove and reinsert the battery unit to reset the device. If the alarm persists, the device may need repair.
  • G
    griffithstephanieSep 4, 2025
    Why is there no beep or light when my BRAND Laboratory Equipment is on the charger?
    • M
      montgomeryallisonSep 4, 2025
      If there's no beep or light when your BRAND Laboratory Equipment is placed on the charger, it could be due to the following reasons: - No battery unit installed in the device. - The battery unit is not installed correctly. - The battery unit is defective. To solve this: - Install a battery unit. - Ensure there is a connection between the contacts of the battery unit and those in the device. - Replace the battery unit.
  • A
    Alexandria MooreSep 8, 2025
    How to fix a flashing battery indicator on BRAND Laboratory Equipment?
    • C
      christopher79Sep 8, 2025
      If the battery indicator is flashing on your BRAND Laboratory Equipment, it likely means a new battery unit has been installed or the current one was removed and reinstalled. To resolve this, charge the battery unit for a minimum of 3.5 hours inside the HandyStep® electronic.

Summary

Safety Instructions

Purpose of the HandyStep electronic

Limitations of Use

Operating Exclusions

Operating Elements Overview

Initial Operation and Battery Pack Insertion

Inserting the Battery Pack

Instructions for opening the battery compartment and inserting the battery pack.

Charging the Battery Pack

Charging Inside the HandyStep electronic

Procedure for charging the battery pack while it is inside the instrument.

Charging the Battery Pack in the Charging Dock

Procedure for charging a separate battery pack using the charging dock.

Replacing the Battery Pack

Switching the Instrument On and Off

Inserting Dispenser Tips

Removing Dispenser Tips

HandyStep electronic Functions

Dispensing (DISP Mode)

Default mode for dispensing a user-defined volume.

Automatic Dispensing (AUTO-DISP Mode)

Automatic dispensing by holding the STEP key, with a learning function.

Pipetting (PIP Mode)

Mode for positive displacement, non-repeating pipetting.

Aspirating Sample

DISP Mode Operation

AUTO-DISP Mode Operation

PIP Mode Operation

Adjusting STEP Volume

Adjusting Aspiration and Dispensing Speed

Changing Operating Mode

Using Compatible Dispenser Tips

Residual Stroke Functionality

Non-Contact Dispensing

Restoring Default Settings

Troubleshooting Guide

Tip Dripping Issues

Addressing issues where the dispenser tip may be leaking.

Instrument Not Responding (ERR 001)

Troubleshooting ERR 001, often related to battery or locking lever.

Instrument Not Responding (ERR 002)

Troubleshooting ERR 002, potentially due to motor blockage or low battery.

Instrument Not Responding (ERR TIP)

Troubleshooting ERR TIP, related to locking lever or tip insertion.

Instrument Not Responding (ERR 003)

Troubleshooting ERR 003, possibly due to electronic faults or tip connector.

No Acoustic Signal; Low Battery Indicator

Addressing lack of signal or light during charging.

Dispensing Process Interrupted (ERR VOL)

Troubleshooting interrupted dispensing due to key press or faults.

Technical Data

Battery Pack Specifications

Details on the rechargeable NiMH battery pack.

Battery Pack Charging Times

Information on charging duration for the battery pack.

Battery Pack Capacity and Runtime

Information on the battery pack's capacity and continuous work time.

Accuracy Table

Ordering Data

Precision Dispenser Tips

Maintenance and Cleaning

UV Sterilization Compatibility

Information on the instrument's resistance to UV sterilization.

Return for Repair Instructions

Contact Addresses

Calibration Service Information

Warranty Information

Disposal Guidelines

Menu Level 1 Navigation

Default Operating Mode

Setting the instrument to the default mode.

Adjusting STEP Volume

Procedure for modifying the volume dispensed per step.

Selecting AUTO-DISP Mode

Procedure for activating the automatic dispensing mode.

Menu Level 2 Navigation

Adjusting Aspiration Speed

Procedure for adjusting the sample aspiration speed.

Adjusting Dispensing Speed

Procedure for adjusting the sample dispensing speed.

Selecting DISP-PIP Mode

Procedure for switching between DISP and PIP modes.

BRAND HandyStep electronic Specifications

General IconGeneral
BrandBRAND
ModelHandyStep electronic
CategoryLaboratory Equipment
LanguageEnglish

Related product manuals