AMETEK Brookeld Page 10 Manual No. M15-356-B0916
I.5 Installaon
Note: “IQ, OQ, PQ”, an abbreviated guideline document for installation,
operation and performance validation for your DVE digital viscometer
can be downloaded from our website www.brookfieldengineering.com.
A more detailed IQ,OQ,PQ procedure is available for purchase from
AMETEK Brookfield or your local authorized dealer.
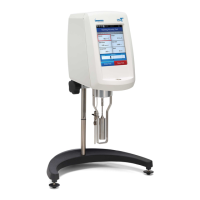
1. To assemble the Model A Laboratory Stand, place the upright rod into the base on a clean,
dry and vibration-free surface (refer to assembly instructions in Appendix G).
2. Insert the mounting rod on the back of the DVE Viscometer into the hole on the clamp
assembly (refer to Appendix G). Center the bubble level from le to right before tightening
the clamp.
3. e Viscometer must be leveled. e level is adjusted using the three leveling screws on the
base. Adjust so that the bubble level on the front of the DVE is centered within the circle.
Note: Check level periodically during use.
4. Remove the shipping cap from the pivot cup. is cap is designed to protect the Viscometer
spindle coupling nut during shipment. Do not attempt to operate the Viscometer with the
shipping cap in place! Save this cap for future use.
5. Plug the metal jack of the power supply into the circular receptacle on the back of the
Viscometer. Screw the threaded collar on the metal jack securely to the threads of the
receptacle. Connect the power cord to the socket on the power supply and plug it into the
appropriate power source. (Refer to Figure I-3.)
6. Optional: Install the screen protector (Part No. DV-1404) per the instructions on the
package. Additional installation help can also be found on our YouTube channel:
www.youtube.com/user/BrookfieldEng
Note: Must be used with the AV-6 power supply. Alternative power
sources may cause damage to the instrument electronics.
Note: e AV-6 must be earth grounded to maintain compliance with
electrical certications.
Note: e AC input voltage and frequency must be within the
appropriate range as shown on the nameplate of the power
supply (see Section I.2).