10
Replacing the seal set
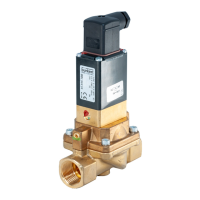
Type 2000, 2002, 2012
5 REPLACING THE SEAL SET
Concerns valves withoutidentication“R”intheactuatorsizes:C(40mm),
D(50mm),
E(63mm),
F(80mm),
G(100mm),
H (125 mm)
Valveswithidentication“R”seechapter“6”,page15.
DANGER!
Danger – high pressure!
▶ Turnothepressureandventthelinesbeforelooseninglinesorvalves.
Risk of injury from improper maintenance!
▶ Maintenance may be performed by authorized technicians only!
▶ Toscrewonorunscrewvalvebodyoractuator,useanopen-endwrench,neverapipewrench.
▶ Observetighteningtorques.
Requiredparts:
Item Description Item Description
5 Graphiteseal(packed) 30 O-ring
7 Wiper 32 O-ring(lipsealactuatorsizeC
without transparent cap)
11 O-ring 36 O-ring(actuatorsizeC)
13 Chevron seal 37 Lip seal (actuator size C)
21 O-ring 53 Self-lockingring(actuatorsizeC,
without transparent cap)
23 Piston seal
NOTE!
The actuator must be completely removed to replace all the seals. A special Bürkert assembly sleeve
is required to mount the packing gland.
Do not use any pointed or sharp instruments!
5.5.1 Disassembly
→
Mount valve
1
on the body.
→ OnlyforcontrolfunctionAandI: Pressurize lower control air connection with compressed air (5 bar).
→ Screw actuator on the nipple
6
out of the valve body
1
.
→ Vent actuator.