28
12345678901234567890123456789012123456789012345678
1
234567890123456789012345678901212345678901234567
234567890123456789012345678901212345678901234567
234567890123456789012345678901212345678901234567
234567890123456789012345678901212345678901234567
234567890123456789012345678901212345678901234567
234567890123456789012345678901212345678901234567
8
12345678901234567890123456789012123456789012345678
12345678901234567890123456789012123456789012345678
1
234567890123456789012345678901212345678901234567
234567890123456789012345678901212345678901234567
234567890123456789012345678901212345678901234567
234567890123456789012345678901212345678901234567
234567890123456789012345678901212345678901234567
234567890123456789012345678901212345678901234567
8
12345678901234567890123456789012123456789012345678
PRO FARMER TRIPLEXPRO FARMER TRIPLEX
PRO FARMER TRIPLEXPRO FARMER TRIPLEX
PRO FARMER TRIPLEX
PRO FARMER / TS • GENIUSPRO FARMER / TS • GENIUS
PRO FARMER / TS • GENIUSPRO FARMER / TS • GENIUS
PRO FARMER / TS • GENIUS
STANDARD FOXSTANDARD FOX
STANDARD FOXSTANDARD FOX
STANDARD FOX
USO E MANUTENZIONE USO E MANUTENZIONE
USO E MANUTENZIONE USO E MANUTENZIONE
USO E MANUTENZIONE
OPERATING AND SERVICEOPERATING AND SERVICE
OPERATING AND SERVICEOPERATING AND SERVICE
OPERATING AND SERVICE
Rev. 02
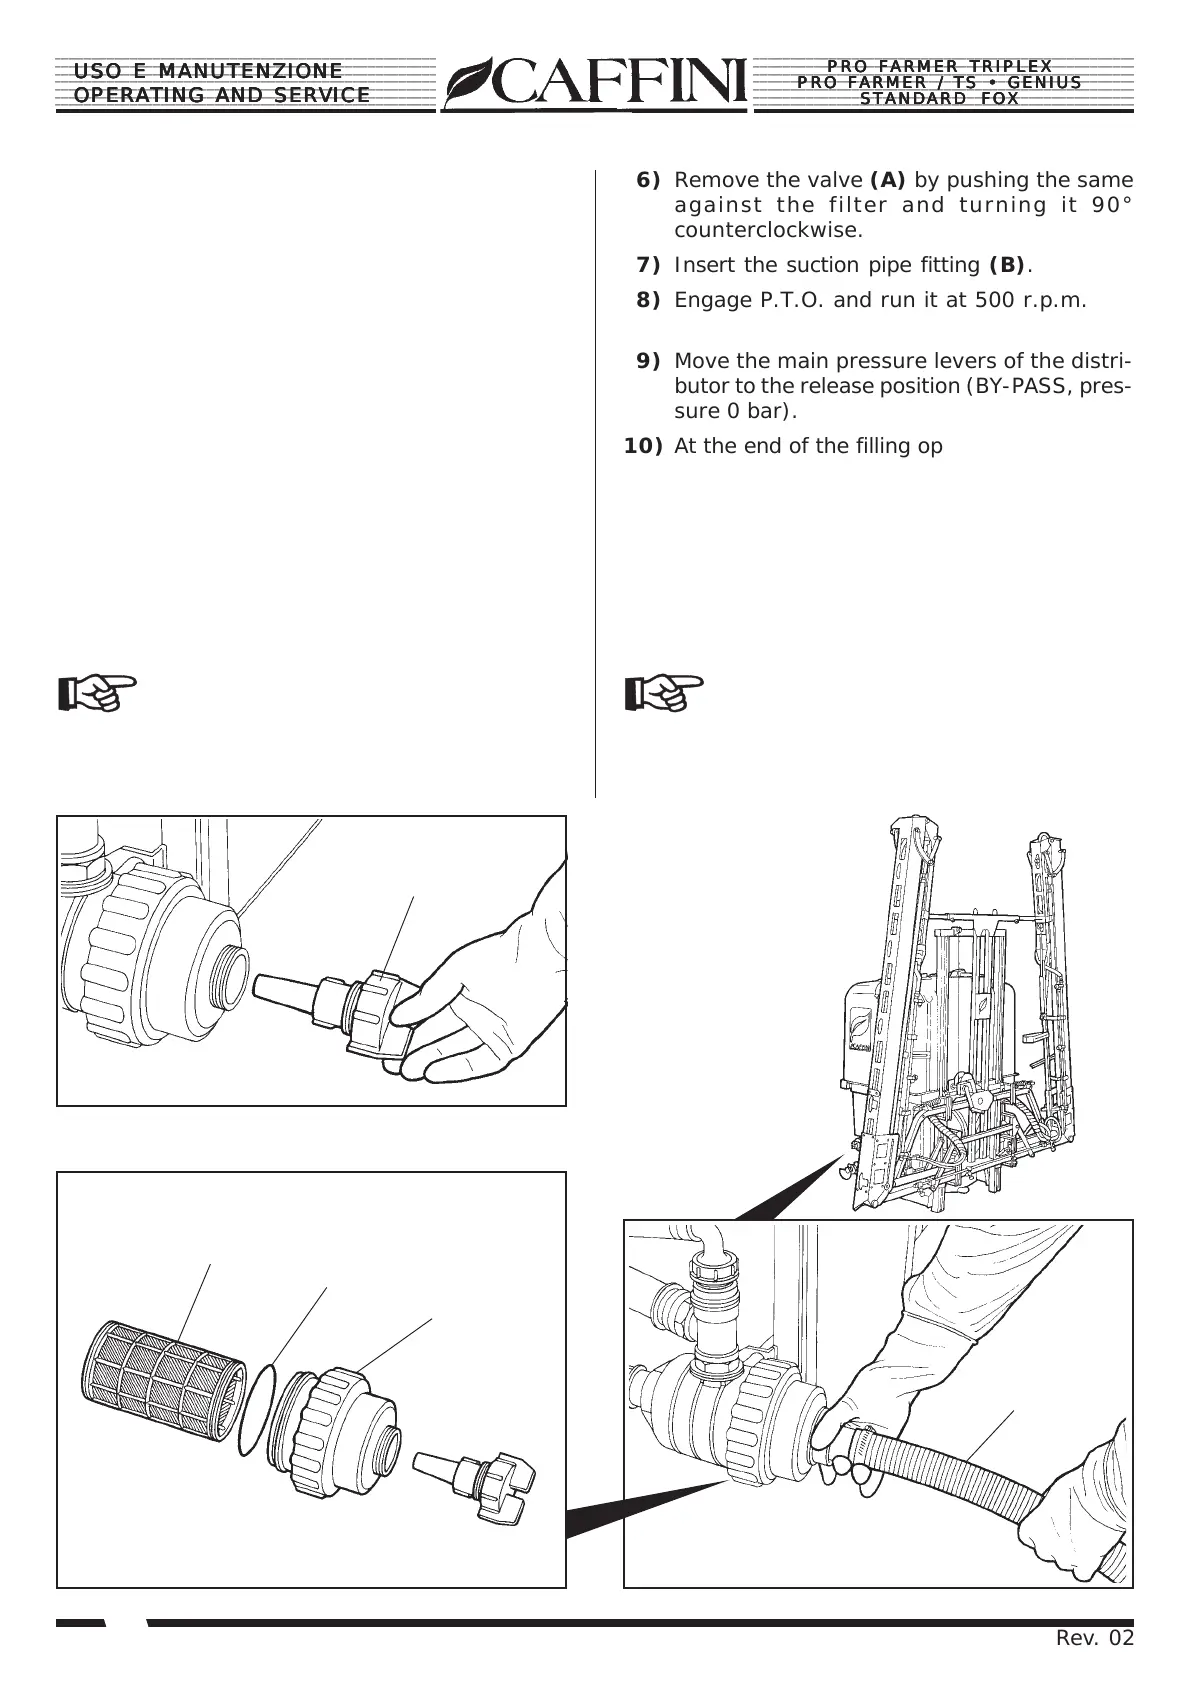
6) Remove the valve (A) by pushing the same
against the filter and turning it 90°
counterclockwise.
7) Insert the suction pipe fitting (B).
8) Engage P.T.O. and run it at 500 r.p.m.
9) Move the main pressure levers of the distri-
butor to the release position (BY-PASS, pres-
sure 0 bar).
10) At the end of the filling operation, disengage
P.T.O., disconnect the suction pipe (B), un-
screw the ring nut of the filter (C), remove
the filter cartridge (D) and clean it.
11) Reassemble everything by following the inver-
ted order, taking care that the O-ring (E) is
correctly positioned and not damaged.
12) Finally insert the cutoff valve (A).
It is important that the installation
of this valve is carried out as last
operation, in order to avoid damages of the
cutoff valve or suction problems.
6) Togliere la valvola (A) premendo la valvola
stessa verso il filtro e ruotando la stessa
di 90° in senso antiorario.
7) Innestare il raccordo del tubo di aspirazione (B).
8) Innestare la presa di forza e portarla ad un
regime di rotazione di 500 g/min.
9) Mettere le leve di pressione generale del di-
stributore in posizione di scarico (BY-PASS,
press. 0 bar).
10) A riempimento effettuato, scollegare il tubo
di aspirazione (B) arrestare la PdF, svitare
la ghiera (C), estrarre la cartuccia filtrante
(D) e pulirla.
11) Rimontare il tutto, seguendo l’ordine inverso,
facendo attenzione che l’anello OR (E) sia nella
posizione corretta e non sia deteriorato.
12) In fine rimontare la valvola (A).
E’ importante che il montaggio di
questa valvola avvenga come ultima
operazione per evitare danni alla valvola di
blocco o creare problemi di aspirazione.
B
A
D
E
C