66
12345678901234567890123456789012123456789012345678
1
234567890123456789012345678901212345678901234567
234567890123456789012345678901212345678901234567
234567890123456789012345678901212345678901234567
234567890123456789012345678901212345678901234567
234567890123456789012345678901212345678901234567
234567890123456789012345678901212345678901234567
8
12345678901234567890123456789012123456789012345678
12345678901234567890123456789012123456789012345678
1
234567890123456789012345678901212345678901234567
234567890123456789012345678901212345678901234567
234567890123456789012345678901212345678901234567
234567890123456789012345678901212345678901234567
234567890123456789012345678901212345678901234567
234567890123456789012345678901212345678901234567
8
12345678901234567890123456789012123456789012345678
PRO FARMER TRIPLEXPRO FARMER TRIPLEX
PRO FARMER TRIPLEXPRO FARMER TRIPLEX
PRO FARMER TRIPLEX
PRO FARMER / TS • GENIUSPRO FARMER / TS • GENIUS
PRO FARMER / TS • GENIUSPRO FARMER / TS • GENIUS
PRO FARMER / TS • GENIUS
STANDARD FOXSTANDARD FOX
STANDARD FOXSTANDARD FOX
STANDARD FOX
USO E MANUTENZIONE USO E MANUTENZIONE
USO E MANUTENZIONE USO E MANUTENZIONE
USO E MANUTENZIONE
OPERATING AND SERVICEOPERATING AND SERVICE
OPERATING AND SERVICEOPERATING AND SERVICE
OPERATING AND SERVICE
Rev. 02
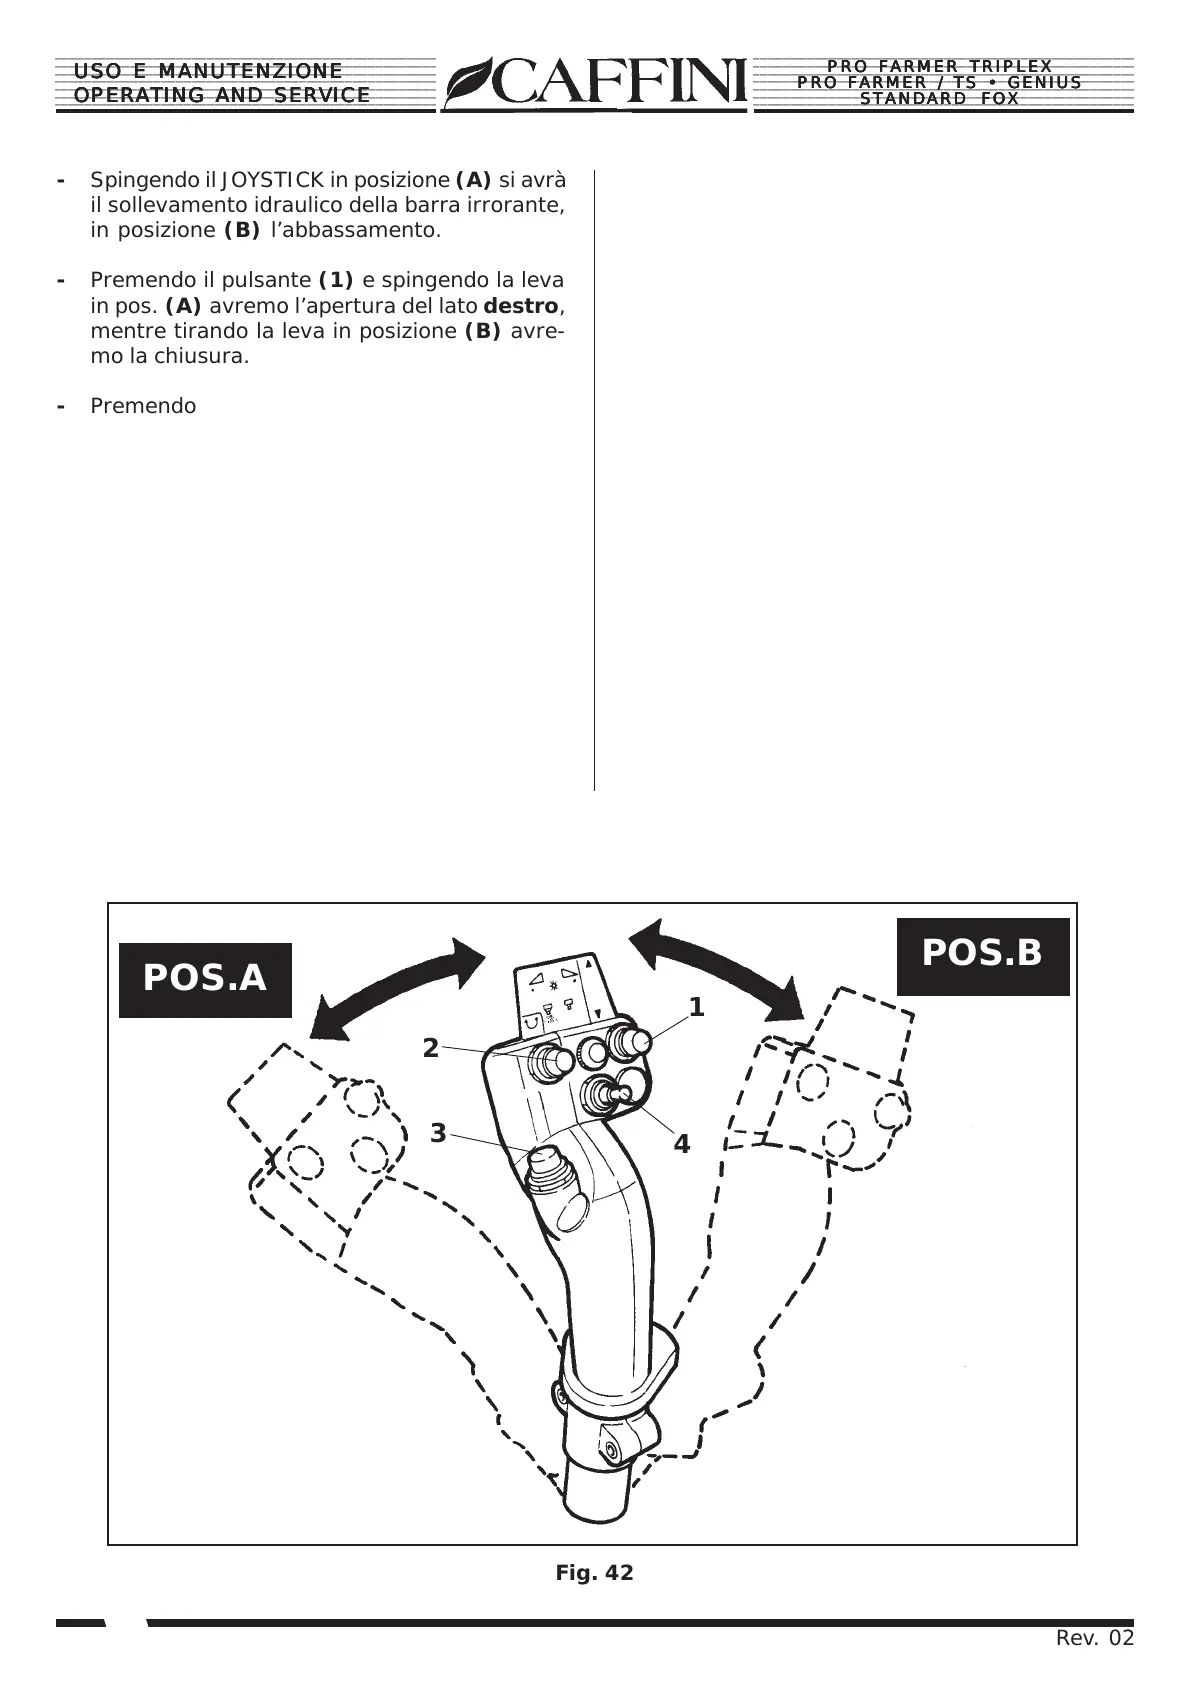
2
3
1
4
POS.A
POS.B
Fig. 42
- Spingendo il JOYSTICK in posizione (A) si avrà
il sollevamento idraulico della barra irrorante,
in posizione (B) l’abbassamento.
- Premendo il pulsante (1) e spingendo la leva
in pos. (A) avremo l’apertura del lato destro,
mentre tirando la leva in posizione (B) avre-
mo la chiusura.
- Premendo il pulsante (2) e spingendo la leva
in pos. (A) avremo l’apertura del lato sini-
stro, mentre tirando la leva in posizione (B)
avremo la chiusura.
- Premendo il pulsante (3) e spingendo la leva
in pos. (A) avremo il sollevamento del lato
destro della barra di distribuzione, mentre ti-
rando la leva in pos. (B) avremo l’abbassa-
mento.
- Spostando l’interruttore (4) a sinistra avre-
mo la valvola di apertura generale in posizone
(ON) mentre spostandola a destra sarà in
posizione OFF (BY - PASS).
- Push the JOYSTICK into position (A) to have
hydraulic lifting of the spraying bar, into
position (B) to have lowering of the bar.
- Press button (1) and push the lever into
position (A) to open the right side, pull the
lever to position (B) to close it.
- Press button (2) and push the lever into
position (A) to open the left side, pull the
lever to position (B) to close it.
- Press button (3) and push the lever into
position (A) to lift the right side of the
distribution bar, pull the lever to position (B)
to lower it.
- On bringing the switch (4) to the left, the
main opening valve will be in position (ON)
whereas on bringing it to the right, it will be
in the position OFF (BY - PASS).