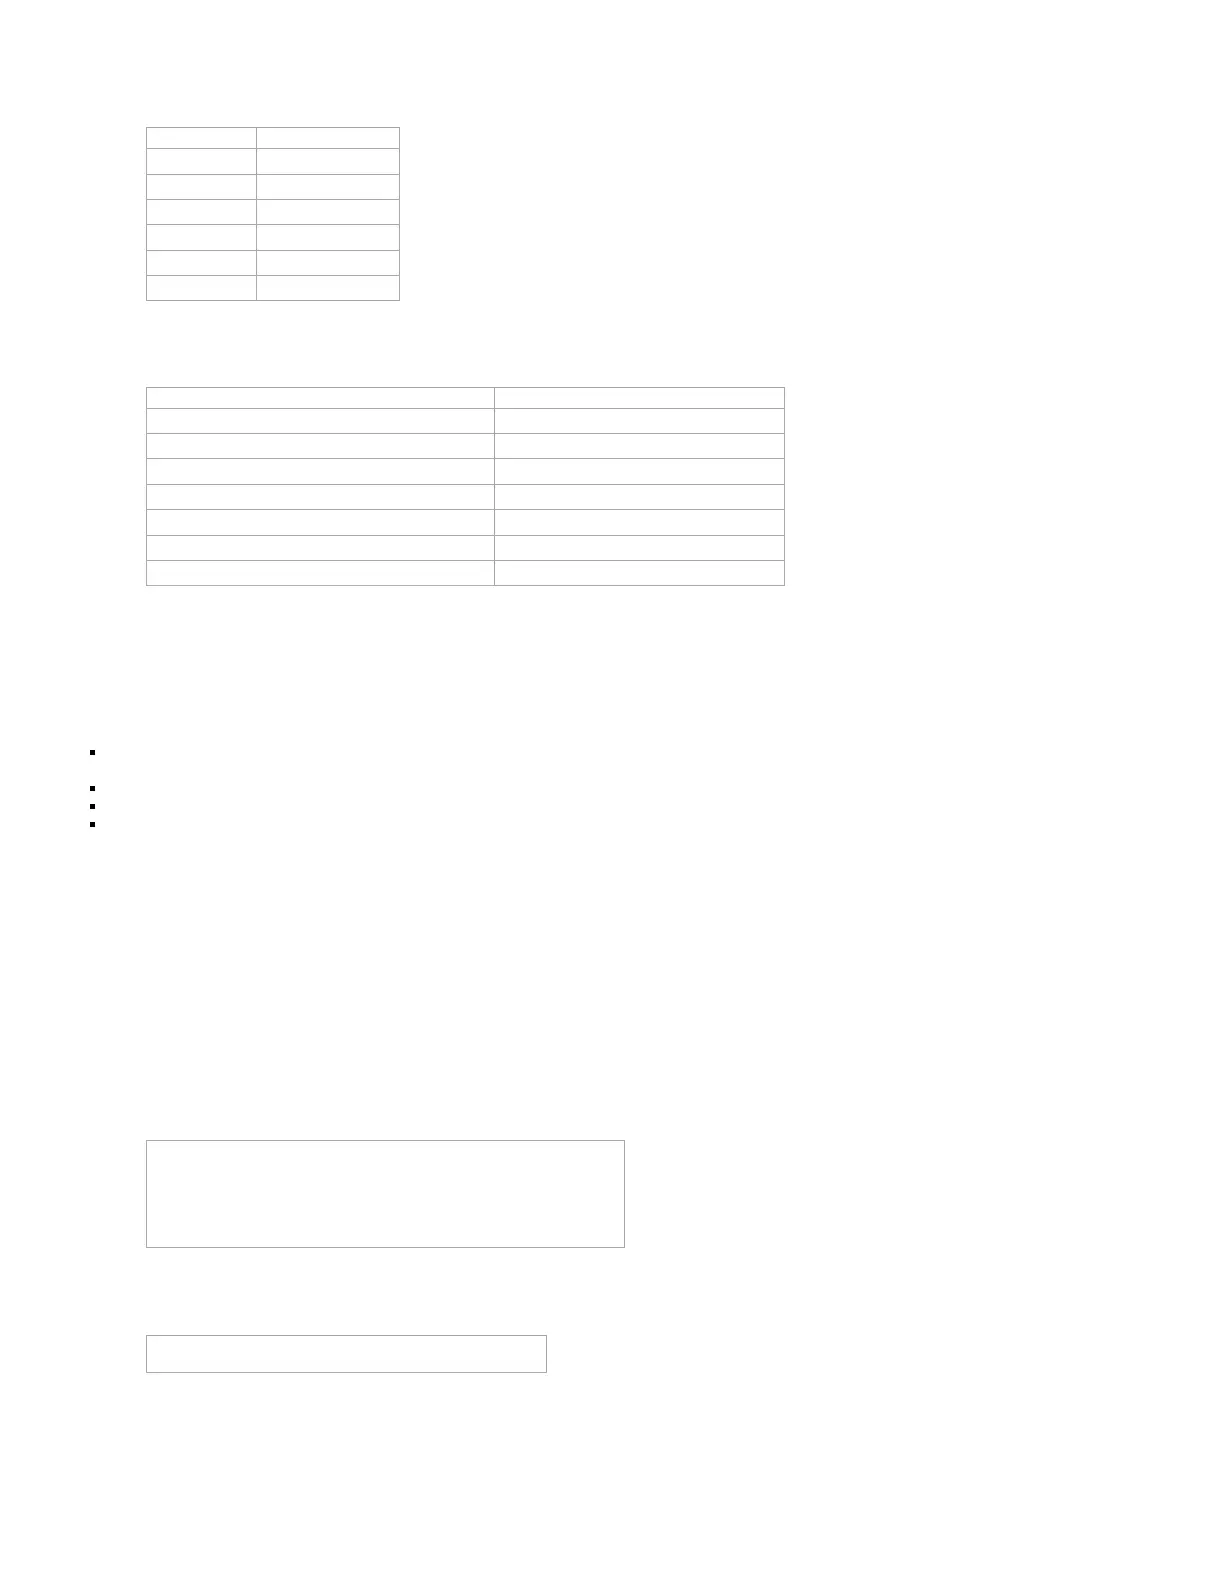
LED #4 (GPS LED - Red/Green) Definitions
Condition LED 4
U-Boot Red Solid
Kernel Start Green Solid
GPS Off Off
GPS On Green Slow Blinking
GPS Time Sync Green Fast Blinking
GPS Fix Green Solid
LED #5 (Comm LED - Red/Green) Definitions
Condition LED 5
U-Boot Red Solid
Kernel Start Green Solid
Modem Off Off
Comm On - Searching Slow Blinking
Network Available Fast Blinking
Registered but no Inbound Acknowledgement Alternates from Solid to Fast Blink every 1s
Registered and Received Inbound Acknowledgement Solid
5 Configuration and Activation
This section details how to quickly get an LMU-5541™ provisioned and configured to point at a specific server. It is assumed that a PEG script has already been created
and is being managed through LMU Manager or PULS™, the CalAmp Maintenance System.
We are making three assumptions to simplify the setup process:
You have created, installed and configured an LM Direct™ Server to receive messages from the LMU-5541™. (See <a
href="https://puls.calamp.com/wiki/LM_Direct_Reference_Guide">LM Direct™ Reference Guide</a> for details)
You are using the standard wiring harness from CalAmp and the serial port expansion harness.
You have created a HyperTerminal or Putty session.
You have contacted the CalAmp sales team regarding the network availability of the LMU-5541™. This device may not be supported for all the carriers or
networks listed in this section (Verizon-LTE, Sprint-LTE, HSPA, GSM), for product availability consult the CalAmp sales team.
5.1 Quick Start - General Config
All LMU-5541s™ must go through a common step during the configuration and provisioning process. Specifically, this is pointing the LMU to your LM Direct™ server,
either via IP or a URL.
This configuration process is accomplished via a series of AT Commands:
1. Power up the LMU-5541™ and connect a serial cable from the LMU to your laptop
2. Open a terminal session to the LMU-5541™
3. Enter the address of the LM Direct™ server:
AT$APP PARAM 2319,0,ddd.ddd.ddd.ddd
AT$APP PARAM 768,0,ddd.ddd.ddd.ddd (32-bit products only)
AT$APP PARAM 769,0,ppppp
Where ddd.ddd.ddd.ddd is the publicly addressable IPV4 address of your LM Direct™ server and ppppp is the UDP port number.
4. Alternatively, if a URL has been set up for your LM Direct™ server, the LMU may be programmed with:
AT$APP PARAM 2319,0,myURL.MyCompany.Com
Where myURL.MyCompany.com is the URL assigned to the server.
5. Enter ATIC to verify the correct settings are displayed for your Inbound Server.
This configuration process is accomplished via a series of SMS Commands:
1. Power up the LMU-5541™ and your handset
 Loading...